belbo
  • Overview
    • Getting to know Belbo
    • Location Settings
    • Switch to Belbo
    • Calendar View & Navigation
    • Recurring Appointments & Courses
    • Appointment Entry & Management
    • Logins & Permissions
    • Multiple Locations & Head Office
    • Manage Employees
    • Absences & Holidays
    • General
    • Working Hours
    • Time Tracking
    • Data Protection (GDPR)
    • Customer Communication (Email, SMS)
    • Customer Management & Records
    • Bonus & Loyalty Programs
    • Campaigns (Newsletter & SMS)
    • Marketing Consents (GDPR)
    • Tracking & Analytics
    • Overview
    • Services & Prices
    • Products
    • Service Packages & Subscriptions
    • Vouchers
    • Purchasing & Suppliers
    • Lagerbestand & Inventur
    • Scanning & Sales
    • Wareneinsatz & Kosten
    • Design & Texts
    • Setup & Settings
    • Integration (Website, Google, Instagram, Facebook)
    • Online payment
    • Accounting & Exports
    • Cash Register Settings & Hardware
    • Checkout process
    • Daily Closing & Reports
    • TSE & Cash Register Anti-Tampering Ordinance
    • Export Overview
    • Employee Utilization
    • Revenue & Reports
    • Belbo Satellite
    • Printer
    • EC Terminal & Card Payment
    • Troubleshooting Hardware
    • Scanner & POS Devices
    • General Settings
    • API & Integrations
    • Notifications & Emails
    • Contracts & Legal
Skip to content

Everything about: Logins & Permissions

Create login for a team member

You can create a separate login for each team member so they can log in to the calendar from home or their mobile device, for example.


You can access this area via Settings > Staff > Click on desired staff member > Create login


Create a login for an existing team member

Click on Options » Create login in the file of the desired team member. If this team member does not yet exist, please add them first. How to create a login for a team member who should not appear in the calendar is explained further down on this page.
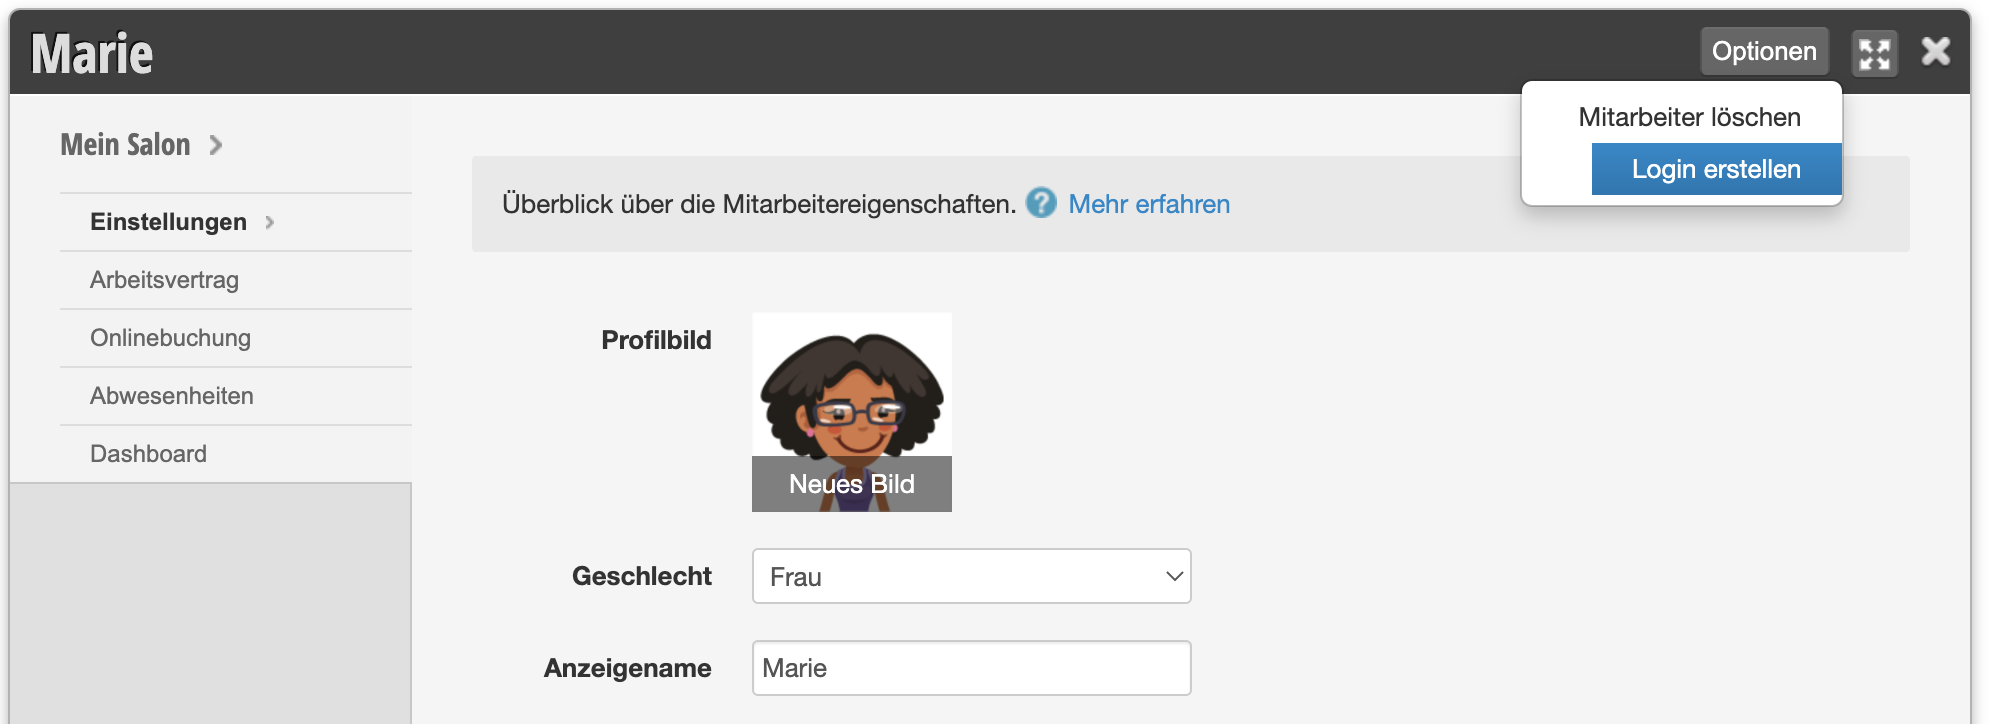
Follow the dialog that opens and enter the email address of the team member. This must not already exist as a login. How to link an existing login with a team member is explained further down on this page.

Set password
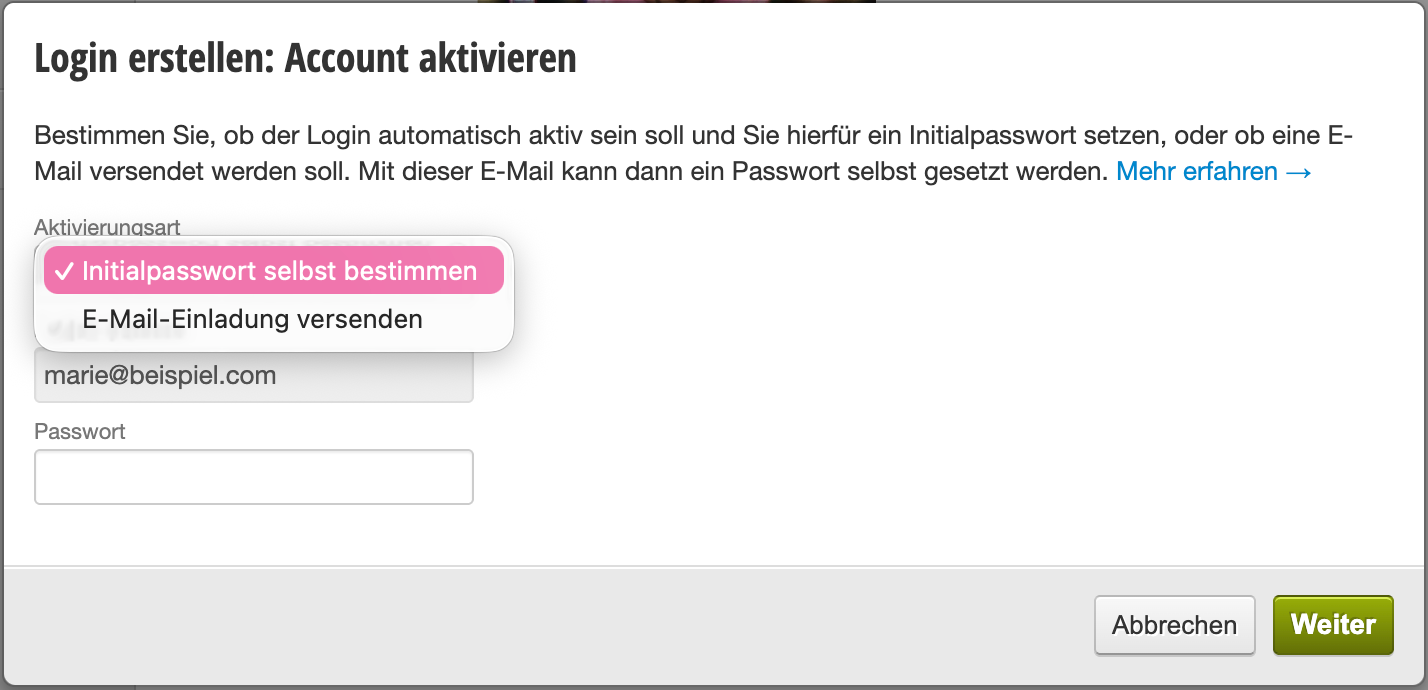
You have the following options to set a password for the team member:

  • Determine initial password yourself: You have the option to set the password yourself immediately. Then share this with the person who should have access to the login.
  • Send email invitation: The team member receives an email with a link and can choose a secure password of their choice.

How to change the employee password at any time you can find here.

Assign permissions

For each login, you can assign individual access rights. This ensures that the person who has access to the login can only view or change data they are authorized to access. While creating a login, you can choose from various options to make setup easier. After you have finished creating the login, you can view and edit the permissions for this login at any time under Settings > Staff > Permissions.
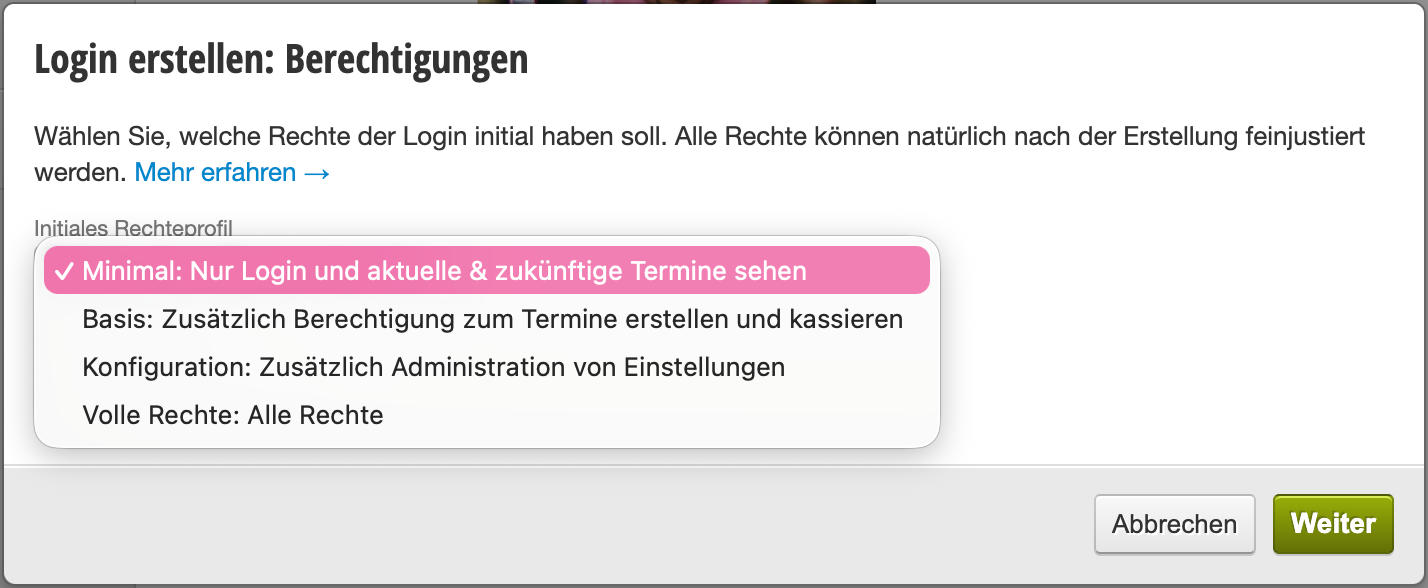
If you want to limit your employees' login to what is necessary, you can proceed as described here.

Enable two-factor authentication

In addition to the password, you can secure individual logins with a two-factor authentication (2FA). This protects particularly sensitive logins from unauthorized access.

Create a login for a team member who should not appear in the calendar

We explicitly recommend this type of login, which is not directly linked to a team member in the calendar, for your team login. This can be used by the entire team and is well suited if all your team members use the same computer or tablet in their daily work.

You can also create logins for a person who should not be available for booking in the calendar itself for appointment entry. This makes sense, for example, for:

  • Management who do not serve customers themselves
  • Marketing and sales personnel who enter appointments for your business
  • Administrative team members such as reception, webmaster or office staff

Learn more about adding such logins here.

Already registered email address

In your Belbo calendar, each email address can only be registered once. If the team member for whom you are creating a login is already registered, a corresponding message will appear. You can view all already registered team members under Settings > Staff > Permissions.

If you still want to link the already registered email address with the team member, you can link it.
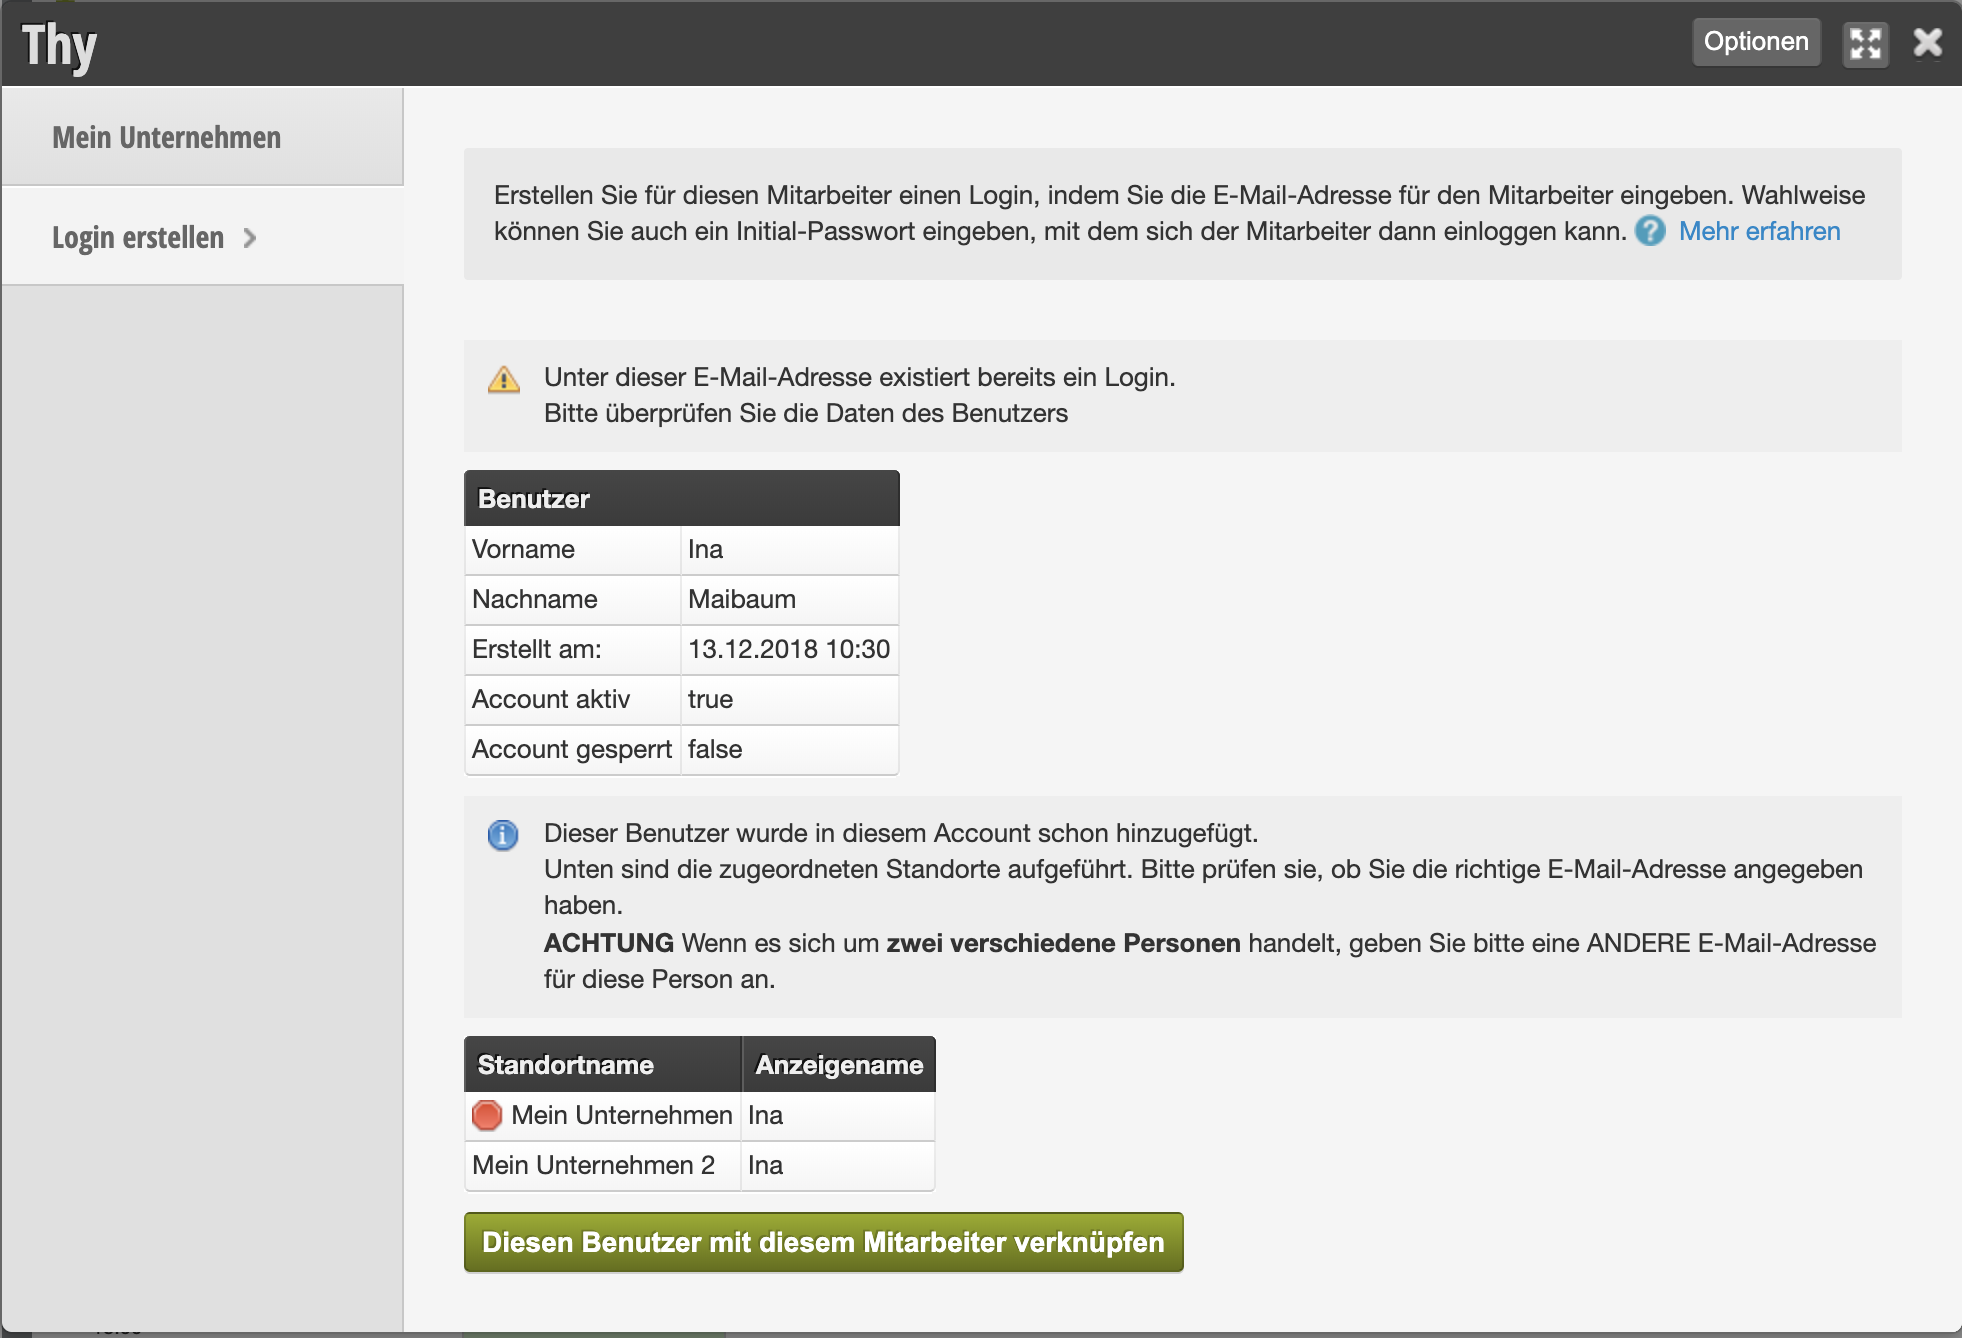

Attention: This can cause problems if the already used email address is already linked to another team member. If you are unsure, please contact us via the help chat, which you can find in your calendar.

Unlink login from a team member

The login and team member are unlinked after confirmation. The login remains usable afterward. If the login is linked to a profile at multiple locations, the other logins remain.
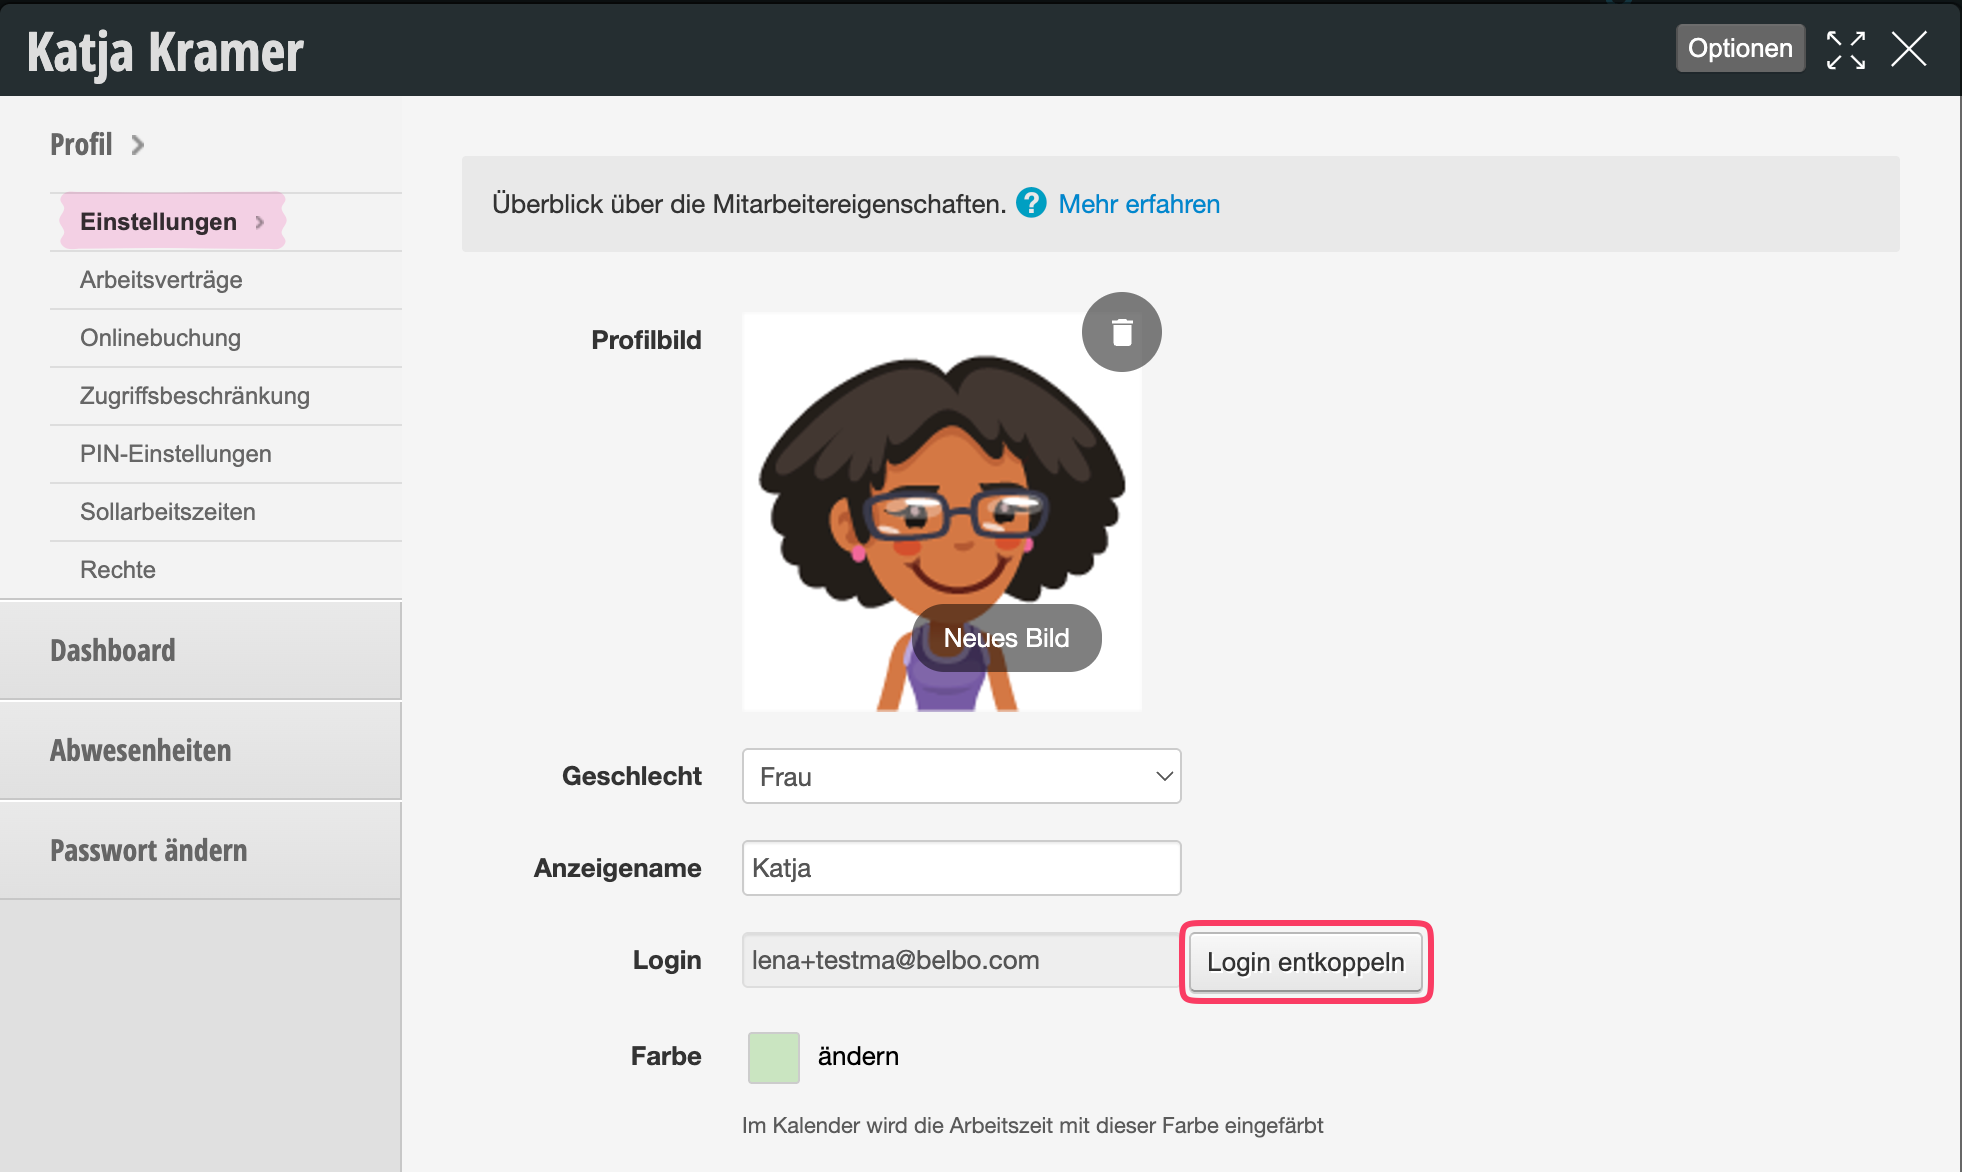
After unlinking, the login can be edited or deleted under Settings > Staff > Permissions.
An overview of all important settings for your team members can be found here.


An overview of all options for restricting access can be found here.

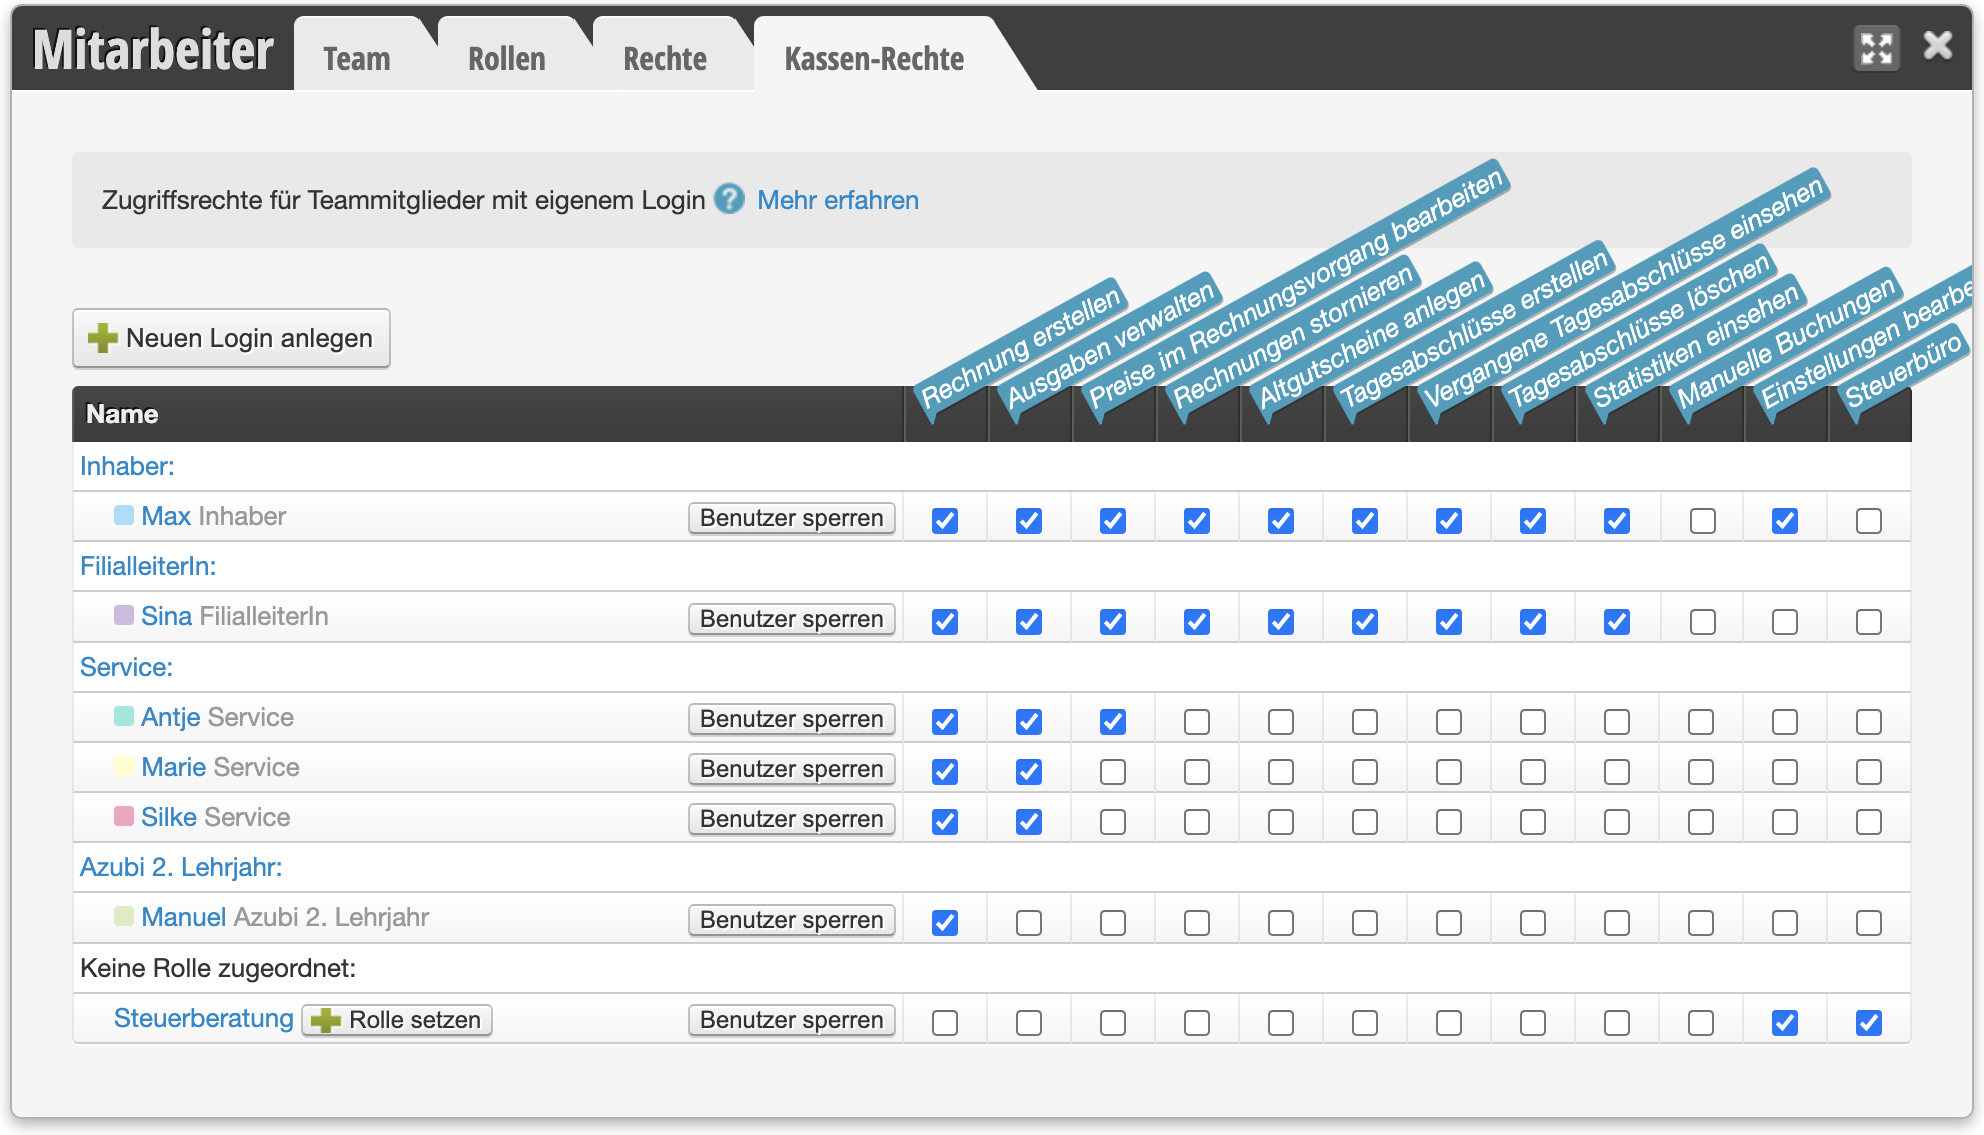
Cash register rights

You can determine which of your employees can access the cash register with their login and which functions should be blocked.

You can access this area via Settings > Employees > Cash Register Rights


Create Invoice
Team member can process appointments and regular customers at the cash register.

Manage Expenses
Team members with this right can enter expenses in the cash register, which are taken into account in the daily closing.

Edit Prices During Checkout
Team members with this right can change prices during the checkout process. If a person does not have this right, for example in case of a surcharge, a corresponding service must be added or the "Cash Register Services" function must be used.

Cancel Invoices
Team members with this right can cancel existing invoices.

Create Old Vouchers
Only if this right is assigned can the person create old vouchers.

Create Daily Closings
Team members with this right can create daily closings.

View Past Daily Closings
Team members with this right can view past closings. If this right is not assigned, the person can only view the current closing, provided they have the "Create Daily Closings" right.

Delete Daily Closings
With this right, existing daily closings can be deleted. A deletion always results in a correction of the closing when it is created again afterwards.

View Statistics
Only with this right can financial statistics be viewed.

Manual Entries
This right should generally not be assigned. It is needed once at the start with Belbo to enter the initial cash register balance. Please discuss with the Belbo team if and for what purposes this right could be needed in exceptional cases.

Edit Settings
Editing cash register settings should only be granted to owners or senior employees.

Tax Office
This right is automatically assigned when you grant your tax office access to your closings via the Tax Office Module. Please do not assign it to any employee who works in daily operations.

Only employees who have the "View Prices" right in the general rights settings can see and use the cash register!
An overview of all options for restricting access can be found here.

Employee PIN

With individual employee PINs, you can track which employee made changes in the system. If several colleagues share a computer and use a Team Login, the employee PIN can be used to track which employee made changes, even if everyone uses the same login.

You can access this area via Settings > Employee PIN
If this function is not activated, it can be activated via "Settings > Add Function".

Each employee enters a short PIN when making changes in the system and can thereby identify themselves. This ensures transparency in the team.
When assigning the PIN, access to certain functions can be restricted. Additionally, this function provides protection against unauthorized access.

Activate Employee PIN

  1. Click on "Settings" in the main navigation.
  2. Go to "Add Function" or enter the term "Employee PIN" in the search field.
  3. Click on the "Employee PIN" function and activate it.

Attention: If you activate the Employee PIN but do not assign PINs to your employees, they will no longer be able to save appointments or make other changes in the calendar.

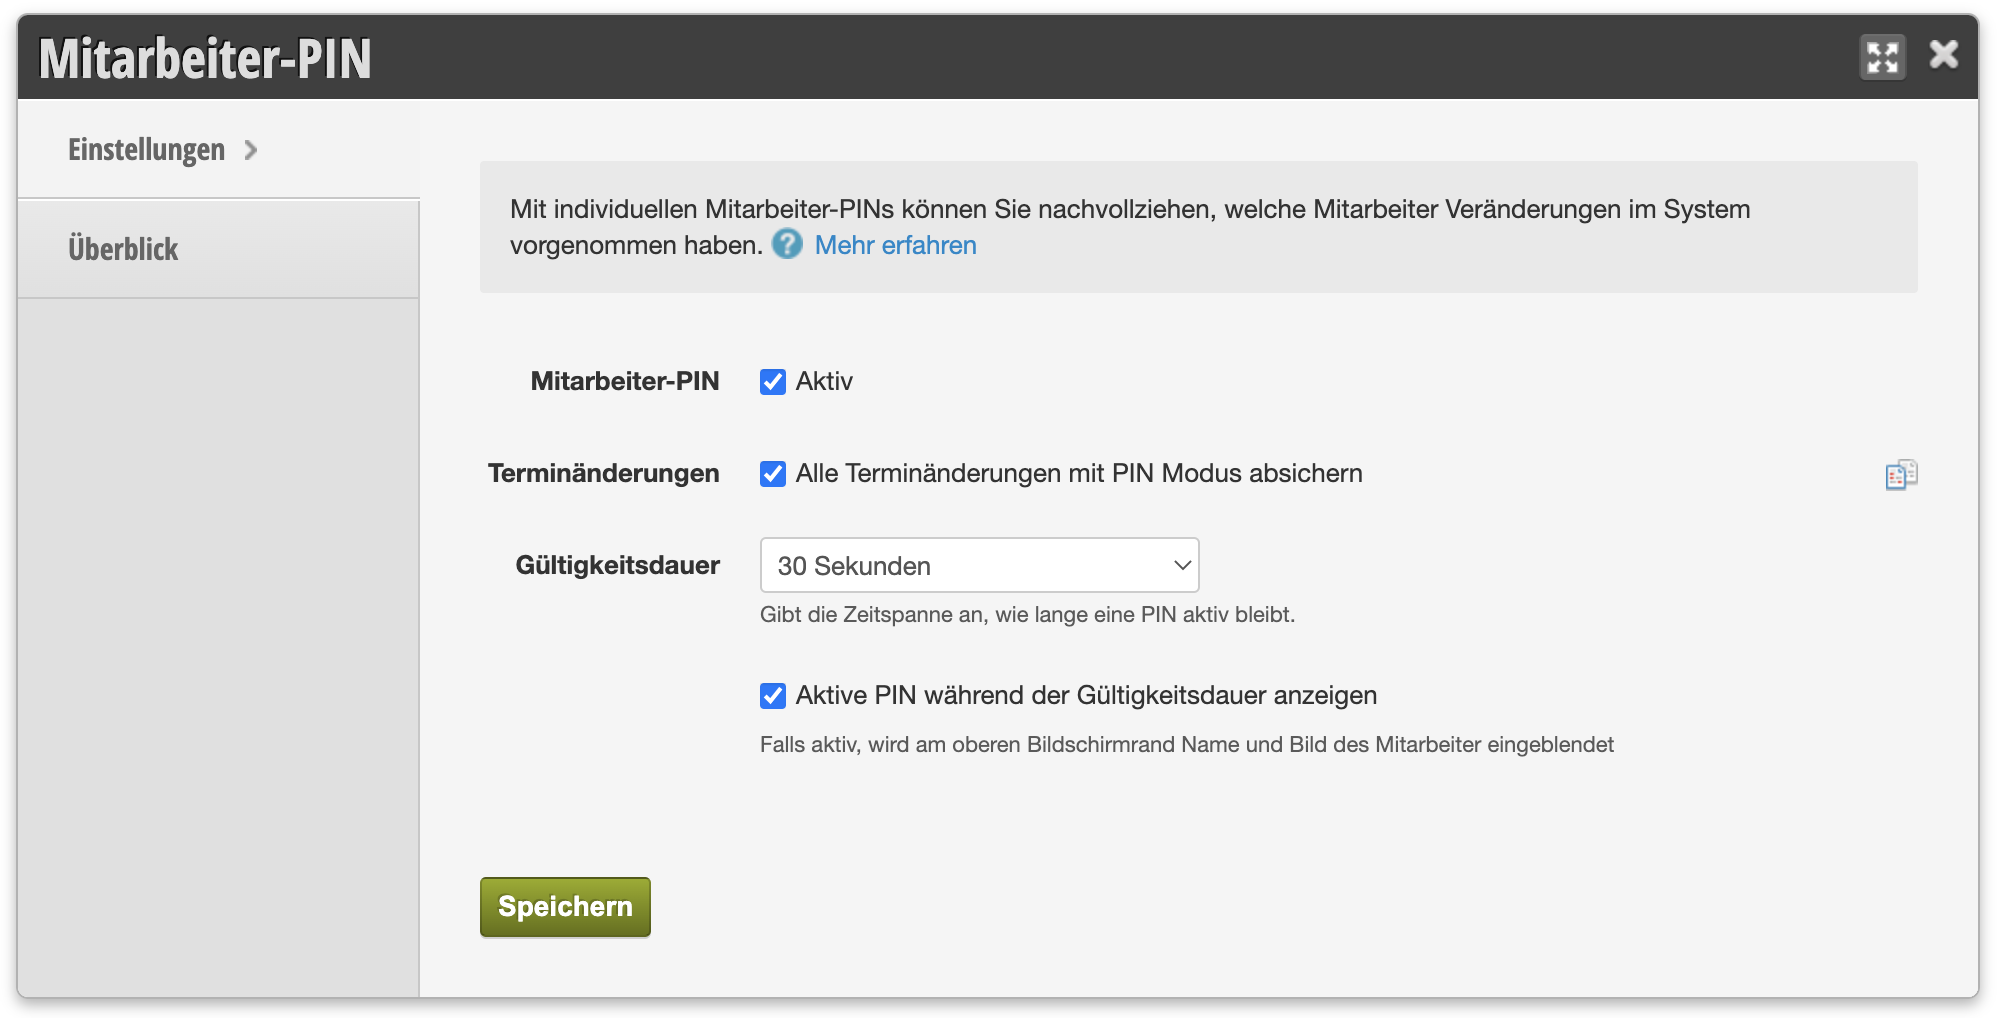
PIN Settings


Appointment Changes
Only if this option is active, the PIN will be requested when an appointment is changed in the calendar.

Validity Period
Determine how long a PIN remains valid before a PIN is requested again. This time period should be kept short if many team members share a computer.

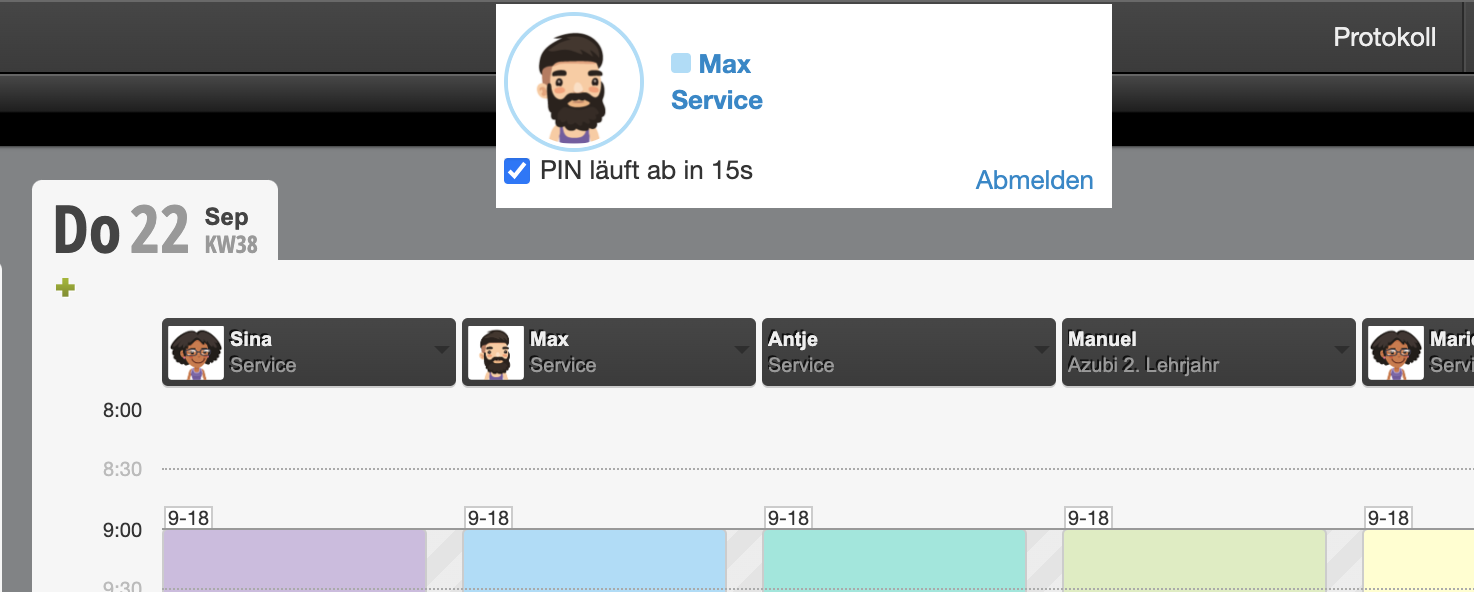
Show Active PIN During Validity Period
The currently valid PIN is displayed in the calendar. This way, with a longer validity period, each team member can see under which name the current changes are being logged.


How to Assign Each Employee Their Own PIN

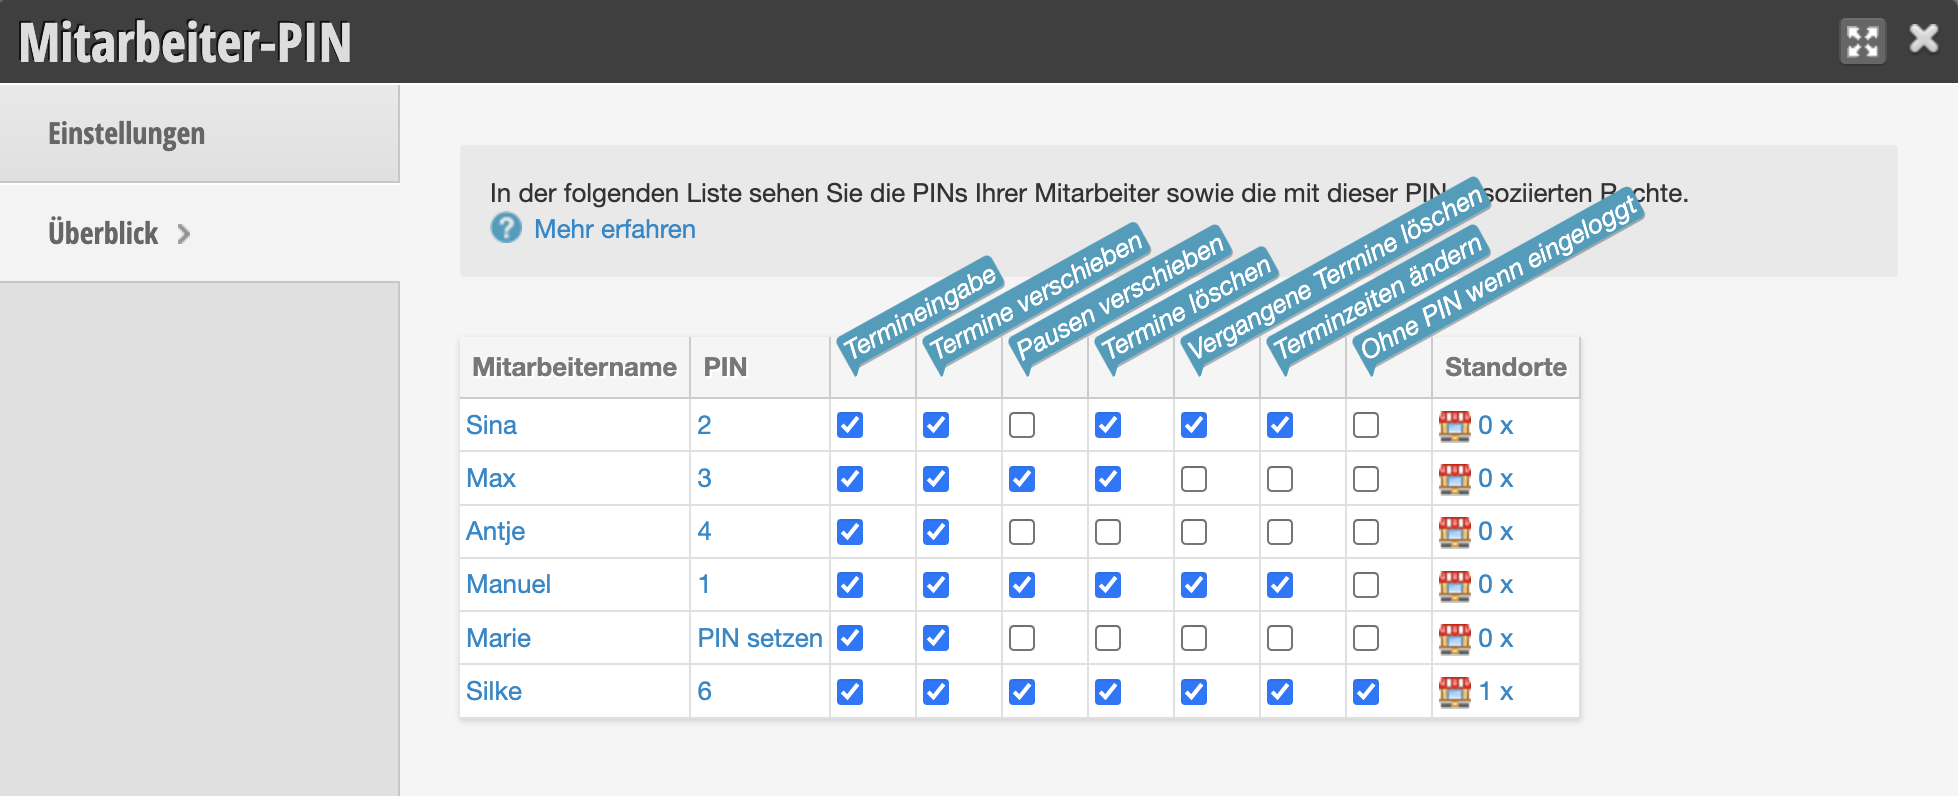
  1. Under Settings » Employee PIN switch to the "Overview" tab
  2. If you have the permission "Manage Employee PIN", you can see here the employees entered in the calendar and their existing PINs.
  3. If an employee has not yet been assigned a PIN, click "Set PIN" in their row.
  4. Assign the PIN and save your entry.
  5. Tell the team member the PIN.
Tips for PIN Assignment: The PIN identifies your employees at many different locations. It should be quick and easy to use in everyday work. PINs with many permissions should not be easily guessable. The PIN can be single or multi-digit, you can use numbers, letters and special characters or combine them. Short letter-number combinations (e.g. "ab45") have proven to be effective.

Assign Permissions for Each PIN

You can determine which actions an employee is allowed to perform with their PIN. For example, you can prevent a specific employee from deleting or moving appointments, while granting these rights to other employees.


Appointment Entry
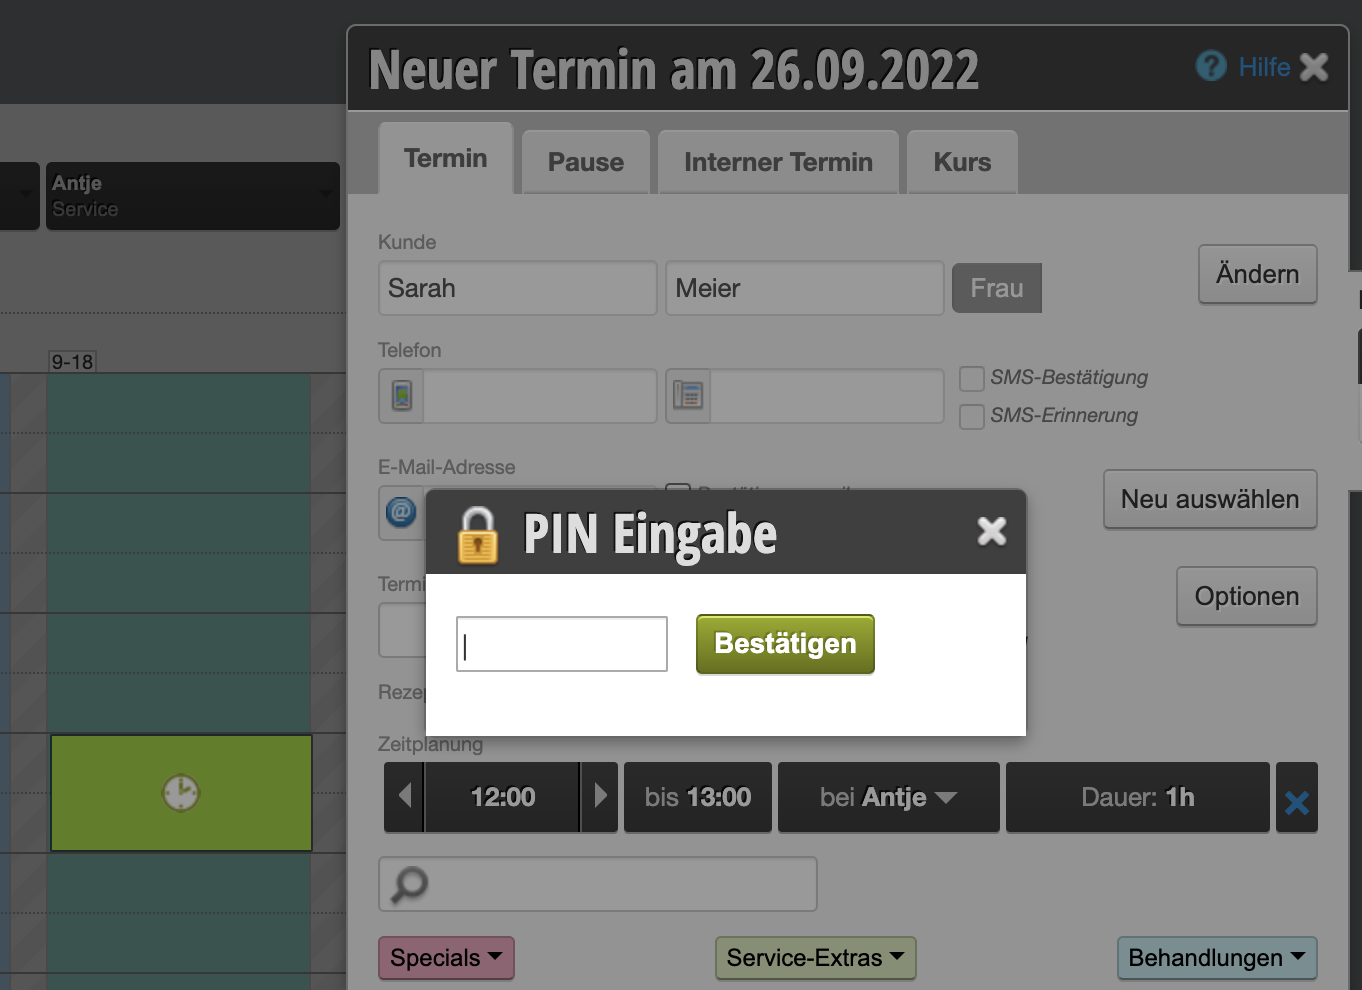
Only if this permission is set can the team member create an appointment by clicking in the calendar. If the permission is not set, only the Appointment Assistant can be used. As soon as a team member no longer has this permission, the PIN entry dialog opens directly when clicking in the calendar and the PIN must be entered before any appointment can be created. This ensures that only employees with appointment scheduling rights can create appointments directly in the calendar.

Shorten and Extend Appointment Times
This employee is allowed to extend or shorten appointment times.

Move Appointments / Breaks
Employees are allowed to move breaks independently.

Delete Appointments
May delete appointments

Delete Past Appointments
May delete appointments in the past

Move Breaks
May move breaks in the calendar.

If Logged In, Do Not Ask for PIN
PIN is only requested during the checkout process and for waitlist entries. Suitable for administrators with their own logins, which are not used in day-to-day business.

Viewing PINs

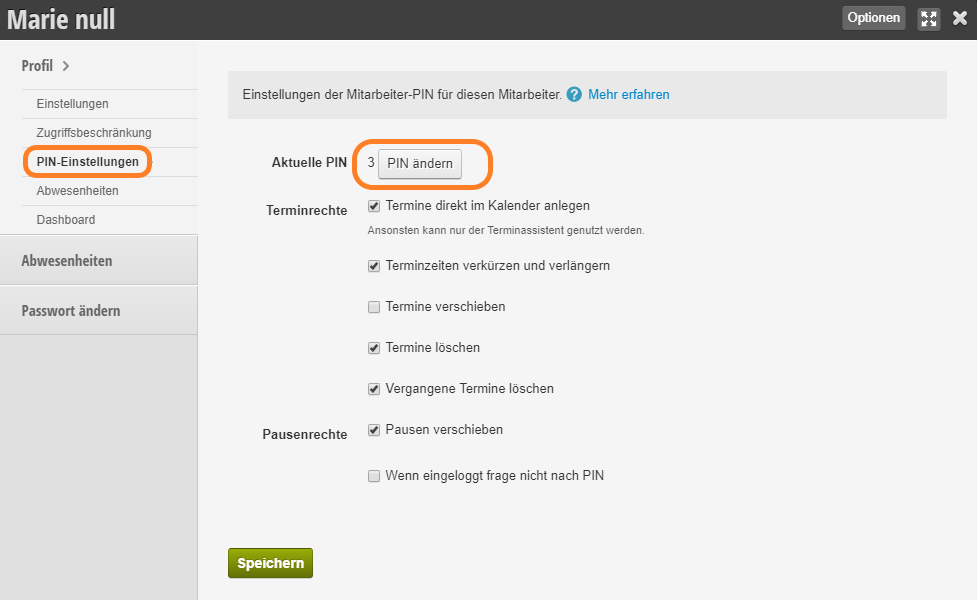
The PIN is displayed in every employee file. You can view the PIN of the respective employee under Employee Profile > PIN Settings.


Traceability of Changes

At various places in the system, you can see which of your employees made certain changes.


Appointments
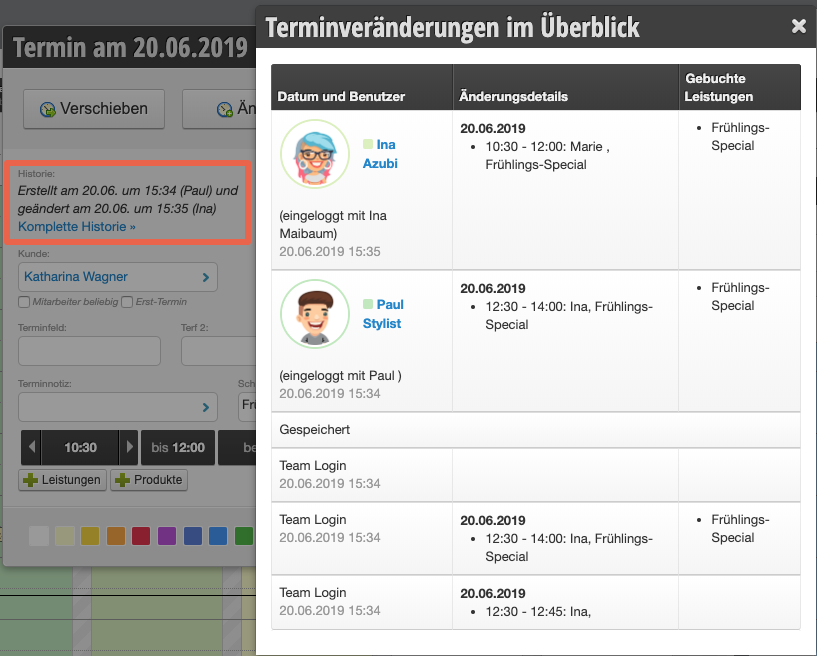
The PIN is requested as soon as an employee saves, moves, deletes or changes an appointment.
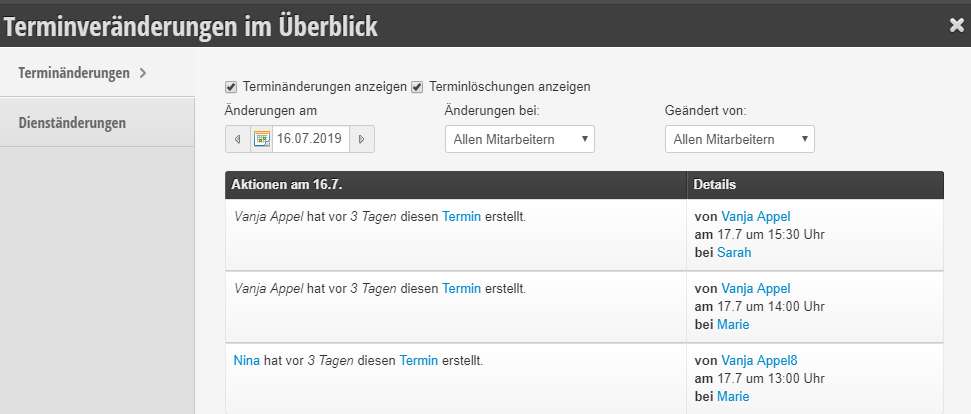
All changes can subsequently be viewed in the history of each appointment:


Cash Register and Daily Reconciliations
Employees who create the daily reconciliation identify themselves with their PIN and can thus be viewed in the daily reconciliation overview.
Protocol
When you open the Protocol, you can check which employee made which change:

Time Recording
If you have activated Time Recording, employees can log in and out using their PIN.

Options for Rights Distribution

To explain the distribution of rights, we show you with the following examples what options are available.


Simple Rights Distribution
It is possible to work with just a single user login, which means that all employees can only log in via this single account.
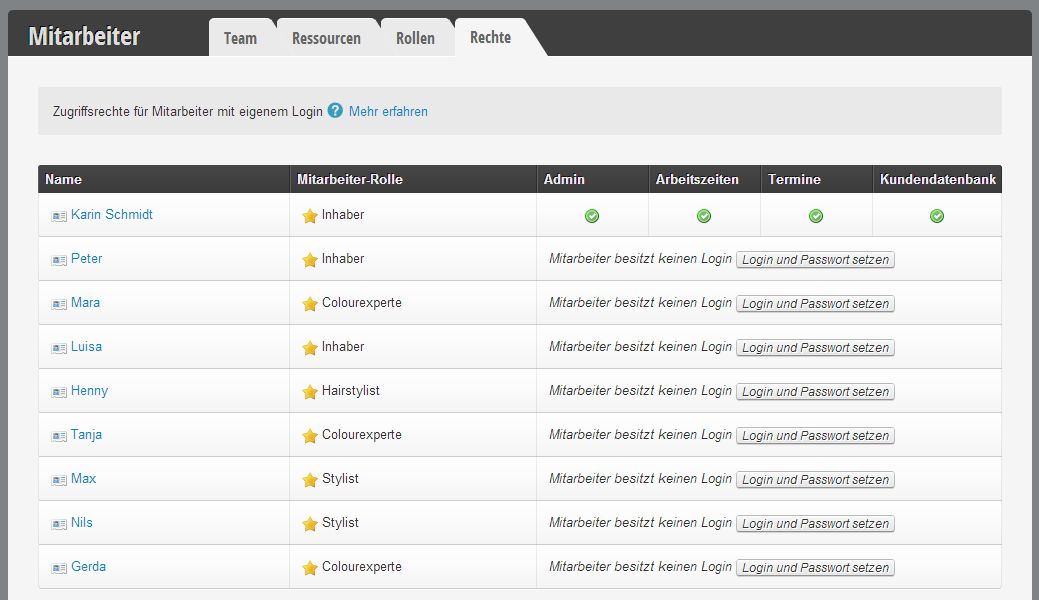
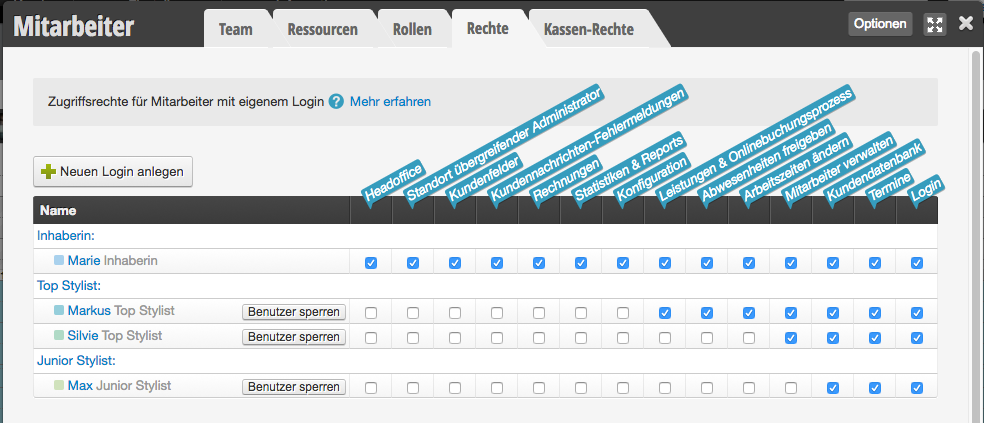
The image shows that only the owner has a login. Consequently, employees can only log in via this account and at the same time have the same rights:Rights Distribution Example 1 [table] [tr][th]Pros[/th] [th]Cons[/th][/tr] [tr][td][custom_list icon="plus-circle"]

  • with the single user login, the overview is optimal and management is very easy.

[/custom_list]

[/td][td] [custom_list icon="minus-circle"]

  • Settings can be accidentally changed by employees.
  • Once an employee leaves, the password must be changed so they no longer have access.
  • When the password is changed, it must first be communicated to each employee again.[/custom_list]

[/td][/tr]
[/table]

If the password for the Team Login is saved in the browser by the administrator, it is kept secret and employees cannot log in from outside, so it does not need to be changed when an employee leaves.


Complex Rights Distribution
It is possible to create an account for the owner only with administrator rights (of course, this person can also have additional rights). All other employees would receive a so-called "team login" that contains all the rights important to them. You can learn more about Team Login here.

[table] [tr][th]Pros[/th] [th]Cons[/th][/tr] [tr][td] [custom_list icon="plus-circle"]

  • Employees cannot change global settings.

[/custom_list]

[/td][td] [custom_list icon="minus-circle"]

  • Once an employee leaves, the password must be changed so they no longer have access.
  • When the password is changed, it must first be communicated to each employee again.[/custom_list]

[/td][/tr] [/table]

If the password for the Team Login is saved in the browser by the administrator, it is kept secret and employees cannot log in from outside, so it does not need to be changed when an employee leaves.

Individual Rights Distribution
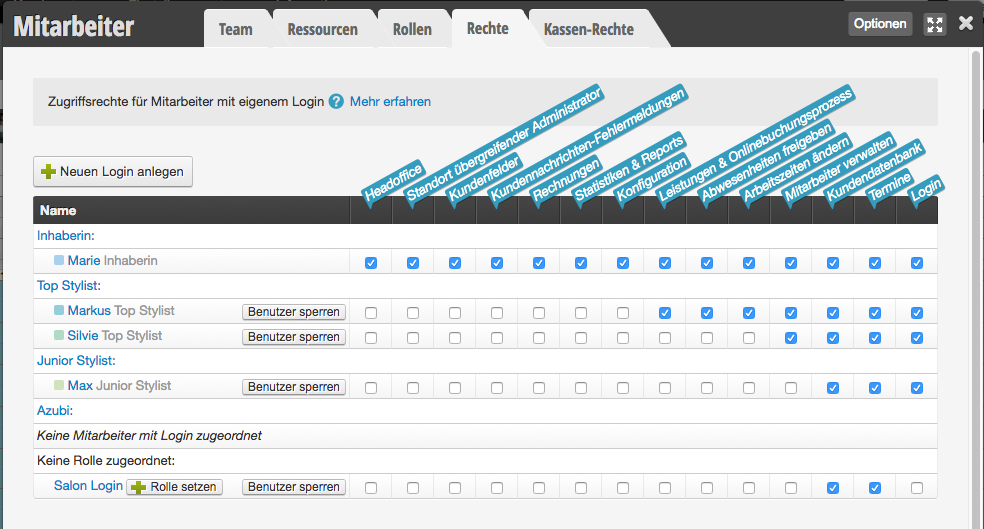
It is possible to give each employee their own user login, which allows rights to be configured individually. In this example, the intern does not have a personal user login:[table] [tr][th]Pros[/th] [th]Cons[/th][/tr] [tr][td][custom_list icon="plus-circle"]

  • Employees can only make changes in their personal user login to the extent that their rights allow.
  • Traceability of changes made.
  • Targeted blocking of individual employees is possible.[/custom_list]

[/td][td] [custom_list icon="minus-circle"]

  • Without Employee PIN, constant logging in/out is required if there is only one computer available.[/custom_list]

[/td][/tr] [/table]

Our Recommendation
We recommend:

  • Only one or two employees (e.g. the owner and the salon manager) have administrator rights. This ensures that not all employees can make global changes.
  • All employees use the Team Login in everyday work.
  • Employees who use the Belbo Calendar App on their private phone or wish to access the calendar from home receive their own login with the desired rights.

The employee who has admin rights and access to working hours can therefore also have control over appointments and the customer database. The first two rights essentially override the other two.

An overview of all access restriction options can be found here.

View Permission

The view permission can only be set by the administrator and determines which employees are displayed to employee xy in the calendar.

To set the view permission:

  1. Click on "Settings" in the navigation bar.
  2. Under the heading "Personnel", select the function: "add, remove or modify desired employees".
  3. Select the desired employee.
  4. An input mask will open where you select "View Permission" on the left.
  5. To edit, check the box "Restrict employee's view to the following employees".
  6. Select which employees should be displayed to the desired employee in their view.
  7. Close the input mask by clicking the X.

When restricting the view permission of an employee, they can only select between employees in their personal calendar view that you allow for their view.


The importance of the role

Each employee as well as rooms and equipment is assigned a role. This makes it easier for you to determine which employee is responsible for which service and when rooms and equipment are available.

For the role of employees, this means:

In the schedule, employees with the same role are displayed grouped together
Gruppierung der Rollen im Dienstplan

Hairdressers are responsible for cuts and beauticians for facial treatments
Friseure für Schneide Kostmetiker für Gesichtsbehandlung

Same time scheduling for the same roles
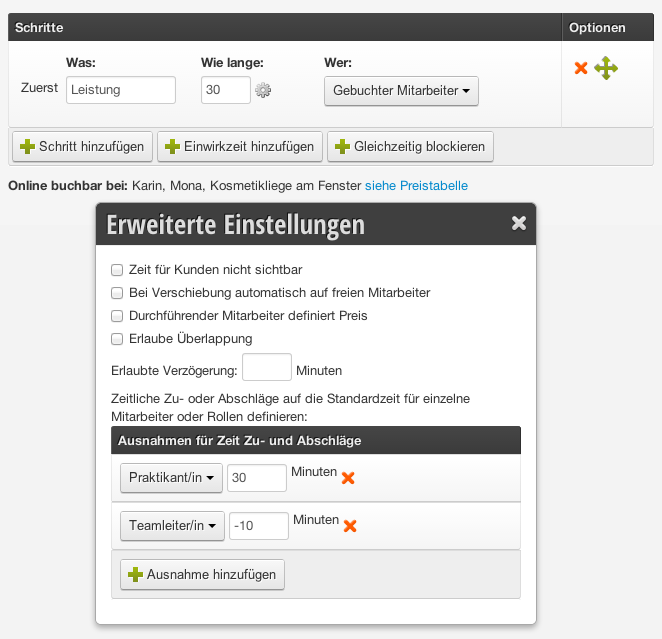
For example, the employee with the role "intern" needs more time for a cut than the employee with the role "team leader". This helps the role assignment when booking in the calendar:
Zeitplanung_PraktikantIn:TeamleiterIn

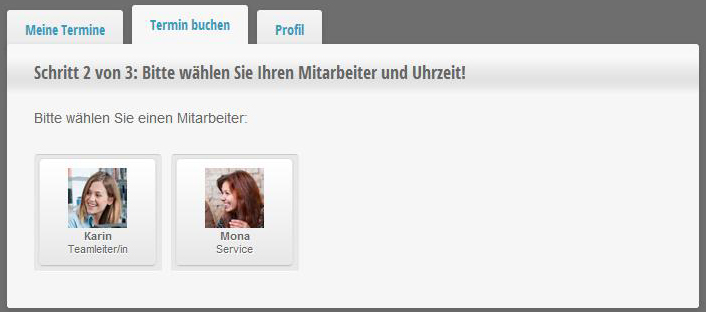
These roles also appear in online booking
Below the employee's name is their respective role. This allows the customer to choose whether they want to book their appointment with the team leader or service:
Rolle in der Buchungsmaske

For the role of the resource, this means:

no double-booking
If you work with rooms and equipment that should be blocked during an appointment, you can specify this in your services here. This prevents double-bookings.


Create roles

Each employee is assigned a role. This simplifies the configuration of employees and rooms and equipment (learn more about the importance of roles).

To create a new role for an employee:

  1. Click on "Settings" in the navigation bar.
  2. Under the "Staff" heading, select the function: "add, remove or modify desired employees".
  3. You will now see an overview of your employees. Next to "Overview", select the "Roles" tab.
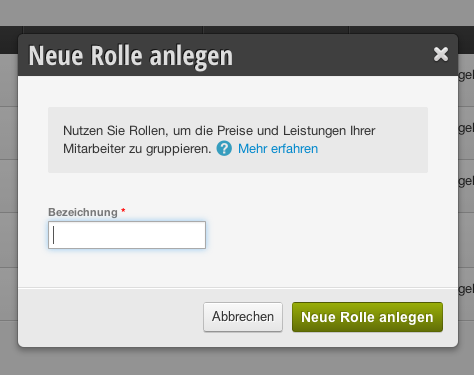
  4. Click on the "Create new role" button to add a new role for an employee:
    Create role
  5. Confirm your entry by clicking the green "Create new role" button (see image)

You can change the role for employees at any time by switching to the "Overview" tab and selecting the employee by clicking on them. Under "Settings" you can then select the appropriate role.

You can also create categories for your rooms and equipment.

Assign Permissions

Employees can only receive different rights if they have a user login.

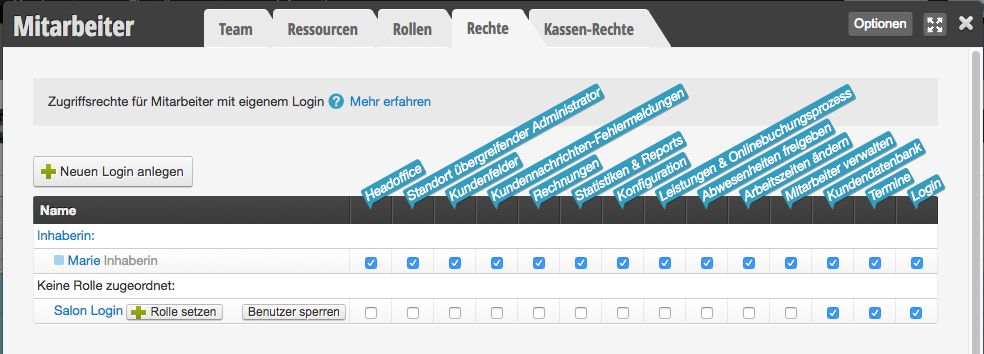
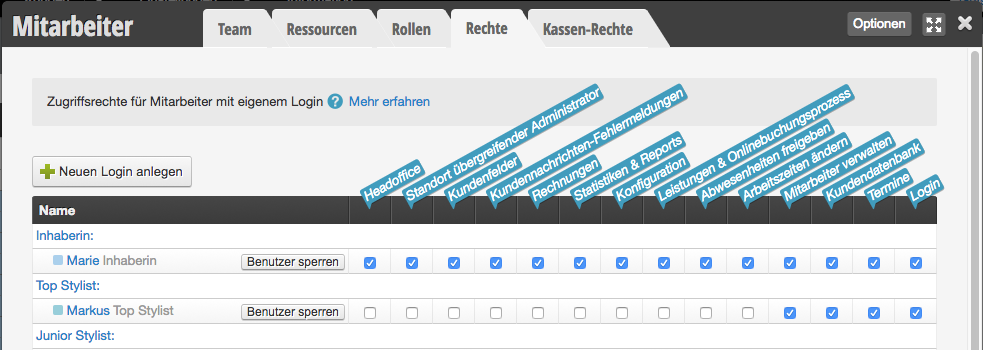
You can access this area via Settings > Employees > Rights.

Available rights:

Head office
If you have multiple locations linked in one Belbo calendar, you have an overview of the statistics of all locations in the Head Office.
Employees with the "Head office" right can view the head office.

Cross-location administrator
If you have multiple locations linked in one Belbo calendar, you can switch between location calendars at any time.
Employees with the "Cross-location administrator" right can make settings that apply across locations.

Manage employee PIN
Persons with this right can view the employee PIN of all team members, change it, and edit PIN rights.

Edit time tracking records
If you use the time tracking feature, employees with this right can correct recorded working times, delete them, or make up for forgotten logouts.

Customer fields
Employees with the "Customer fields" right can create, edit or delete customer fields.

Customer message error notifications
If emails or SMS messages cannot be delivered (for example because the customer has turned off their phone), the corresponding employee receives direct messages about the undelivered customer message. This function can be activated in the SMS settings.

Invoices
Employees with the "Invoices" right can view and download Belbo invoices in the account settings.

Statistics & Reports
Employees with the "Statistics & Reports" right can view reports under Information.

Configuration
Employees with the "Configuration" right can make and change settings.

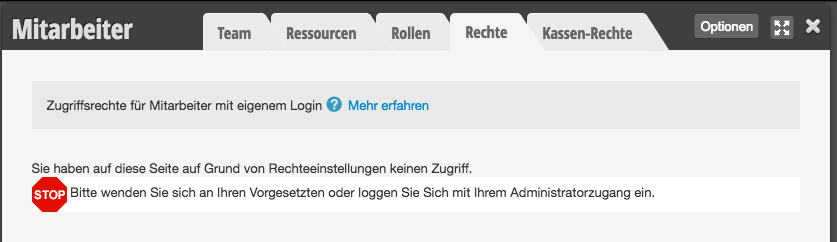
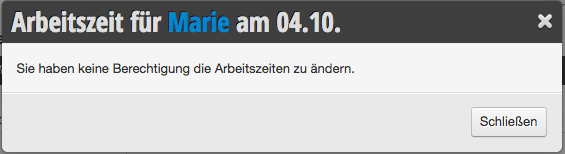
Example of missing "Configuration" right:


Services & Online booking process
Employees with the "Services & Online booking process" right can create, edit and delete services and edit the online booking process.

Release absences
You can specify in the scheduling settings that employees who are not allowed to edit their own working times are allowed to enter absences such as vacations. Employees with "Release absences" right can then plan these permanently or reject them.

Change working times
Employees with "Change working times" right are allowed to change their own working times and those of their colleagues.

Example of missing "Change working times" right:


View prices
Only employees with this right see prices in the calendar and can use the Belbo cash register system.

Manage employees
Employees with "Manage employees" right can edit the employee files of all employees and, for example, change data or colors.

Customer database
Employees with the "Customer database" right can view customer management.

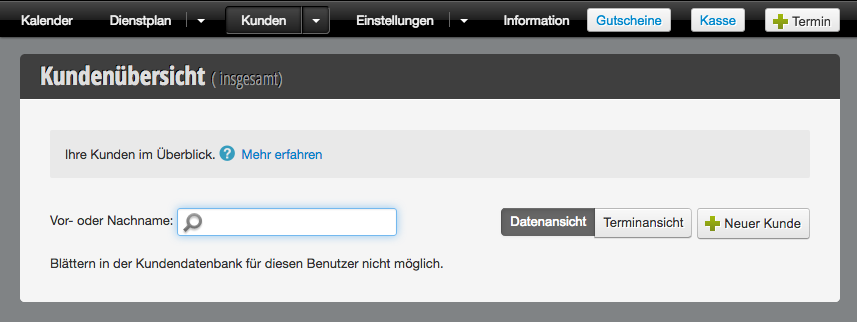
View for employees without "Customer database" right:


Appointments
Employees with "Appointments" right can create and edit appointments.

Login
Employees without "Login" right can still log in at any time. This right is only needed if you want to create a very limited login without any other rights.

If you use the Belbo cash register system, you can give your employees individual cash register rights.

Distribute rights

  1. Click "Settings" in the navigation bar.
  2. Under the heading "Employees", select the function: "View and change employee rights".
  3. Click the column of the desired right within the row of the desired employee.

Example of different rights distribution:

Here you will find case examples of how you can distribute the rights as well as our recommendation.

You can find an overview of all options for restricting access here.

Employee lock / unlock

Blocking an employee prevents them from logging into the system or being booked. Appointments and the calendar column remain intact.

You can access this area via Settings > Employee > Rights.

Block employee login

  1. Click "Settings" in the navigation bar.
  2. Under the "Employee" heading, select the function: "add, remove or change desired employees".
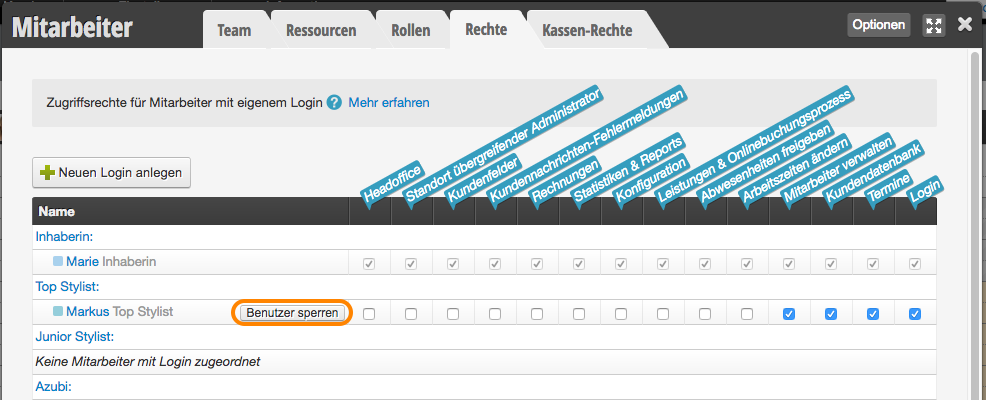
  3. At the end of the line of the desired employee, click the "Block user" button.
  4. To unblock, click the "Unblock user" button for the respective employee. All previous settings will then be available again.

Block other access

If you use a Team Login, it is advisable to change the password for this login! You can find out how to change passwords here.

Former employees If this is an employee who is leaving your company, please do not delete them! You can find out how to handle former employees in Belbo here.

Post navigation

Newer posts →
This manual is a service by belbo. Legal notice