belbo
  • Overview
    • Getting to know Belbo
    • Location Settings
    • Switch to Belbo
    • Calendar View & Navigation
    • Recurring Appointments & Courses
    • Appointment Entry & Management
    • Logins & Permissions
    • Multiple Locations & Head Office
    • Manage Employees
    • Absences & Holidays
    • General
    • Working Hours
    • Time Tracking
    • Data Protection (GDPR)
    • Customer Communication (Email, SMS)
    • Customer Management & Records
    • Bonus & Loyalty Programs
    • Campaigns (Newsletter & SMS)
    • Marketing Consents (GDPR)
    • Tracking & Analytics
    • Overview
    • Services & Prices
    • Products
    • Service Packages & Subscriptions
    • Vouchers
    • Einkauf & Lieferanten
    • Lagerbestand & Inventur
    • Scanning & Sales
    • Cost of Goods & Expenses
    • Design & Texts
    • Setup & Settings
    • Integration (Website, Google, Instagram, Facebook)
    • Online payment
    • Accounting & Exports
    • Cash Register Settings & Hardware
    • Checkout process
    • Daily Closing & Reports
    • TSE & Cash Register Anti-Tampering Ordinance
    • Export Overview
    • Employee Utilization
    • Revenue & Reports
    • Belbo Satellite
    • Printer
    • EC Terminal & Card Payment
    • Troubleshooting Hardware
    • Scanner & POS Devices
    • General Settings
    • API & Integrations
    • Notifications & Emails
    • Contracts & Legal
Skip to content

Everything about: Customer Communication (Email, SMS)

Sender email address

You can use your own sender email address for outgoing emails from belbo instead of the standard address termine@belbo.com. This is possible, but requires additional settings outside of belbo – directly at your domain.


Prerequisites

  • The address must belong to your own domain that you operate yourself.
  • Public email providers are not permitted, e.g. peter.lustig@gmail.com or peter.lustig@gmx.de will not work as a sender.
  • You need access to the DNS management of the domain – or someone who has this access for you (see below).

Setup in Email Settings

Enter your desired address in the email settings. belbo will then show you the values for three DNS entries (SPF, DKIM, Return-Path) that must be added to the domain.

As long as SPF, DKIM, and Return-Path are not all marked as verified/completed, sending via your own address is not reliably secured.

⚠️ Changing DNS Entries is Not a Simple Click

These entries cannot be set within belbo itself. They must be added to your domain's DNS management – that is, where the domain is registered or hosted (e.g. with your provider, host, or web agency). From experience, this is not trivial:

  • You need admin access to the DNS zone of the domain. If you don't have this yourself, your host or web agency must set the entries for you.
  • The syntax of the entries (TXT or CNAME records) must be applied exactly – even a missing character will cause the verification to fail.
  • Changes don't take effect immediately: DNS propagation can take several hours to 48 hours depending on the provider.
  • Incorrect or incomplete setup can result in emails not being delivered at all – not just landing in spam.

If in doubt, we recommend making this change together with the person or company that manages your domain or website.

Which Entries Are Needed?

  • SPF – TXT record that identifies belbo as an authorized sender for your domain.
  • DKIM – cryptographically signs outgoing emails so that recipient servers recognize them as unchanged and legitimate.
  • Return-Path – CNAME record; the hostname must be exactly pm-bounces.

What to Do If Emails Land in Spam or Don't Arrive?

Usually, DKIM or Return-Path entries are simply missing. Check this in the email settings and pass the missing values to your domain administrator.

If your own domain cannot be set up (in the short term), simply reset the sender address. belbo will then send via the verified standard address termine@belbo.com again, without delivery issues.

Send customer surveys as direct message via email

With the Customer Questionnaires feature, customers can fill in certain data themselves. For example, they can be filled out and signed directly on-site on an iPad. If you would like to send the questionnaires via email to specific customers, proceed as described here.


1. Create a direct message

Under Settings > Email Settings you can create and edit direct messages. Create a new direct message template or edit an existing one.

You can use placeholders to include the customer's name and of course the customer questionnaire to be filled out in the message at the desired location:

2. Send direct message to the customer

In the customer record in the "Messages" tab, you can now select the direct message template and send it to the customer:

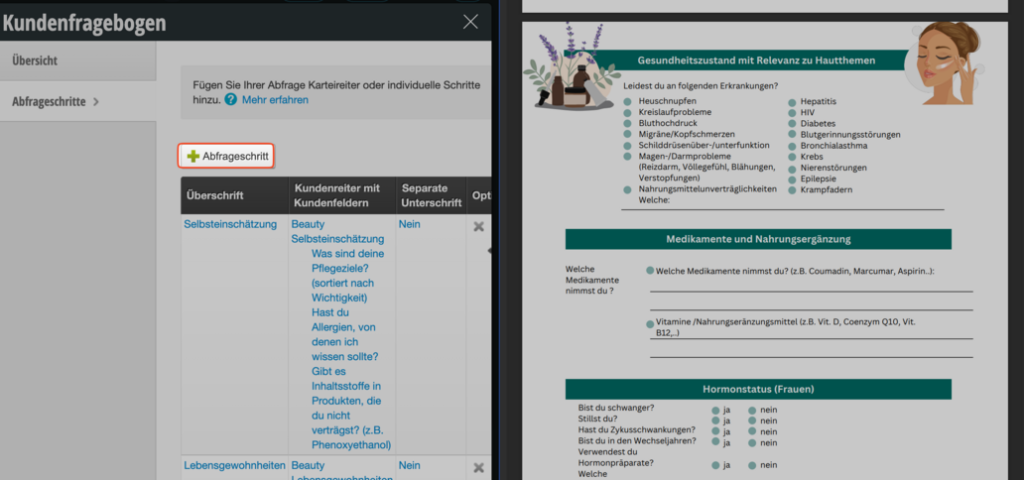
Customer questionnaires

With the customer inquiry, you can quickly and easily maintain your customers' master data by having your customers enter or update their own data! You can also request consent for digital data storage here. To do this, you will need a second device (for example, a tablet) that you can hand over to the customer. The customer has access only to their own data and does not have access to your calendar or other customer records.


You can access this area via Settings > Customer Inquiry
If this function is not enabled, it can be enabled via "Settings > Add Function".


Customer entering their own data:

Step 1: Create customer fields for the inquiry

First, you can decide which fields your customers should fill out in the customer inquiry. You can do this conveniently on your laptop or desktop computer if you wish.

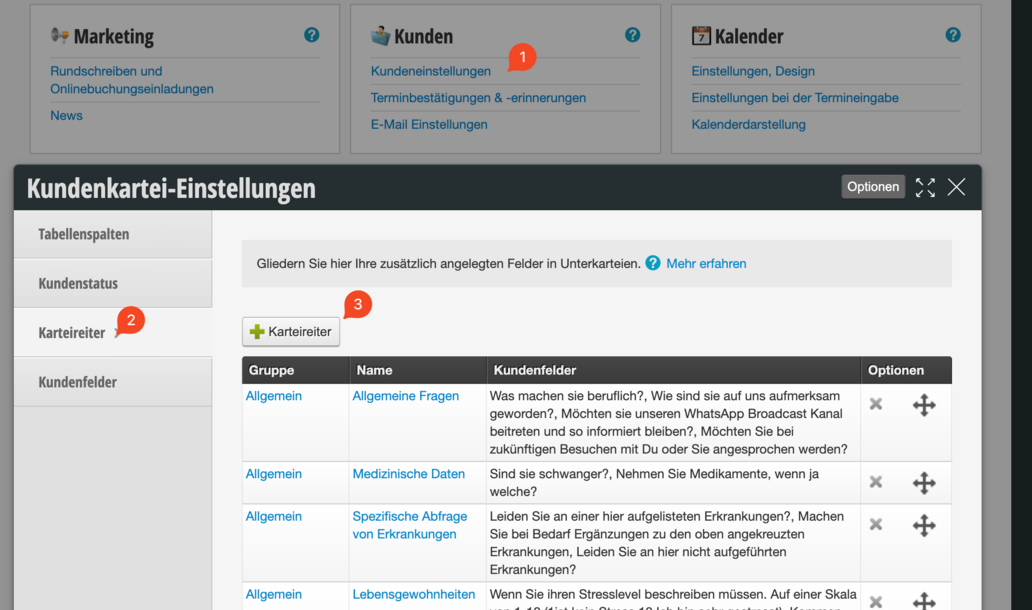
  • Click on "Settings".
  • Under the main menu item "Customers", click on "Customer Settings".
  • Here in the "Tabs" section, create a new tab, for example "Customer Inquiry".
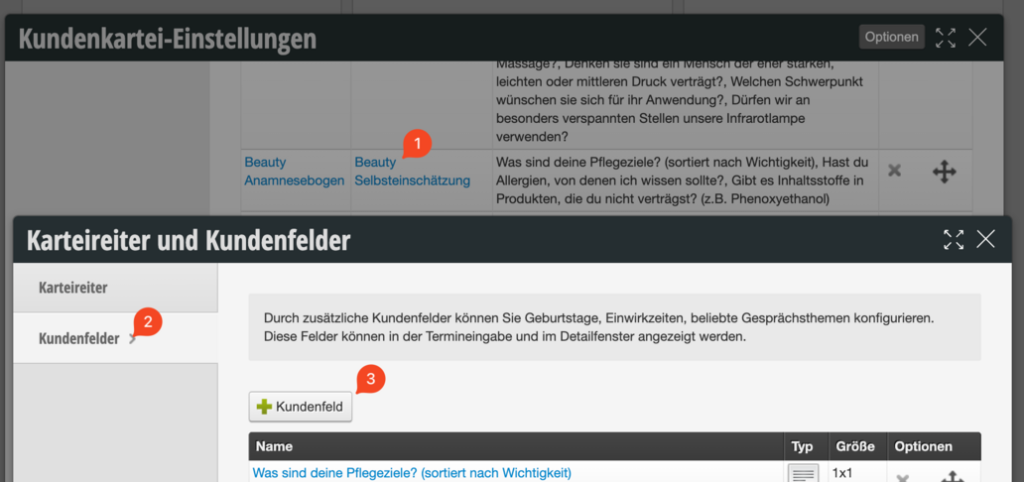
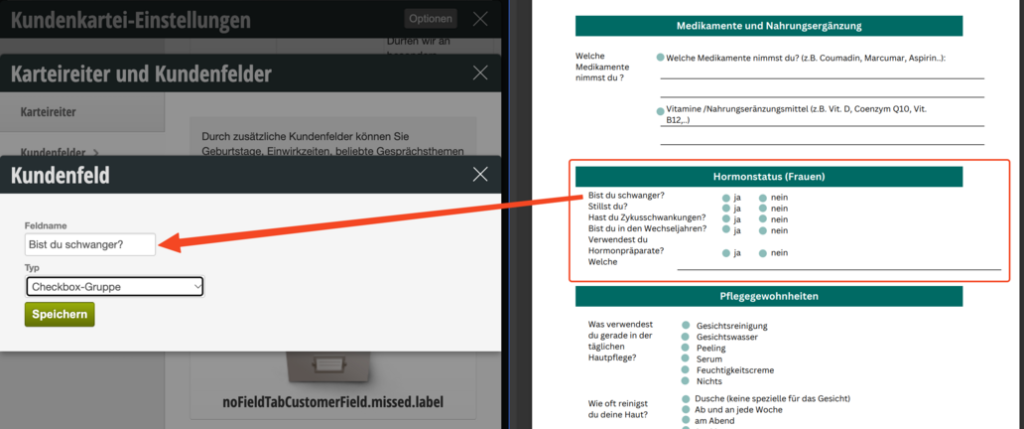
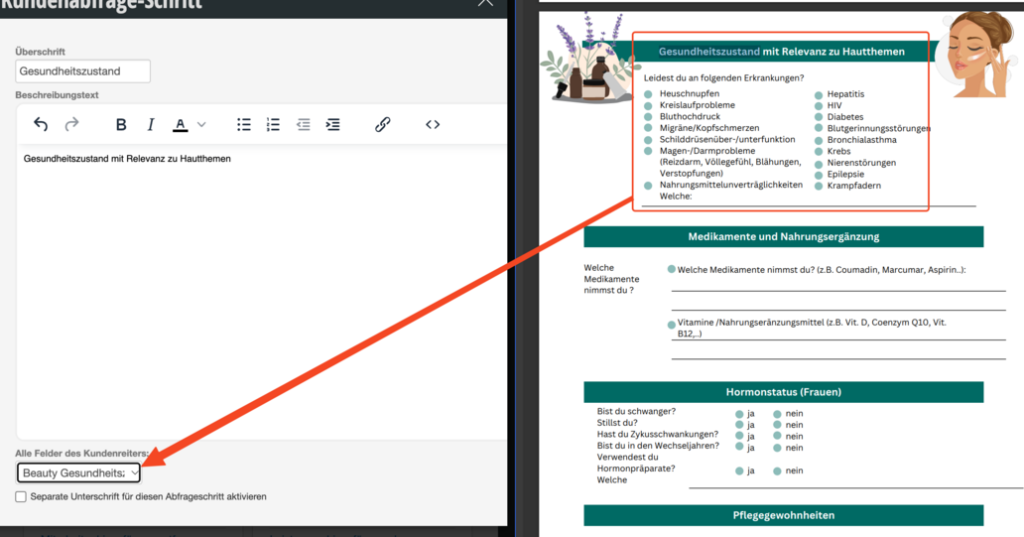
  • Now create in the "Customer Fields" section those customer fields that should be asked in the customer inquiry. Select here under "Tab in customer file". your newly created tab.
  • Please note that master data such as name or email address does not need to be created separately, but can be selected separately for the inquiry.
  • If you want to create many questions, you can also divide them into multiple tabs.
  • Existing tabs can also be included in the customer inquiry without needing to create new tabs.

Step 2: Create customer inquiry

Once you have created all the questions, you can now create the customer inquiry.

  • Click on "Settings".
  • Click on the "Customer Inquiry" function. If it is not enabled, you can enable it under "Add Function".
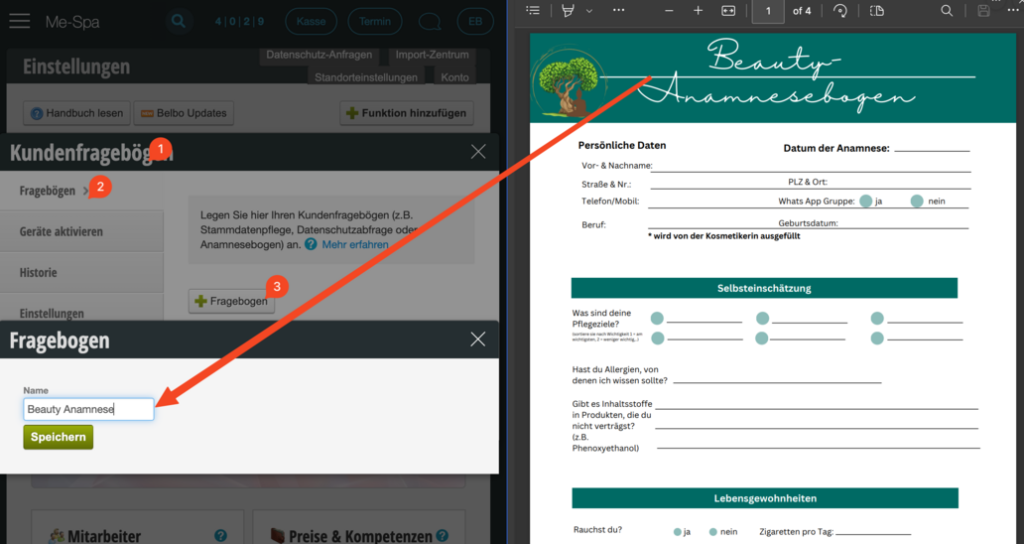
  • In the "Questionnaires" tab here, click "+Questionnaire" to create a new inquiry.
  • Now determine what data you want to request.
  • Checkmark for "Request master data": Master data such as first and last name as well as phone numbers and email address are also requested.
  • Checkmark for "Digital Storage: Request Consent": The customer receives your information text on digital storage, which you can note here.

Define multiple inquiry types

  1. Master data maintenance, data protection inquiry or medical history form? If different questionnaires are desired, you can store them.
  2. Now open the customer inquiry function page on your main device and open the "Questionnaires" section.
  3. Click on "+ Questionnaire"
  4. Enter a name for the new questionnaire. This will then appear as soon as you start a customer inquiry.

Step 3: Activate devices

  1. To use this function, you must enable it in the area Settings > Add Function.
  2. Now you need to activate your second device. To do this, visit the following website with the second device (e.g. tablet): https://<Your customer domain>.belbo.com/office/display
    Tip: Don't know your customer domain? Just look at your calendar in the address bar. Your personal customer domain is located there before ".belbo.com"

  3. Now open the module Settings > Customer Inquiry on your main device and open the "Activate Devices" section.
  4. Click on "+ Device"
  5. Enter a name for the device (e.g. "Tablet 1"). This could be useful if you want to use multiple tablets or devices for this purpose.
  6. Below the name you will find the "Activation Code" field. Enter this code now on the device where you opened the "/office/display" page from step 2.
  7. The device is now activated and can be used for the inquiry.

Step 4: Start customer inquiry

  1. For data protection reasons, the customer inquiry is always initiated from the main device. Therefore, open your calendar and click on a current appointment for whose customer you want to start the inquiry.
    Why can't I select the customer directly on the second device? The reason is that the customer has the device in their hands. After completing data entry, the customer should not be able to see another inquiry or the names of other customers. A password entry by the employee also poses a risk/burden.

  2. In the appointment details, click on Options in the top right and select "Start customer inquiry".
  3. The inquiry will then start on the second device.

Customer questionnaires in confirmation and reminder emails

You can link your inquiries in confirmation and reminder emails to ask your customers to complete the questionnaires before their appointment. There are placeholders for the created questionnaires that you can place in the email.

This is especially useful for questionnaires that must be completed by all customers.

How to manually send questionnaires to specific customers is explained here.

Reminder Overview

If you want to check which of your customers receive a reminder for your appointment, you can use the reminder overview.

You can access this area via Settings > Appointment Confirmations & Reminders

Overall Overview

In the "Appointment Confirmations & Reminders" module you will find an overview that shows you how many of your appointments within the last and next 7 days contained a reminder.

Detailed Overview

Next to the pie charts, the number of appointments without a reminder is linked. By clicking on the blue link, you will go to the detailed overview.
In the detailed overview of future appointments, you can quickly and easily set the checkmarks for missing reminders.

Paid Marketing SMS

If you want to send your customers important and urgent information, you can use marketing SMS. Costs are incurred when sending.

Sending SMS is not free even today. Belbo generally only sends direct SMS through official and legitimate SMS service providers. We pass the costs for these SMS directly on to you.

The cost of a marketing SMS depends on your SMS contract and can be a maximum of 10 cents per SMS.

Email sent not in mailbox

It can happen that customers contact you when they cannot find certain emails in their mailbox. These include, for example:

  • Reminder and confirmation emails
  • Forgotten password emails
  • Newsletters

However, it can also be Belbo system emails that you as the owner of a Belbo calendar expect to find but cannot locate. These include, for example:

  • Appointment confirmation
  • Online booking notifications
  • Forgotten password emails

If you are certain that the corresponding email was sent, for example if it can be found in the "Messages" tab of the customer record, it is likely due to your customer's mailbox settings that it cannot be found there.

Automatic mailbox rules (e.g. Google Mail)

Some email services, especially Google Mail, offer users the ability to pre-sort emails so that not all messages land in the normal email inbox. Messages that Google classifies as desired advertising or notifications can be retrieved somewhat hidden. Please ask the customer to check these mailboxes and, if necessary, change the automatically created rule:

Custom mailbox rules

Custom rules for specific senders can be created with all email services. If it was previously specified that messages from your company should always be marked as "Read" and archived, other messages may also be affected.

Example of use:
You have the appointment confirmation sent to you every morning, but you don't want it unread in your inbox; instead, you only want to access it in case of emergency. Other emails from the same sender can also be treated accordingly if you have set this rule for the sender (e.g. termine@belbo.com).

Rejected messages and spam

Your customers have the option to mark your newsletters or reminder messages as spam if they no longer wish to receive them. In this case, future messages will also be sorted into the spam folder.

Some email service providers can also make this decision on their own. There are international guidelines that email service providers use to determine which senders are classified as spam senders. The service we use for sending emails has an excellent reputation and is very rarely marked as spam. Nevertheless, it can happen occasionally.

We ask for your understanding that we have no control over this. Your customer can mark the sender as safe in order to receive future messages again.

Send marketing SMS to customers

With hairlist, it is very easy to contact all or specific customers in your customer file via SMS. One SMS of 160 characters costs you 10 cents - regardless of which subscription plan you are on - these will be listed in your next invoice. With round-SMS you can reach all your customers for whom the corresponding contact details are stored in the customer file. The prerequisite for marketing SMS is that the SMS module is activated in your account (you must not be in DEMO mode) and you have already successfully sent reminder SMS.

Tip: Don't quite know what you want to write? You can find some inspiration and text suggestions here.

Requirement: It is legally required that your customers give their consent to receive marketing activities. In every customer file in the Messages --> Notifications section, you will therefore find several boxes that must be activated.

Note: Otherwise, this customer will not receive any SMS or email. If a large portion of your customers are not accepted as recipients, please contact us via chat or email/phone and we can unlock all your customers for marketing once - for example, if you already had customer data in another system and they have already given their consent for marketing activities.

How to write a mass SMS: IMPORTANT - WORK WITH GOOGLE CHROME

1. Click on the small white arrow in the navigation bar, to the right of Customers, and select Marketing.

2. You will now see all your campaign drafts that you have prepared. To start a new campaign, click on the Create New Campaign button.

3. Give it a title (only visible to you) with which you can distinguish the campaign well. Choose which customers the action should be sent to. You can select multiple statuses by holding down the Ctrl / cmd key. In the normal case, you can simply leave All Customers selected.

For campaign Type, choose SMS. In the background, hairlist now searches all customers for valid mobile phone numbers and filters out duplicate numbers. When the window closes automatically, this process is complete. Now click on the newly created title to edit the SMS.

4. In the Text tab you can now determine the content of your SMS. You have some placeholders available and you can see immediately how long your SMS already is.

The placeholders will then be inserted individually according to the message recipient. For example, they allow you to address each customer personally by first and last name. Important: The placeholders only work with the Google Chrome browser.

  • Salutation Mr. / Ms.: depending on whether Mr. or Ms. will be used
  • Formal salutation (Dear…): will be replaced with Dear Ms. Smith or Dear Mr. Miller. So the last names are already included in this placeholder!
  • Friendly salutation (Hi…): will be replaced with Hi Ms. Vreni Smith or Hi Mr. Martin Miller. So first & last names are already included in this placeholder!
  • First name: will be replaced with just the first name alone (if you write "HI" or "HELLO" or Good morning before it and don't use a salutation from us)
  • Last name: will be replaced with just the first name alone (if you write "Hello Name" before it and don't use a salutation from us)

When using placeholders, be sure to click Save so you can see if the changes have been applied correctly. After saving, you will also see your final character count and can calculate how much your campaign will cost (number of recipients * number of SMS * 10 cents).

Then switch back to the General tab and send the campaign with a click on Start SMS delivery.

Your SMS will now be forwarded to our provider and placed in the queue. It may therefore take a few hours for the SMS to be completely delivered. However, you can check the status at any time and see when the campaign has been successfully sent.

SMS App

With the SMS app, you can send confirmation and reminder SMS from your own mobile phone with an SMS flat rate and save costs.


Requirements:

  • Your location is in Germany or Austria.
  • You have a current Android phone.
  • On your phone, you must enable that you are allowed to install apps downloaded from the internet.
  • Download and install this app: SMS app from Belbo
  • Enter the prefix of your account. ATTENTION: If your calendar URL is for example: "https://mycompany.belbo.com/office", then enter only "mycompany" as the address. Please omit ".belbo.com".
  • Click on the location where SMS sending should be carried out.
  • Enable the checkbox "Enable background sending"
  • Only if the numbers in the app increase does SMS sending work.
  • You can see in the SMS outbox which SMS were sent.
  • Enable that the app is allowed to run in the background. This setup is very difficult and very device-dependent. A possibly outdated guide is available below. Search the internet for your mobile phone model for instructions on how to allow background activity for apps.


This function requires a special setup and cannot be activated without further configuration! If you only activate it without setting up the SMS app, no SMS will be sent!

https://www.youtube.com/shorts/ddLLQ2GnjOU

Troubleshooting

It is very likely that sending issues are due to a local setting on your phone.

  • Open the settings on your phone.
  • Tap on Apps or Apps & Notifications.
  • Find the app for which you want to change permissions and tap on it.
  • Select Permissions.
  • Look for the SMS option.
  • Tap on SMS and decide whether you want to allow or not allow.


For more information on: App restrictions in the background on various Android devices

Disable battery optimization on your phone for the app

Your phone's operating system may disable background processes and apps to save battery. Therefore, it shuts down the SMS app when it appears to be inactive.

You can prevent this by following the procedure described in this article: Keep apps running in the background – here's how

Receive daily sales report by email

With the daily revenue report, you receive a simple summary of your sales via email every day.

You can access this area via Settings > Daily Revenue Report
If this function is not activated, it can be activated via "Settings > Add Function".

After you have activated this function, you can enter your email address. You will then receive an email every evening with a simple revenue report for your desired location.

You can specify whether you want to see net or gross sales.

Example of a daily revenue report via email:

Evaluation

In the "Evaluation" tab you can load the revenue report for a freely definable time period:

Detailed description of a service in confirmation and reminder emails

If certain services require explanation or if customers need to pay attention to something before their appointment, you can also include this information in the confirmation and reminder emails. This ensures that your customers receive the information after booking the service.

Store information in the service

Please first add this information to the service as detailed description. This information can then also be displayed directly in the online booking.

  • Click on Prices & Competencies under Settings.
  • Click on the desired service.
  • Write your information in the "Detailed Description" field and save your entry.

Detailed description in the email

You can then specify that this text appears in confirmation and reminder emails when the customer books the corresponding service.

  • Click on Appointment confirmations & reminders under Settings.
  • Select the desired email type here under "Emails".
  • Place the placeholder "Detailed description of booked services" at the desired location and save your entry.

External documents in the description

If you wish, you can also place a link to a website in the detailed description. This is useful if the information is complex or illustrated. You can also link a document that the customer should print out and bring signed to the appointment.

  • Upload the document to your website or create a subpage where you store the information.
  • Link the document or website in the detailed description of your service.

Example: Confirmation email with detailed information

The information is now shown in the email when the customer has booked this service:

Post navigation

← Older posts
This manual is a service by belbo. Legal notice