With the "Employee PIN" function, you can determine which employee made a change in the calendar for a shared login.
The "Manage Employee PIN" permission allows you to view and edit employee PINs.

With the "Employee PIN" function, you can determine which employee made a change in the calendar for a shared login.
The "Manage Employee PIN" permission allows you to view and edit employee PINs.
With the Service Packages function, you can sell multiple treatments for a customer in a single checkout process.
The right "Create and edit packages" allows you to edit existing service packages and add line items during the checkout process.
With the Service Packages function, you can sell multiple treatments to a customer in one checkout process.
The "Manage Package" permission allows you to create new service package templates in the "Service Packages" function and also delete existing service packages.
If you have linked multiple locations in a Belbo calendar, you can switch between location calendars at any time.
The "Cross-location settings" right allows you to edit design and text settings that apply across locations.
If you have multiple locations, you can use the "Head office" function.
The "Head office" permission enables the Head office for login, where you can view sales statistics across locations.
The "GDPR Supervisor" right unlocks functions with which data protection requests and data protection deletions can be processed that can be filled out by the customer online.
 This article is particularly relevant for users from Switzerland.
The Joint Commission for the Swiss Hairdressing Industry (PK Coiffure) monitors compliance with the collective labor agreement in the Swiss hairdressing industry - and checks, for example, the working conditions of companies subject to the collective labor agreement through random or reported inspections. During such an inspection, salon owners must demonstrate that employees and apprentices in the salon do not exceed the legally permitted working hours and that mandatory breaks are observed.
The PK Coiffure states on its website
Working time must be recorded for employees to whom the working time regulations of the ArG (Labor Act) apply. It must be traceable for each employee when they worked, took breaks, and finished work. Based on this information, it can be verified whether the working and rest time regulations of the Labor Act have been complied with. The employer is obliged to keep these working time records for 5 years.
If working hours and breaks have been properly maintained in the schedule and calendar, it is easy to export the corresponding reports and statistics required by the PK Coiffure. The Excel template specified by the PK Coiffure can optionally be downloaded here <a href="https://www.pk-coiffure.ch/media/files/Arbeitszeitdokumentation_elektronisch_2020.xlsxdownload:
- Street
- Postal code
- City
- Country
- Working percentage (in %)
- Vacation days/year
- Compensation balance from previous year
This information cannot currently be exported, but it is recommended to create a cover sheet per employee in a program such as Microsoft Word or OpenOffice (free).
The following points must be verifiable for each day per employee:
- Hours worked (total)
For this, we recommend exporting the following statistic:
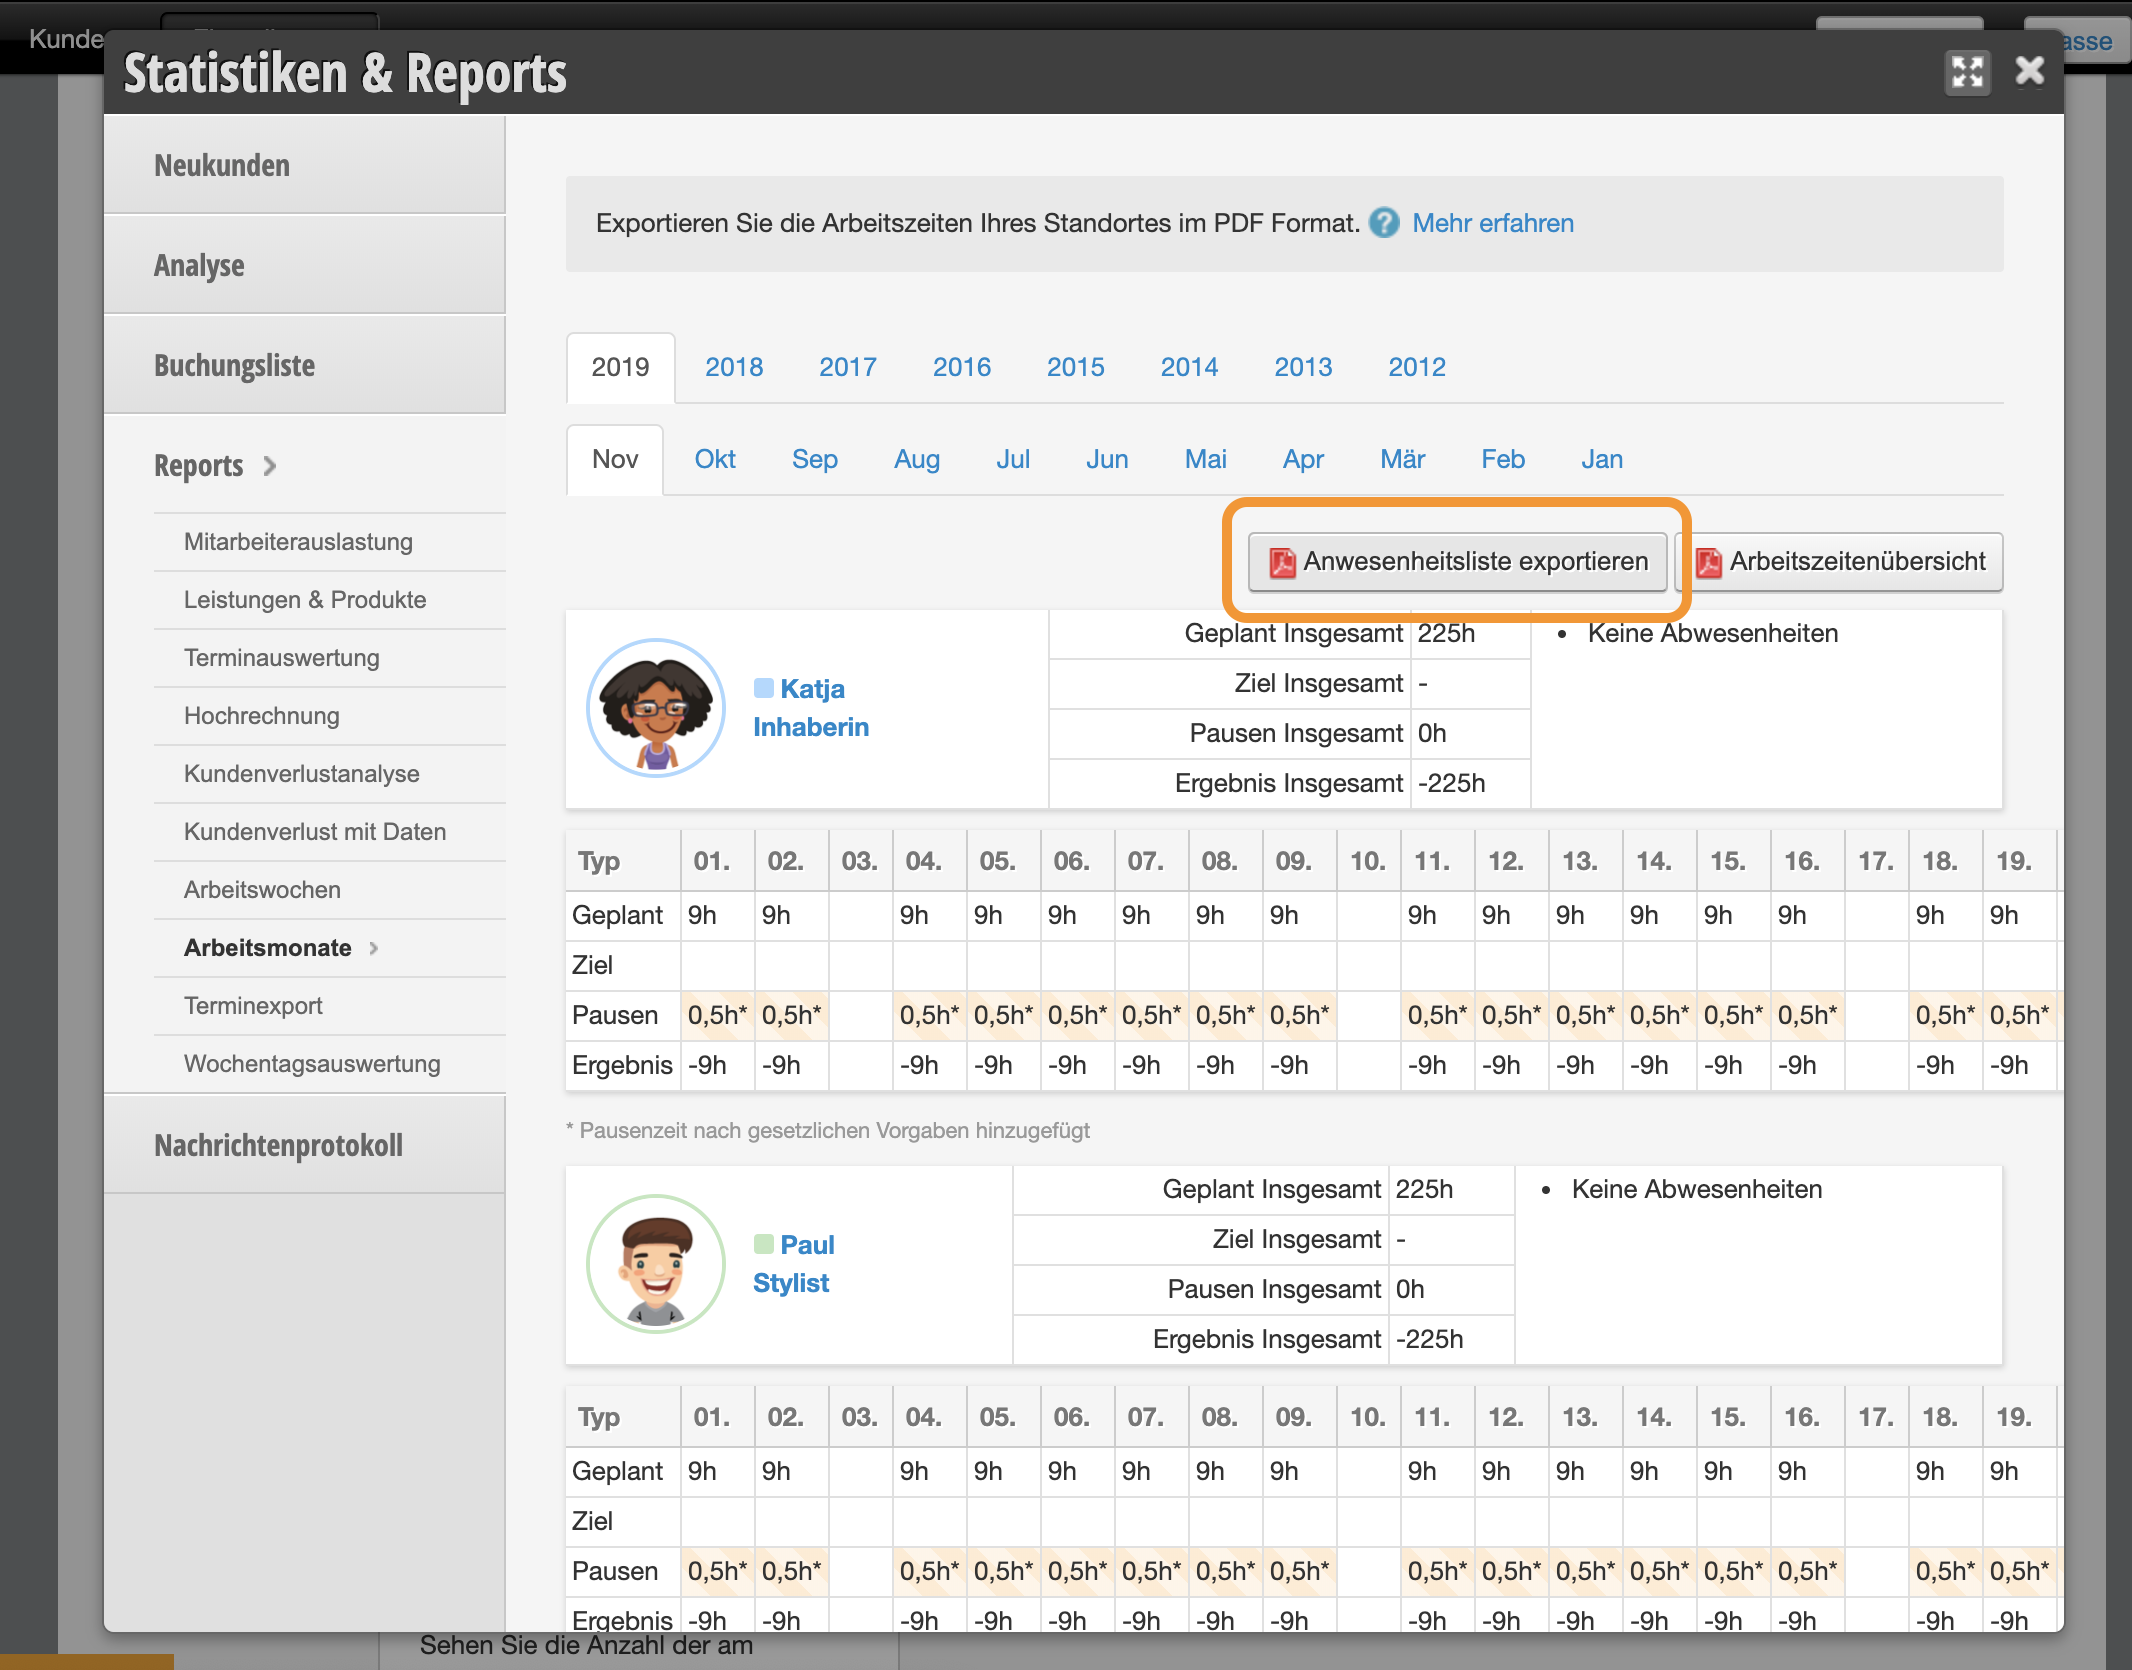
Settings > Statistics > Reports > Work months: This export shows the daily hours worked or absences for all employees for each month:
The PK Coiffure not only checks the hours worked, but also the actual breaks and working times:
- Start of working time
- End of working time
- Start of break
- End of break
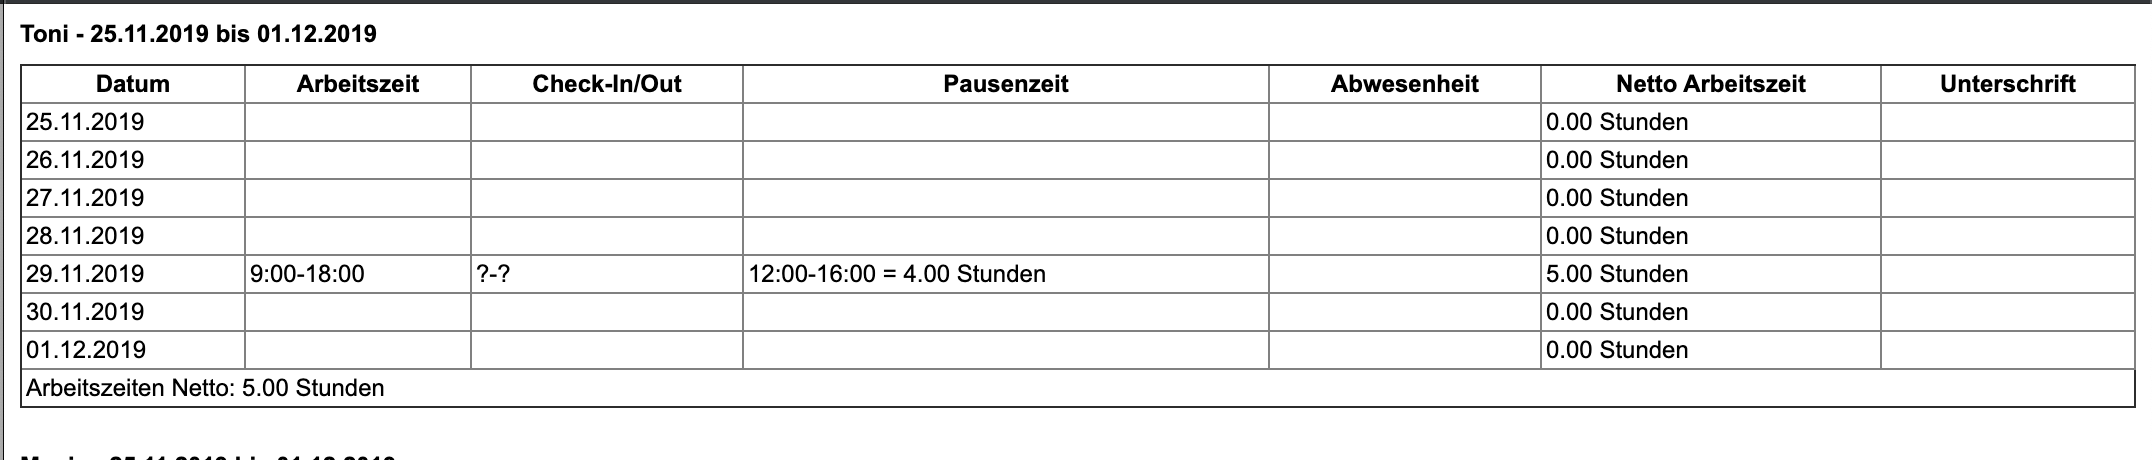
For this, we recommend exporting the following statistic: Settings > Statistics > Reports > Work weeks - HTML: This export shows the start and end of working and break times for all employees for each week:
Note: The PK Coiffure specifies which different types of absences should be distinguished:
- FE = Vacation control per Art. 33 GAV
- FT = Holiday control per Art. 33 GAV
- Holidays which, according to cantonal legislation, are treated equivalent to Sunday.
- KR = Illness
- KA = Short absence When an employee was briefly away from the workplace during working hours to attend to private obligations.
- UN = Occupational accident or non-occupational accident
- BE = Paid leave days per Art. 34 GAV
- MU = Maternity leave per Art. 44 GAV
- TK = Conferences and courses per Art. 35.2 GAV
- FW = Free weekday on which no work is performed. E.g. Mondays or Sundays.
- KO = Compensation for overtime work per Art. 25.3 GAV
The absence types can be added or changed as follows:
<a href="/abwesenheiten/
" target="_blank">Absences
If you want to prevent employees from accessing certain data, you can restrict access. In Belbo, you have various options available to limit the permissions of your employees.
The following terms are used in this article:
Owners generally have a login that allows access to all functions in Belbo. We recommend not passing this login to your employees.
You can create a team login for your employees, whose permissions you can then set. All employees use the team login together in daily business. Therefore, we recommend activating the employee PIN to see which employee created or moved an appointment.
If you want to give individual employees extended permissions, you can create their own login and then assign the desired rights.
→ This is suitable for supervisory employees or receptionists who should, for example, be able to change settings or create daily closings.
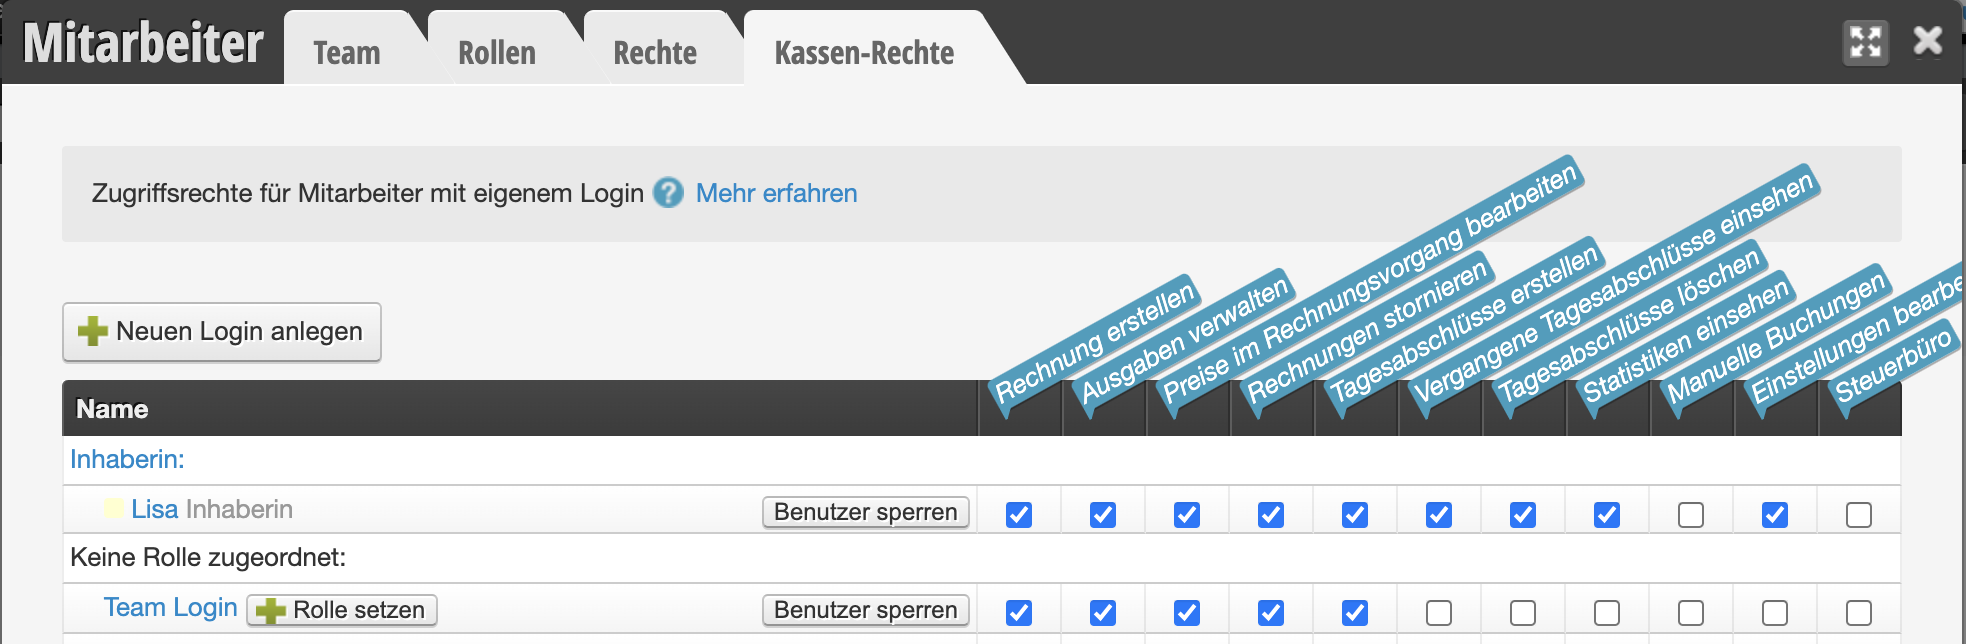
You can assign individual rights to each login. This way you can determine whether employees have access to certain areas or can change settings.
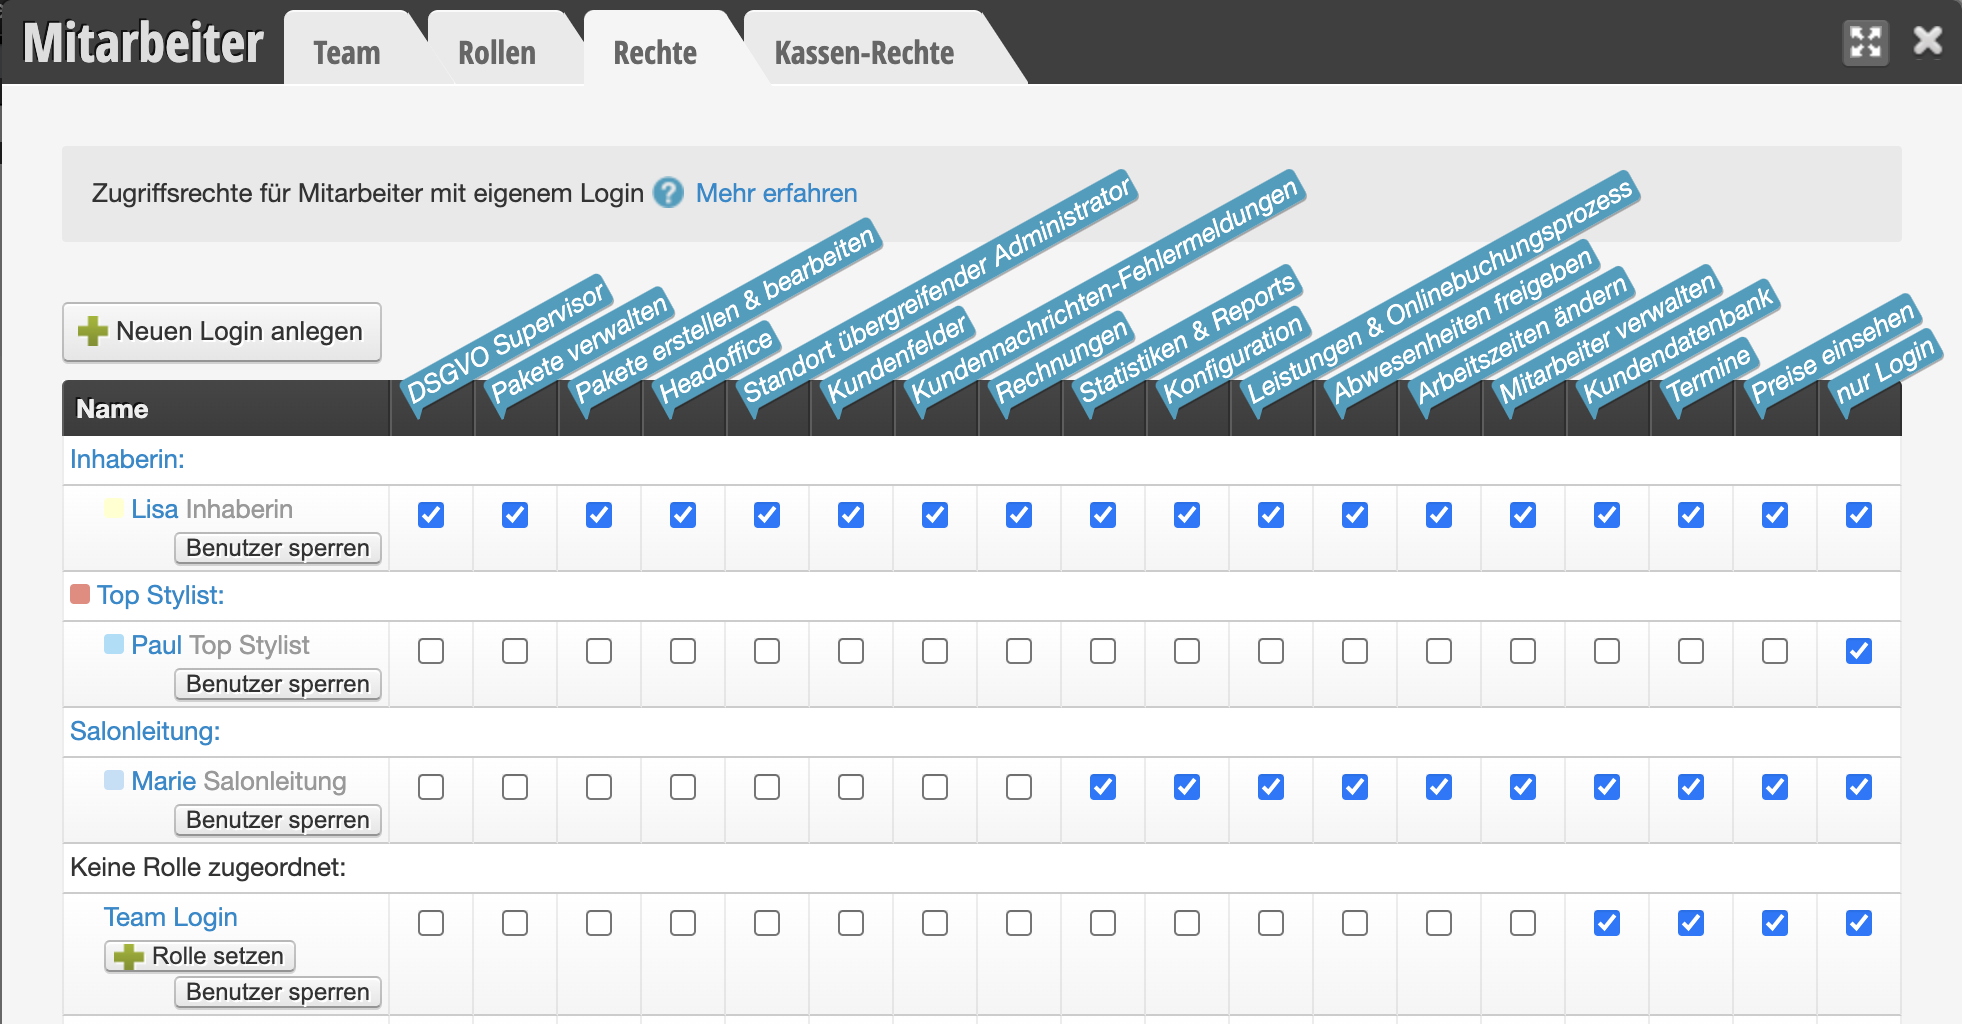
You can pay special attention to the following rights:
[/toggle]
[/toggle]
Owner compared to Team Login:
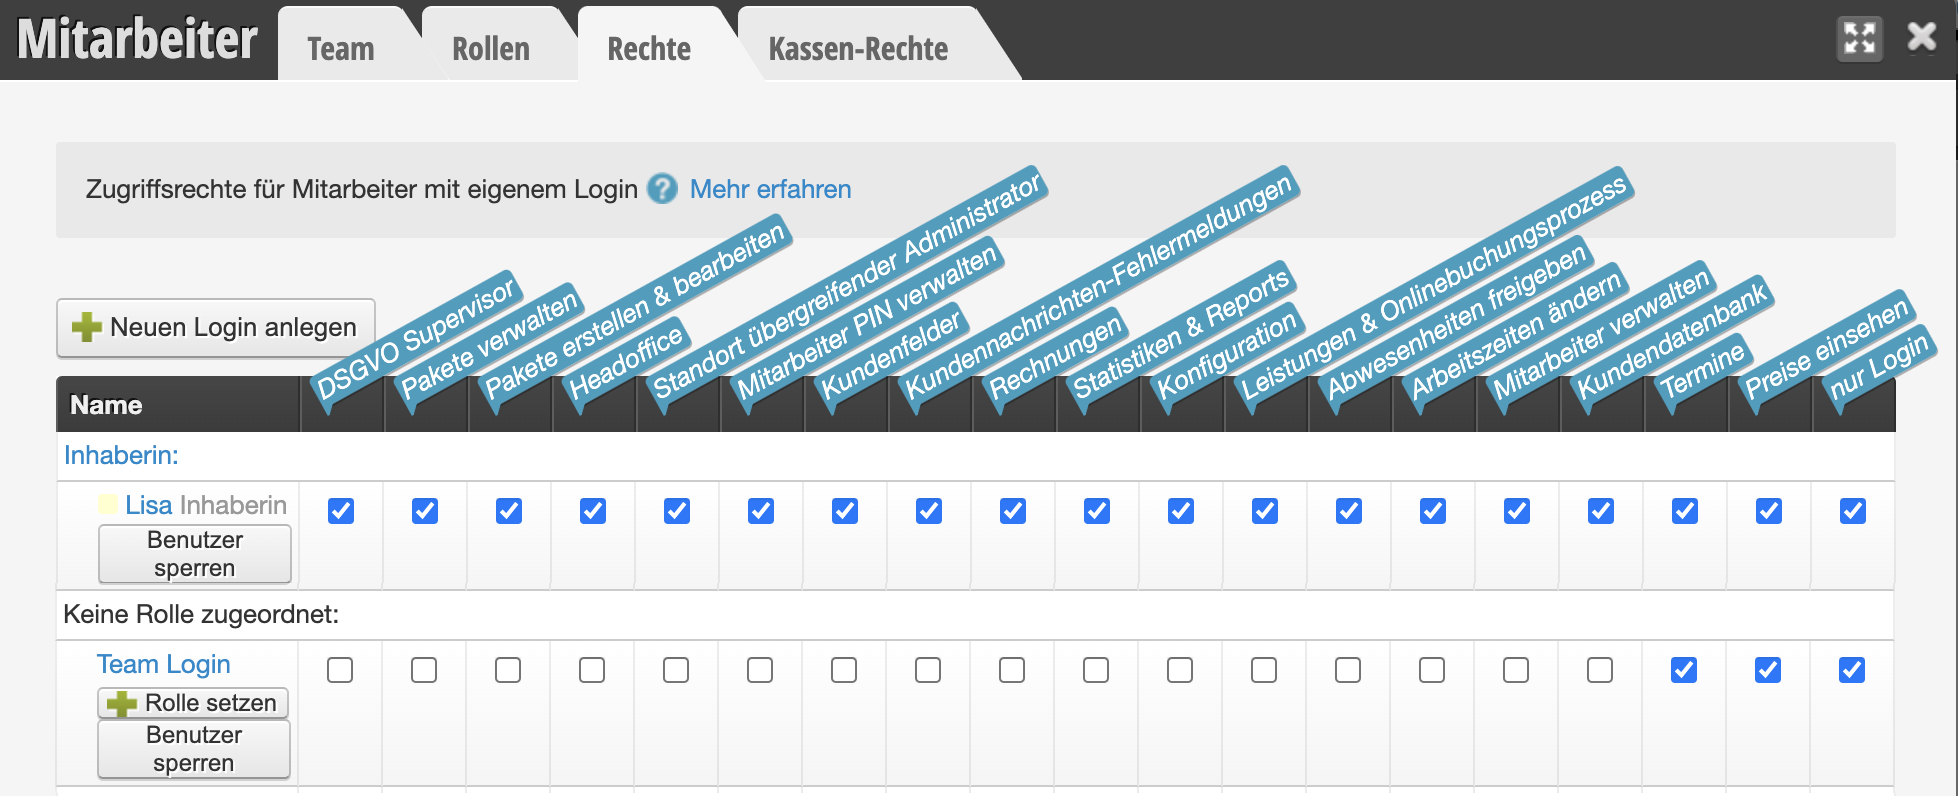
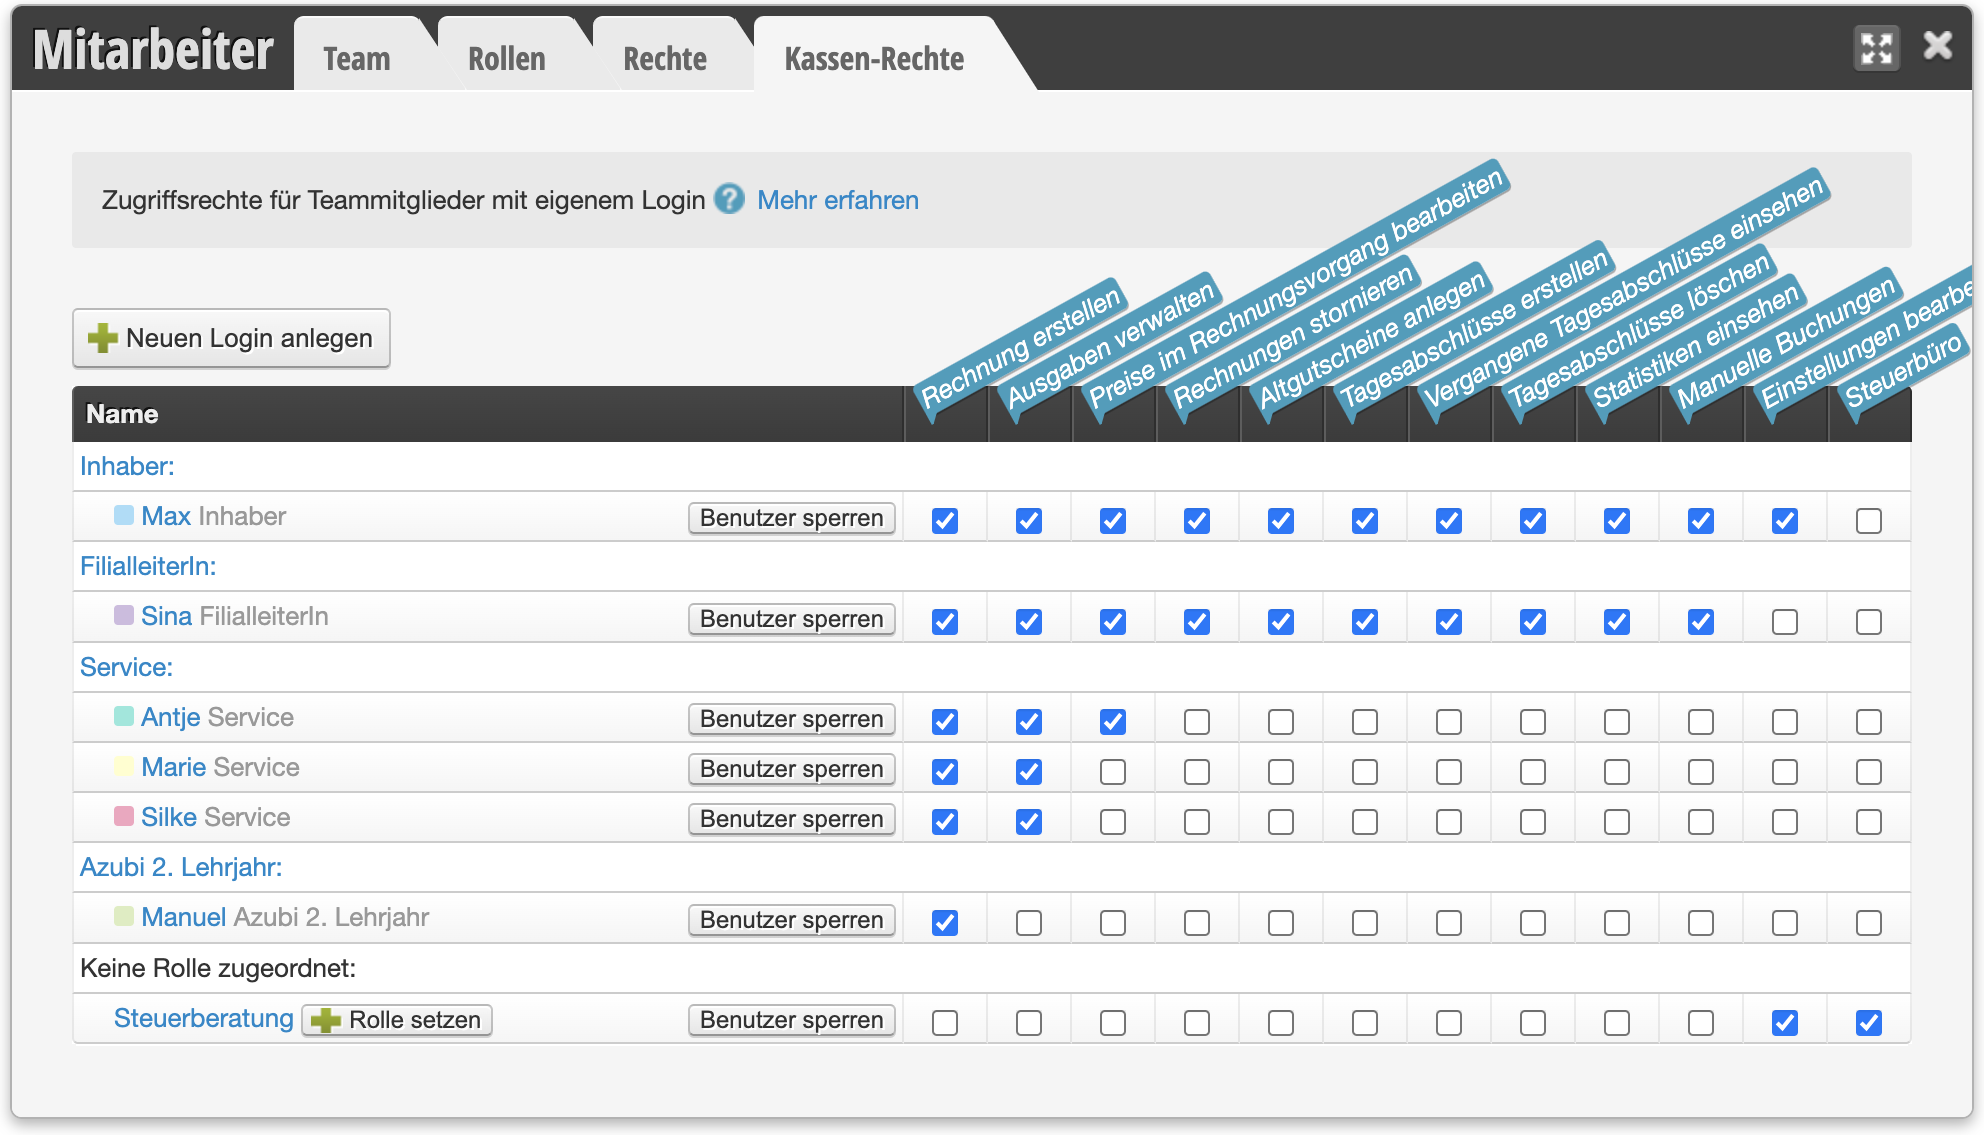
Owner compared to Team Login:
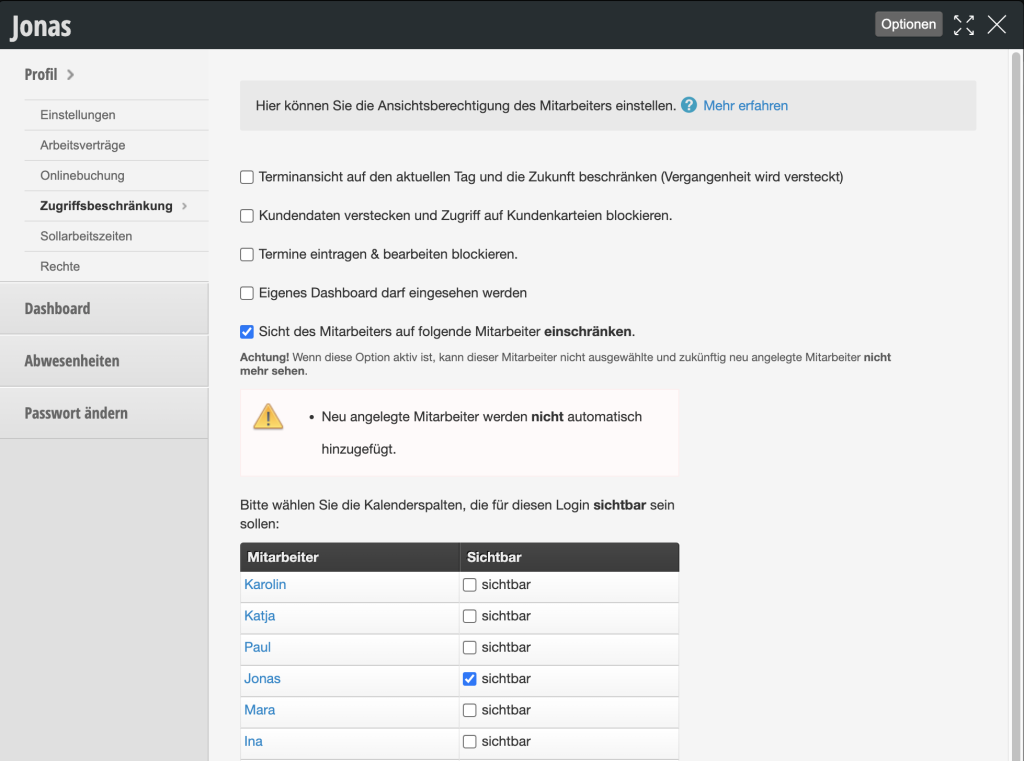
In the file of each employee who has their own login, you can store access restrictions. You can access your employees' files under Settings > Employees.
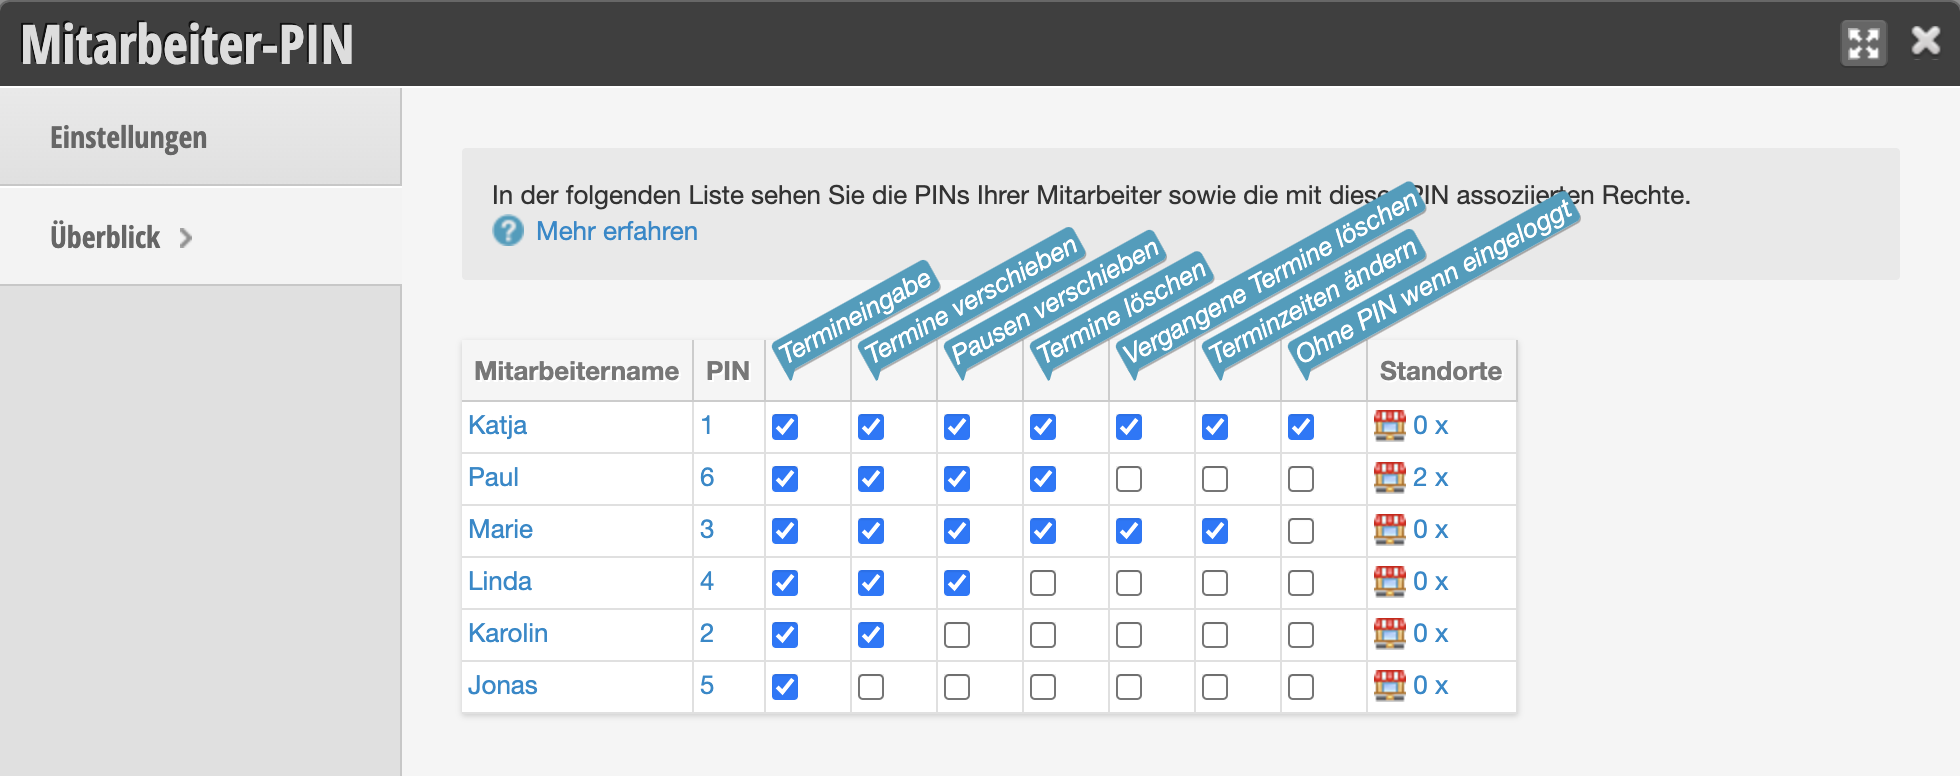
Each employee can receive their own PIN, which is used to identify individual employees. When PIN mode is activated, each employee enters their own PIN whenever they change or move an appointment, create breaks, collect appointments, or record product usage.
The employee PIN can in turn be equipped with certain rights. This way you can specify that certain employees cannot shift breaks or delete appointments.
You can set that employees with certain logins can only log in from a device specified by you. Use the login access restriction function for this.
If you don't work alone in your company, it makes great sense to create a separate login for your team. You can assign your own rights to this login and thus prevent all employees from having access to settings and statistics. This type of login, which is not directly linked to an employee, can be used by the entire team and is well suited if all your employees use the same computer or tablet in their daily work.
This type of login is also suitable for other types of employees who have access to the calendar and can enter appointments or change settings, but should not themselves appear as bookable employees in the calendar. These include, for example:
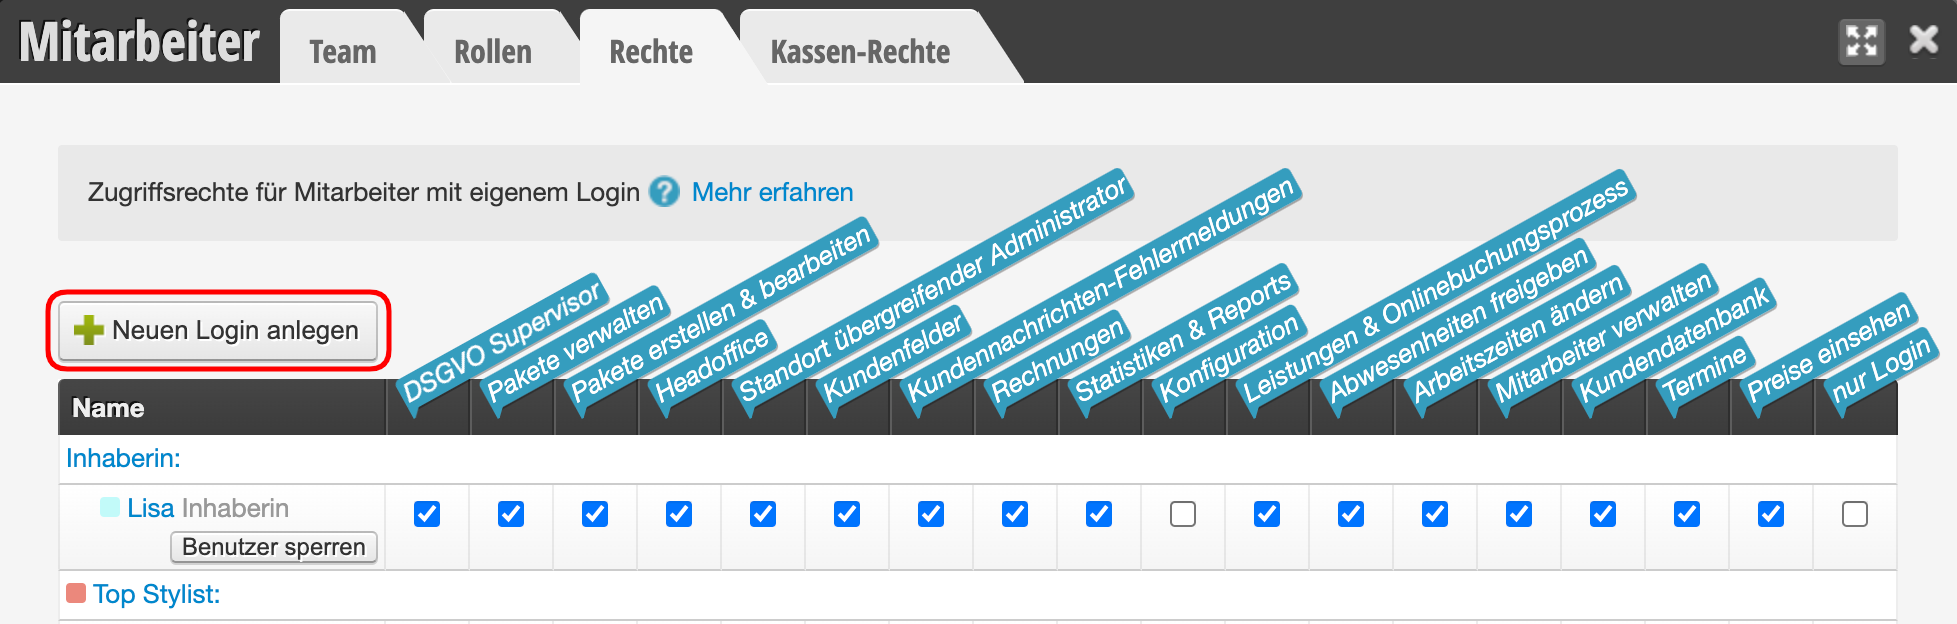
After you have set up the login, you can then set the access rights for this login under Settings > Employees > Rights.
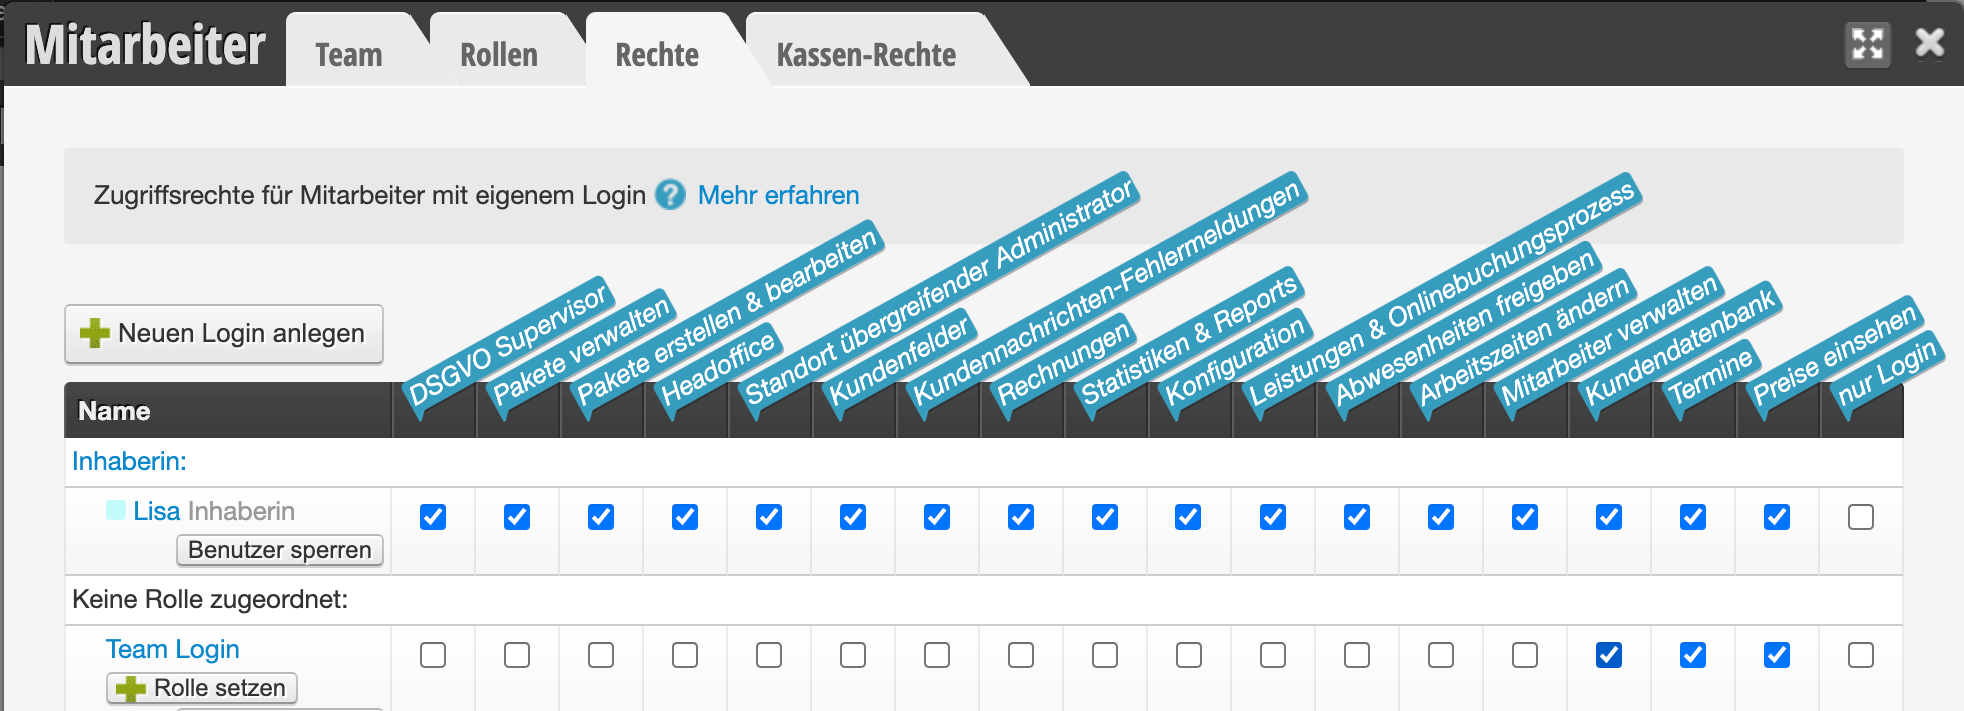
After you have set up the team login, you can then set the access rights for this login under Settings > Employees > Rights. We recommend giving this login only a few rights.
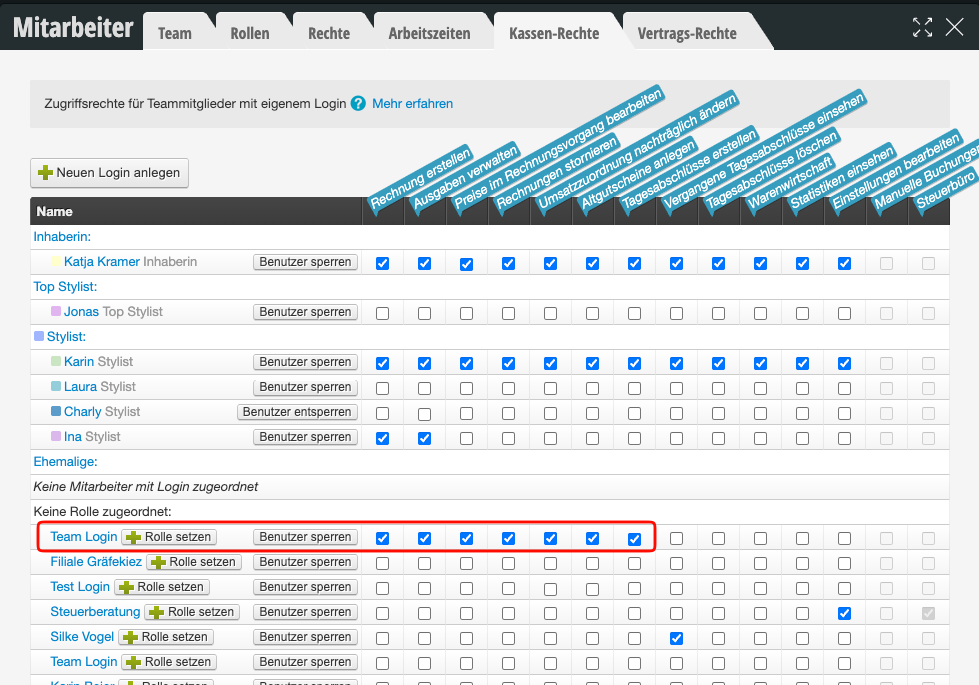
We recommend that the team can cash appointments and complete current daily summaries. However, statistics and cash register settings remain management's responsibility.
If there are employees to whom you would like to grant additional rights, you can assign a separate login for these employees.
If all employees use the same login, it is not easy to track which team member made which changes when appointments are created and modified. We therefore recommend additionally using the employee PIN.
This allows precise identification of your employees despite sharing the same login. Additionally, with the help of the employee PIN, you can fine-tune the rights of individual employees. Learn more about the employee PIN here.
If you want to prevent your employees from logging in from other devices (for example from home or a private mobile phone), you can use the login access restriction feature.
Since the team login is shared by multiple people, you can additionally secure it with two-factor authentication (2FA). Note that all people who use the team login need access to the same device with the stored authenticator app.
Your employees can log into the calendar with their own login. These logins can be assigned specific permissions so you can determine which employees have access to certain functions. You can change the passwords of your employees entered in the calendar.
Under Settings > Employees > Permissions you can see all logins that are stored in your company.
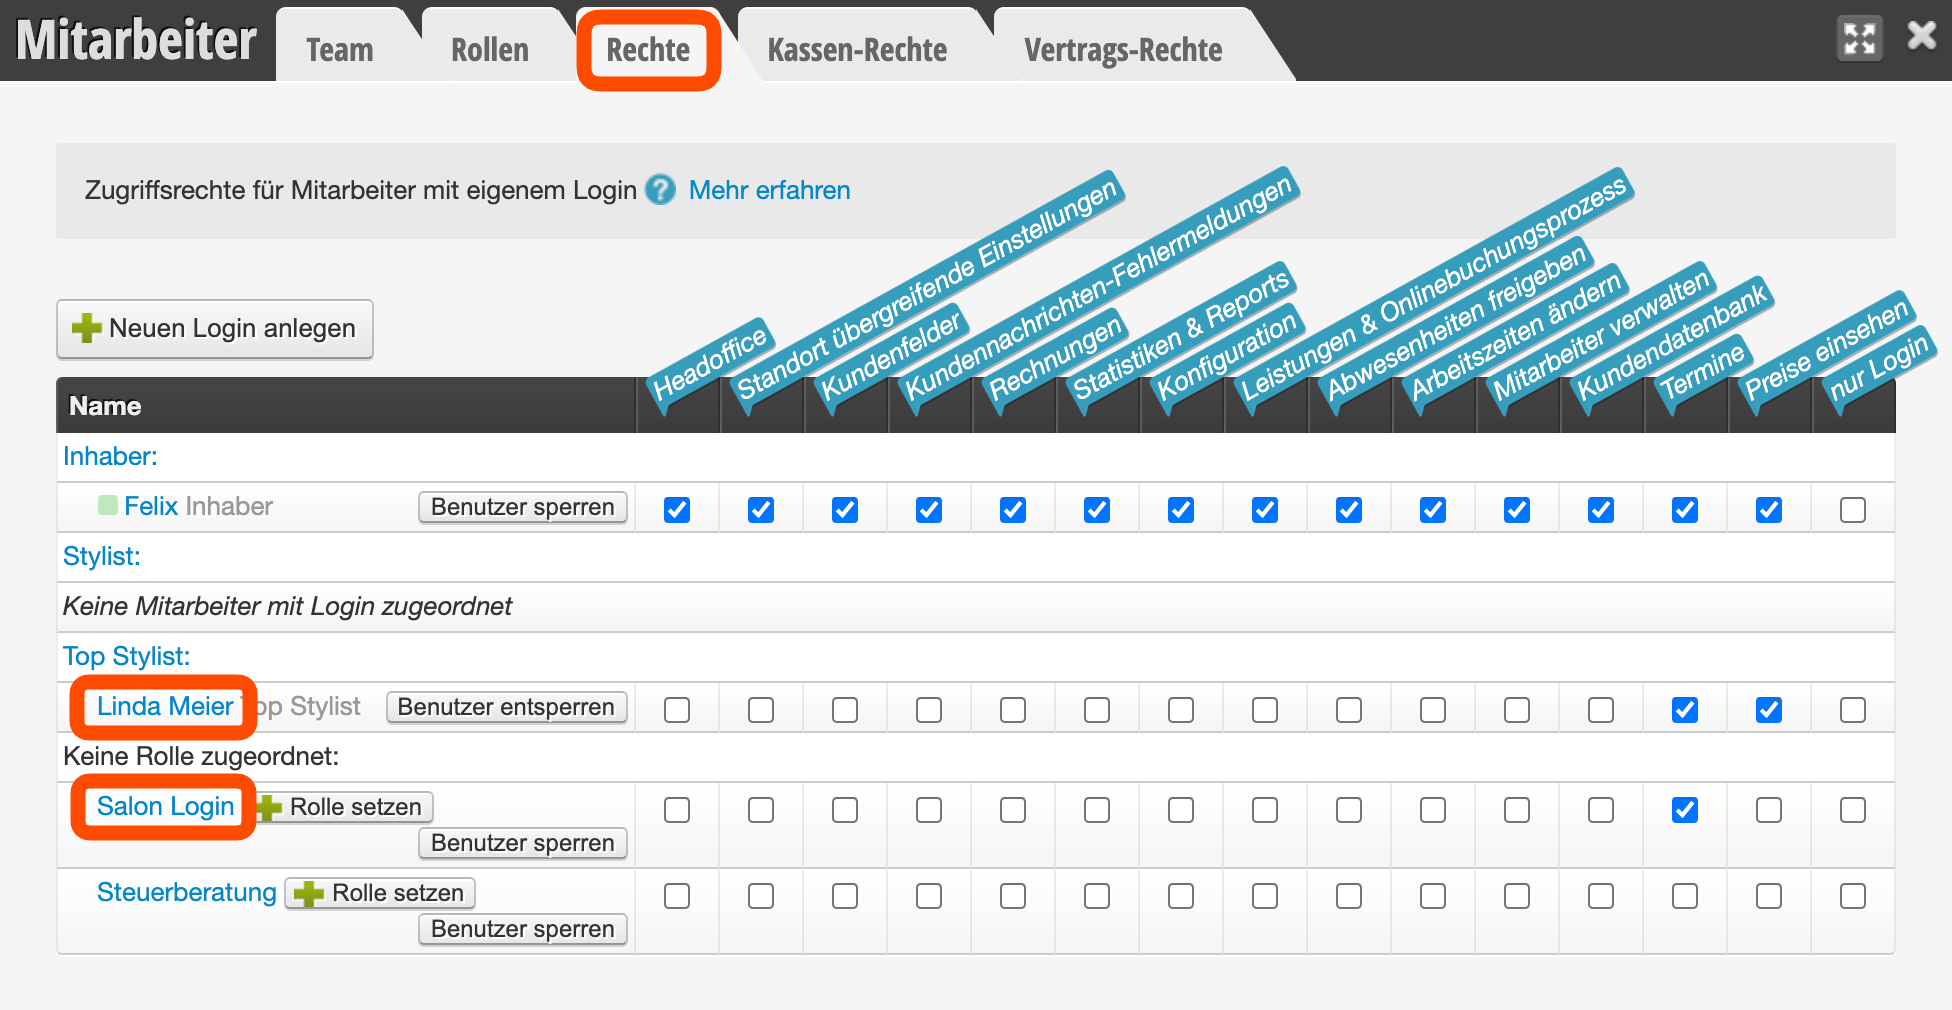
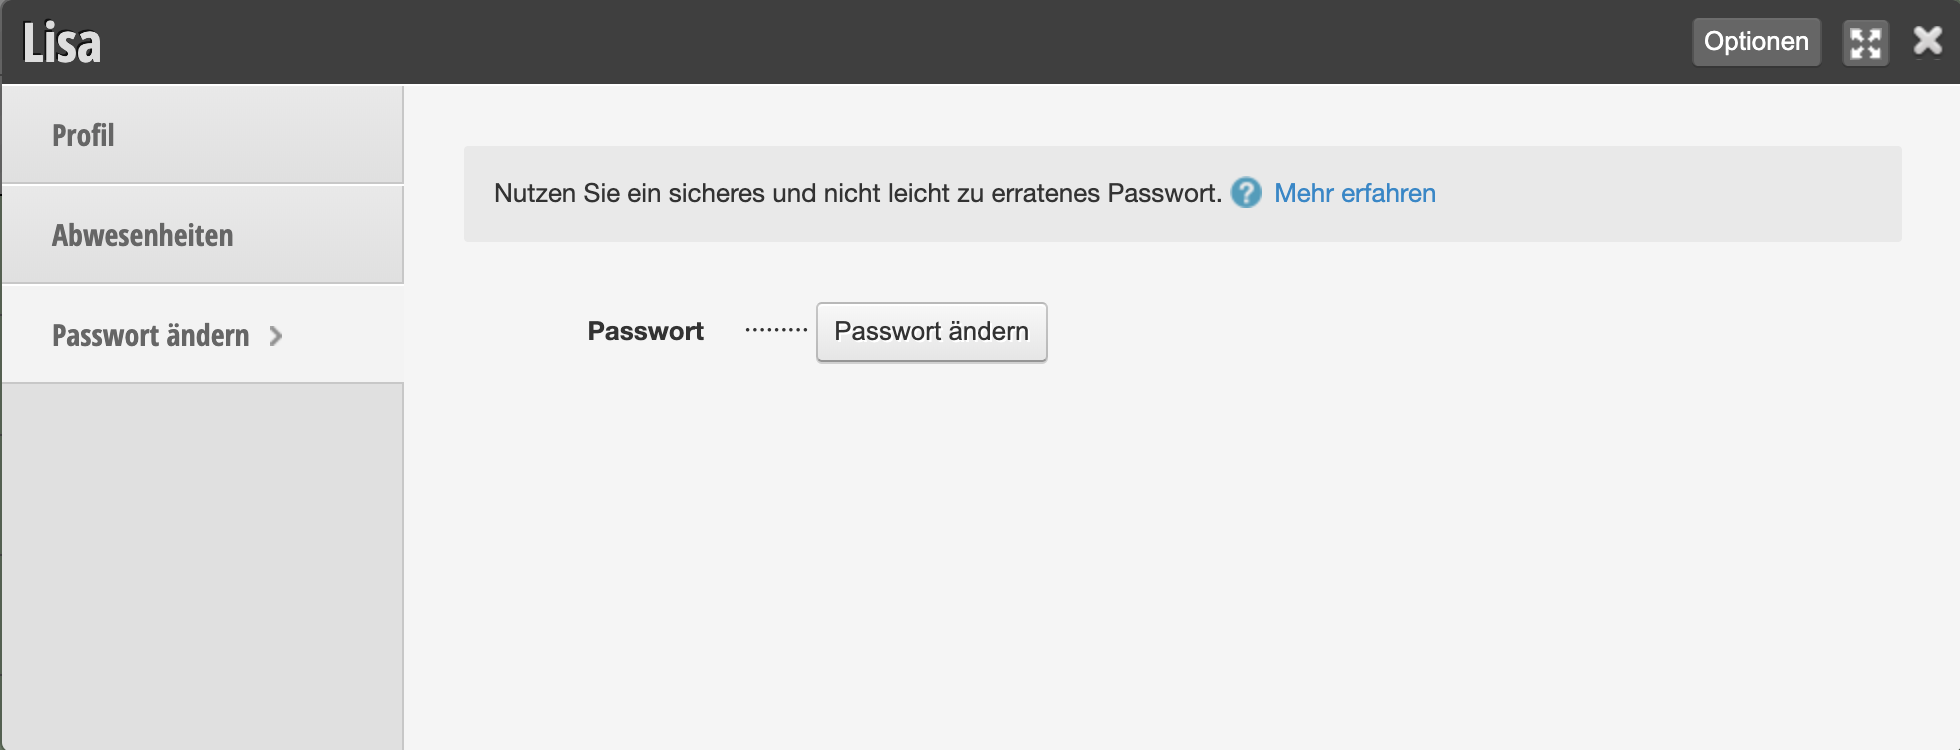
Click on the desired login here and follow the instructions in the dialog that opens when you click "Change password" to change the employee's password.
You can find out how to lock an employee here.
Instead of or in addition to regularly changing the password, you can secure a login with two-factor authentication (2FA). This way the login remains protected even if the password falls into the wrong hands.