belbo
  • Overview
    • Getting to know Belbo
    • Location Settings
    • Switch to Belbo
    • Calendar View & Navigation
    • Recurring Appointments & Courses
    • Appointment Entry & Management
    • Logins & Permissions
    • Multiple Locations & Head Office
    • Manage Employees
    • Absences & Holidays
    • General
    • Working Hours
    • Time Tracking
    • Data Protection (GDPR)
    • Customer Communication (Email, SMS)
    • Customer Management & Records
    • Bonus & Loyalty Programs
    • Campaigns (Newsletter & SMS)
    • Marketing Consents (GDPR)
    • Tracking & Analytics
    • Overview
    • Services & Prices
    • Products
    • Service Packages & Subscriptions
    • Vouchers
    • Purchasing & Suppliers
    • Stock & Inventory
    • Scanning & Sales
    • Cost of Goods & Expenses
    • Design & Texts
    • Setup & Settings
    • Integration (Website, Google, Instagram, Facebook)
    • Online payment
    • Accounting & Exports
    • Cash Register Settings & Hardware
    • Checkout process
    • Daily Closing & Reports
    • TSE & Cash Register Anti-Tampering Ordinance
    • Export Overview
    • Employee Utilization
    • Revenue & Reports
    • Belbo Satellite
    • Printer
    • EC Terminal & Card Payment
    • Troubleshooting Hardware
    • Scanner & POS Devices
    • General Settings
    • API & Integrations
    • Notifications & Emails
    • Contracts & Legal
Skip to content

Everything about: General

Create schedule

To create the schedule, first enter your employees:

  • Add employee


  1. Now go to the schedule.
  2. Select the week for which you want to create the new schedule in the horizontally displayed calendar.
  3. Click on the corresponding employee. An input mask will open showing the previously selected week.
  4. Enter the working hours or regular absences (e.g. vocational school).
  5. To enter break times, select "other working hours" instead of the preset working times and enter them accordingly up to the break.
  6. Click on the green plus sign, select "create new break" and enter the corresponding time.
  7. Click on the green plus sign again to enter the working time after the break.
  8. Proceed in the same way for your rooms and equipment (e.g. beds, workstations, cabins, EMS devices, etc.)
More articles on the topic of schedule

  • one-time working time deletion / modification
  • Regular working time modification
  • Enter breaks

Service Schedule Settings Overview

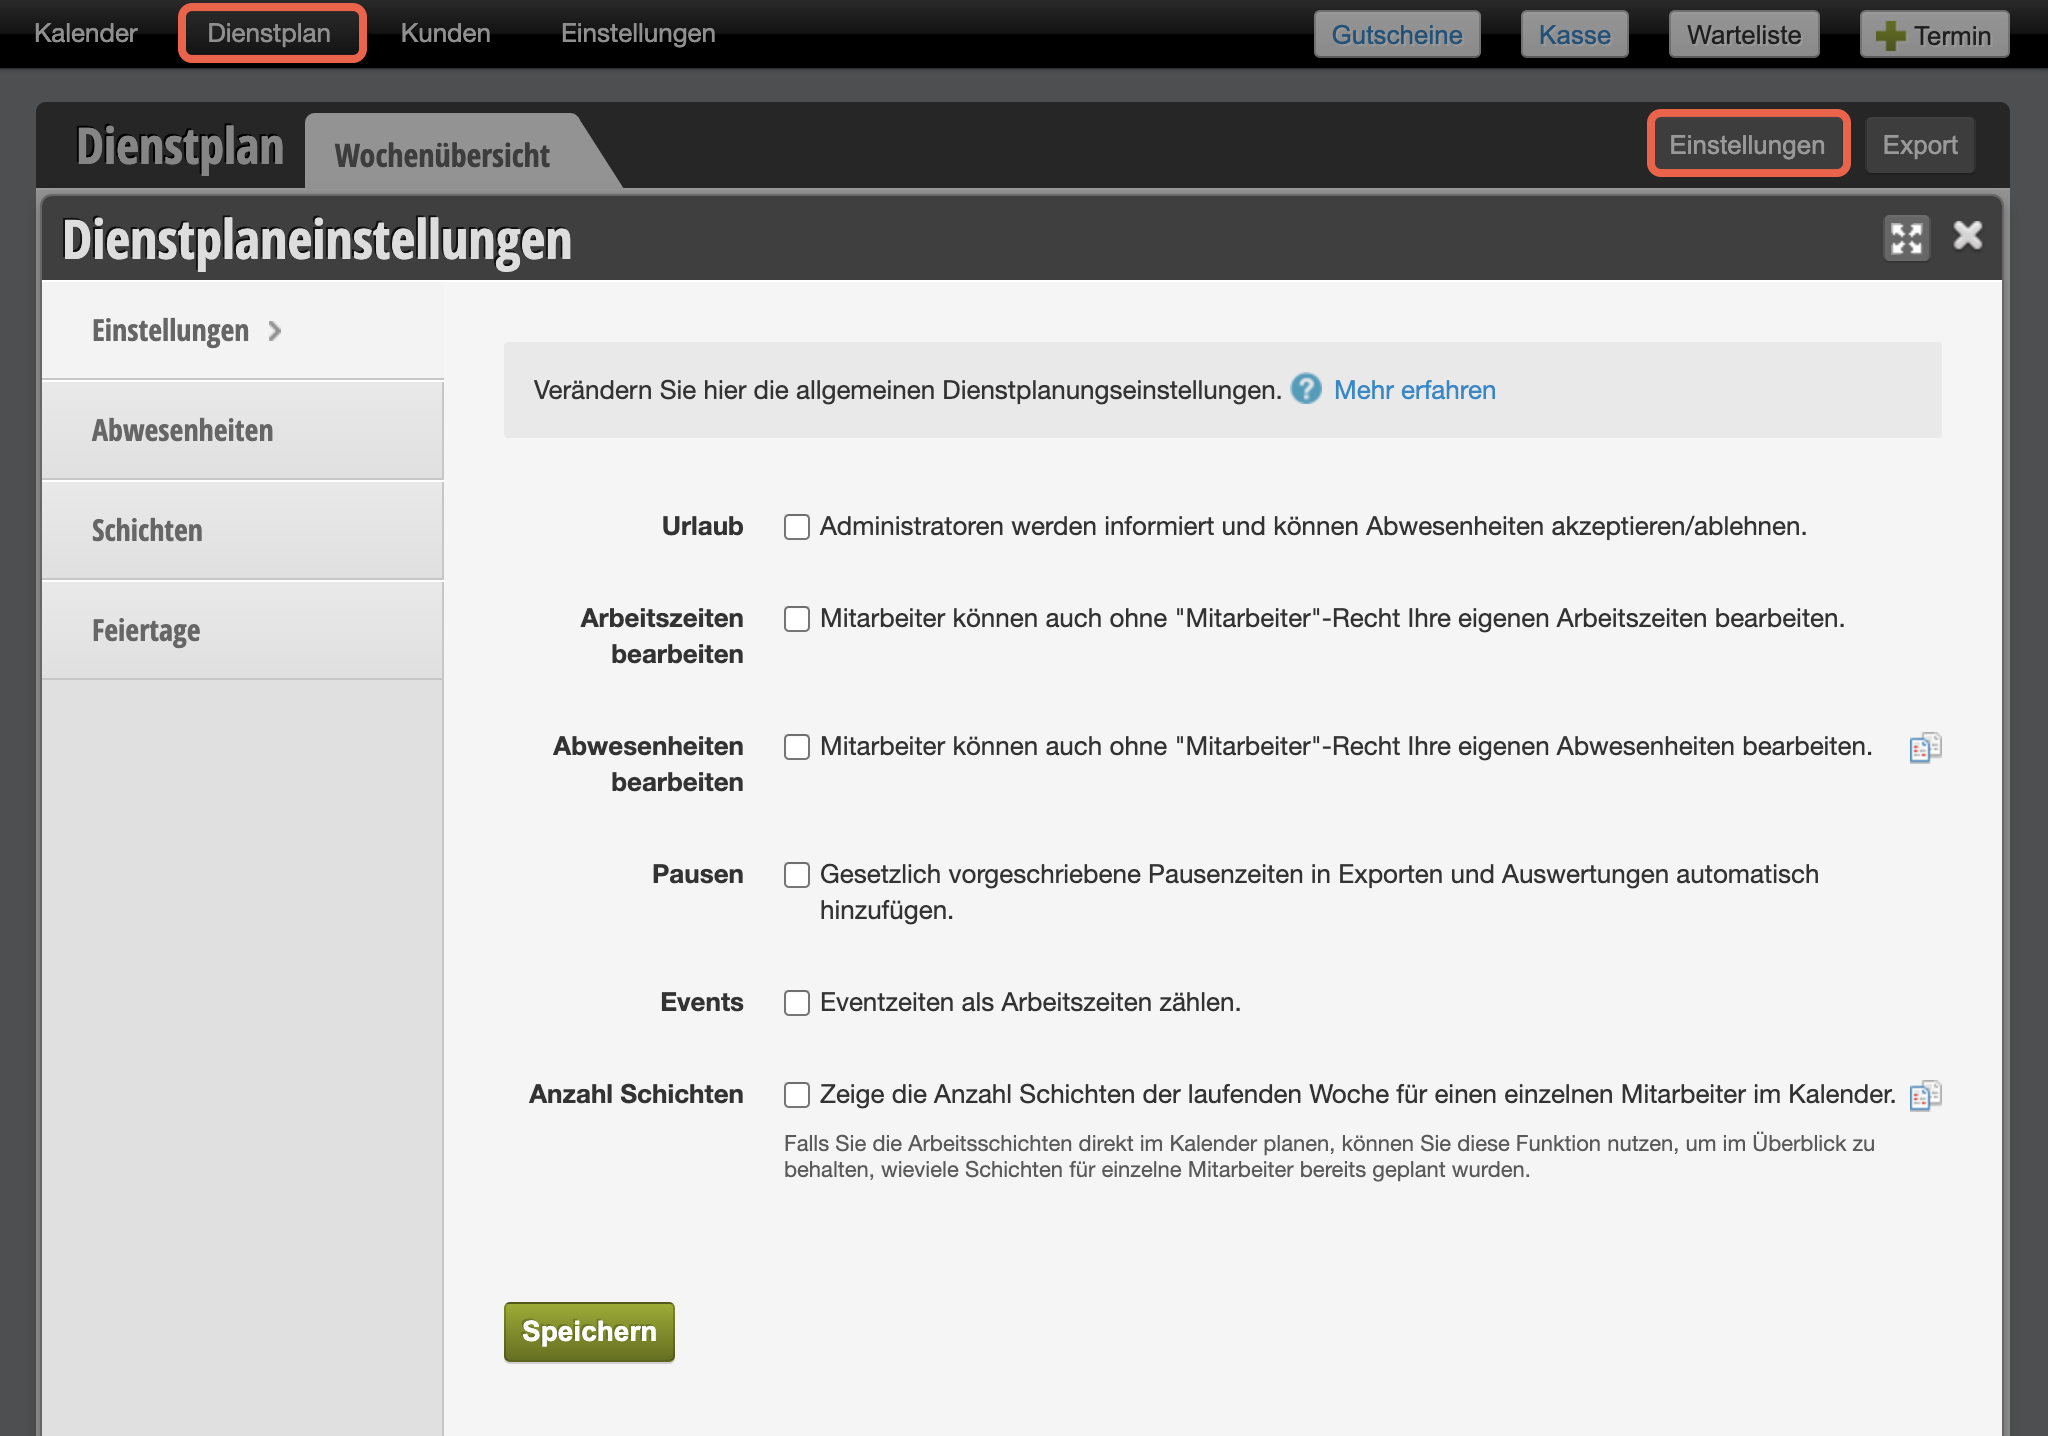
In the shift planning settings, you can activate various functions and customize the shift plan to your needs.

You can access this area via
Shift Plan > Settings (top right).

In the shift planning settings, you can activate the following functions:

Vacation
Administrators are informed and can accept/reject absences. This option allows employees to not independently enter vacations; instead, they must first be accepted by the administrators of your business. The employee without administrator rights can only create vacation requests. Please note that vacation for online booking is only accepted once the administrator has approved the vacation.

Edit working hours
Team members can edit their own working hours even without Employee rights. This option allows employees who should not have scheduling rights to still edit their own working hours.

Edit absences
Team members can edit their own absences even without Employee rights. This option allows employees who should not have scheduling rights to still edit their own working hours.

Breaks
If you use Shift plan exports, legally required break times can be automatically added to exports:

  • If working time exceeds 6 hours, a 30-minute break is automatically deducted.
  • If working time exceeds 9 hours, a 45-minute break is automatically deducted.

Events
So-called setup times are considered Events. If you use events in the shift plan, you can specify here that these should be counted as working time and not as break time.

Application example:
Your employees start at nine in the morning, but must first spend 15 minutes preparing and cannot yet receive customers. These preparation times can be entered in the shift plan and easily carried forward in the shift schedules.
Alternative solution: Instead of permanently entering preparation in the shift plan, you can also automatically assign preparation time to appointments and services. This is blocked directly before the respective appointment without you having to manually maintain events.

Number of shifts
If you plan work shifts directly in the calendar, you can use this function to keep track of how many shifts have already been scheduled for individual employees.

More articles on shift planning settings:

  • Absences
  • Weekly templates
  • Team templates
  • Display / block holidays
You can find detailed information on the shift plan here.

Working Weeks Export

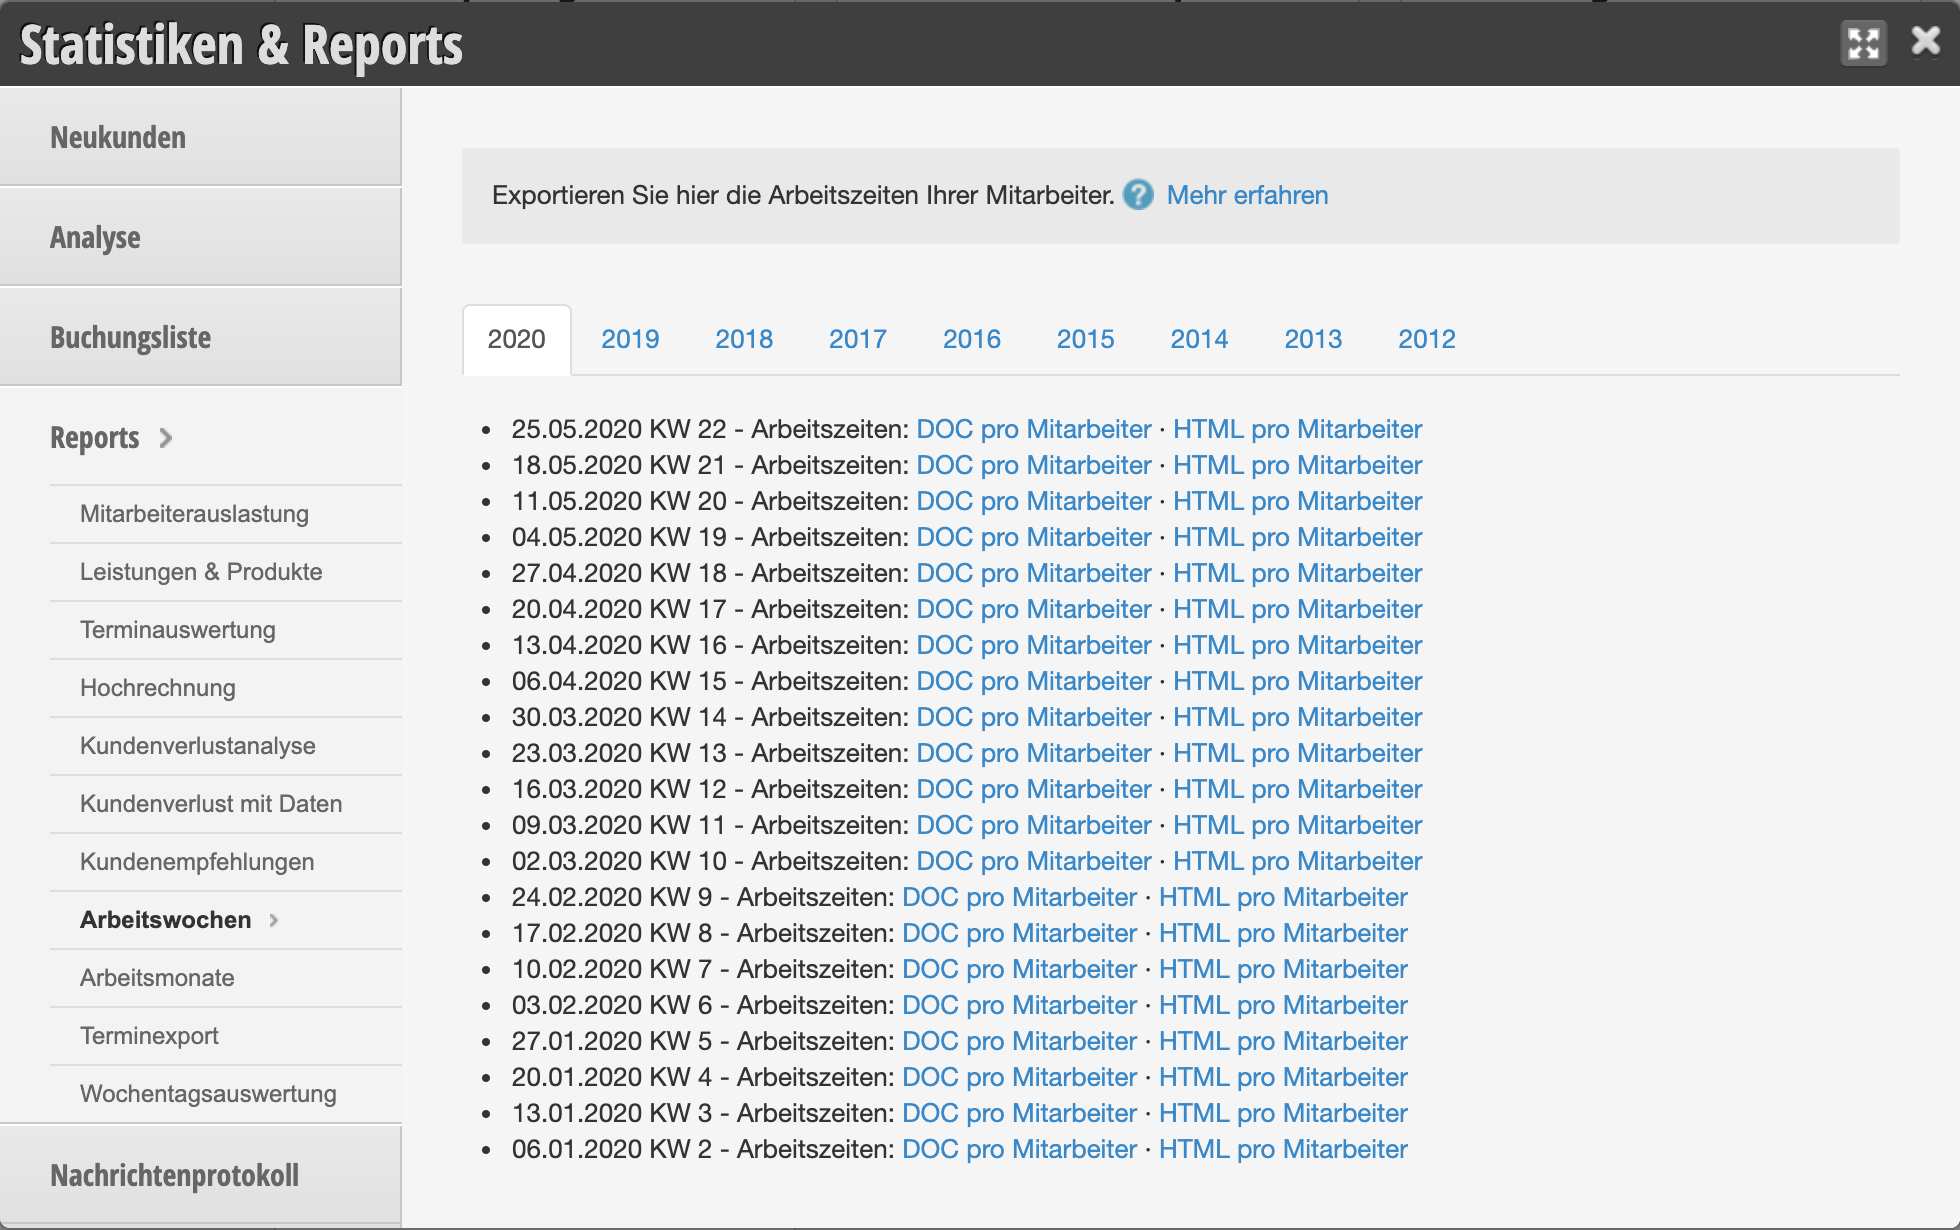
You can export the working hours and hours worked by your employees. These can be downloaded as text files or HTML.

You can access this area via Settings > Statistics & Reports > Reports > Working Weeks

The documents you can download are suitable for being signed by your employees.

You can find more statistics and reports under Statistics & Reports

Weekly Team Templates

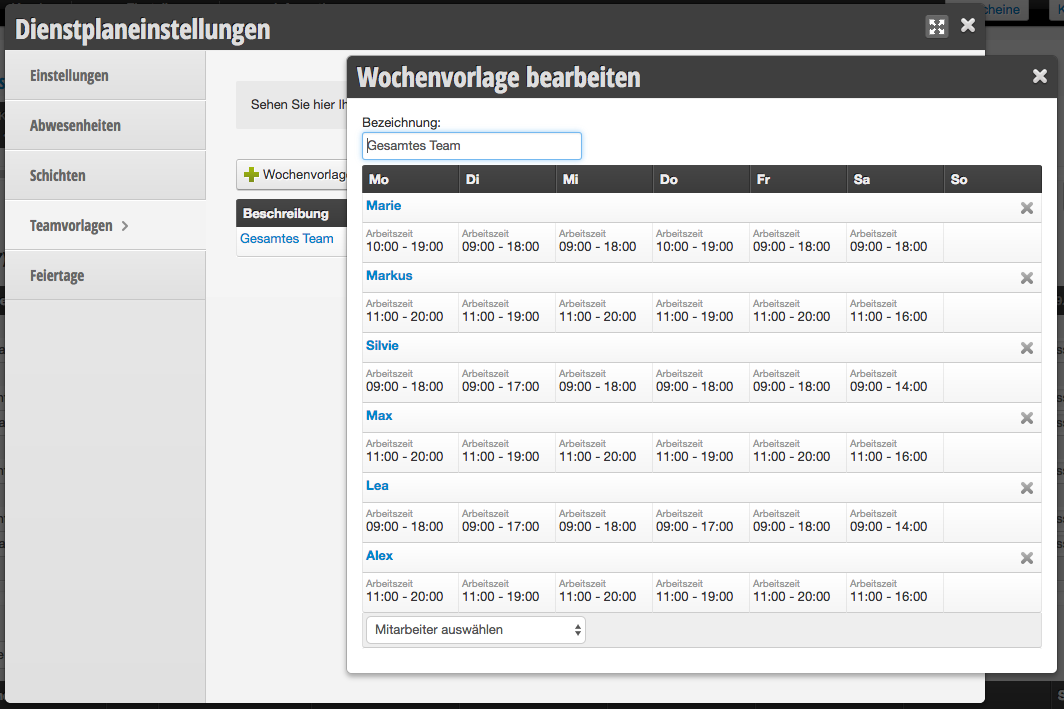
When you create weekly templates for your team, you can use them to quickly and easily create schedules for your team.

You can access this area via Settings > Schedule Settings > Team Templates.

Create weekly templates

Weekly templates are designed so you don't have to enter working hours for each employee individually. Weekly templates are ideal for businesses that operate in shifts.

Here's how to create a new weekly template:

  1. Select the small white triangle next to "Schedule" in the navigation bar.
  2. Go to "Schedule Settings".
  3. Click on "Working Times".
  4. Select "Weekly Templates".
  5. By clicking the "Create New Template" button, you can create a custom template.
  6. For each day, select the appropriate time/absence/event.
  7. Confirm your selection by clicking "Save".

Apply weekly templates in the schedule

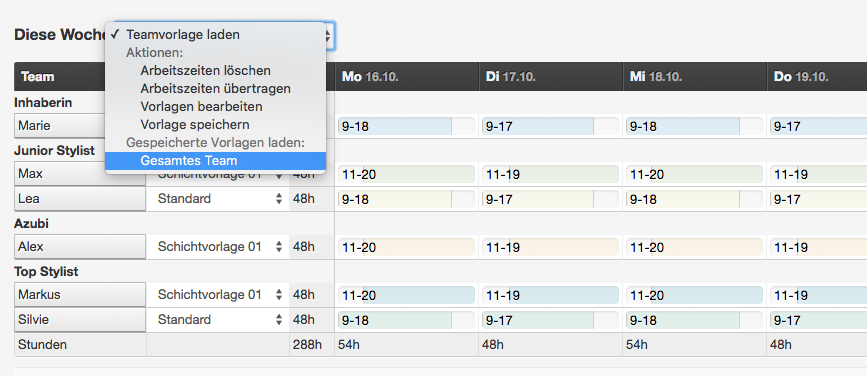
In the schedule, you can now enter the saved weekly template for your entire team with just a few steps. To do this, go to the main menu item Schedule and navigate to the desired week. Select the desired weekly template here.

You can find an overview of all schedule settings here.

Shift Schedule

The schedule provides an optimal overview of your employees' working hours and your resources' availability. You can choose between a monthly overview and a weekly overview.

Click on one of the following topics to get more information:

  • Create schedule
  • Enter / release holidays
  • Edit employees
  • Edit working hours
This manual is a service by belbo. Legal notice