belbo
  • Overview
    • Getting to know Belbo
    • Location Settings
    • Switch to Belbo
    • Calendar View & Navigation
    • Recurring Appointments & Courses
    • Appointment Entry & Management
    • Logins & Permissions
    • Multiple Locations & Head Office
    • Manage Employees
    • Absences & Holidays
    • General
    • Working Hours
    • Time Tracking
    • Data Protection (GDPR)
    • Customer Communication (Email, SMS)
    • Customer Management & Records
    • Bonus & Loyalty Programs
    • Campaigns (Newsletter & SMS)
    • Marketing Consents (GDPR)
    • Tracking & Analytics
    • Overview
    • Services & Prices
    • Products
    • Service Packages & Subscriptions
    • Vouchers
    • Purchasing & Suppliers
    • Inventory & Stock Audit
    • Scanning & Sales
    • Goods Used & Costs
    • Design & Texts
    • Setup & Settings
    • Integration (Website, Google, Instagram, Facebook)
    • Online payment
    • Accounting & Exports
    • Cash Register Settings & Hardware
    • Checkout process
    • Daily Closing & Reports
    • TSE & Cash Register Anti-Tampering Ordinance
    • Export Overview
    • Employee Utilization
    • Revenue & Reports
    • Belbo Satellite
    • Printer
    • EC Terminal & Card Payment
    • Troubleshooting Hardware
    • Scanner & POS Devices
    • General Settings
    • API & Integrations
    • Notifications & Emails
    • Contracts & Legal
Skip to content

Everything about: Hardware & Technology

Card payments with Flatpay

If you use the Belbo cash register system, you can accept any payment method that can be correctly posted in Belbo accounting. Some payment methods may have special features.


With Belbo you can connect classic EC devices if they have a standard interface (ZVT or TIM). There are card providers such as "Flatpay" that do not have such an interface. With Belbo you can correctly post these payments. You can therefore use "Flatpay" as a card terminal with Belbo.

Card payments without integration into Belbo

These payments are posted as follows:

  1. Click on the appointment to be cashed in the cash register and select "EC" from the payment methods.
  2. Note the amount to be paid and enter it manually into the EC device.
  3. After the customer has made the payment, click on "(Amount X) paid by EC"
  4. The payment is correctly posted.

If you want to avoid manual entry on the EC device as a potential source of error, you can opt for an EC device with a ZVT interface or SumUp. These include, for example, current Ingenico and CCV devices (Germany) or Six (Switzerland).

Epson Printer Installation for Windows

Here you will learn how to install your Epson printer on a Windows computer and connect it to Belbo. If you use other devices, please look here.

Step 1 of 3: Epson Installation

First, install the driver for your Epson model.

  1. Important: Do not plug the USB cable into the computer before running the installation, otherwise the installation will fail.
  2. Download the driver software from Epson. You can find some drivers here:
    • Epson TM-20: Download driver
    • Epson TM-T88IV: Download driver
    • Epson TM-T88V: Download driver
    • Epson TM-M30: Download driver
    • Epson TM-M30 II: Download driver
  3. Extract the installation file and then run the "setup.exe" file in the "setup" folder.
  4. Select the "Typical" option and complete the installation.
  5. Now connect the computer to the printer using the USB cable. Attention: Some printer models have 2 free USB ports. These are labeled "USB-A" and "USB-B". To connect to the computer, you must use the "USB-B" slot.
  6. The device should now appear in Windows in the area Settings > Devices > Printers once the device is connected to the USB port.
  7. You can now proceed to Step 2 "Test".

Wiring of POS Devices

Test on a Windows Computer

If the installation and setup were successful, you can test this. To do this, open any text editor and try to print on the printer. Only if this print succeeds can you use the printer in the Belbo system.

  1. Open the "Notepad" software and enter a short test text, for example "Test".
  2. Then select "File" in the navigation and then "Print".
  3. Do you see your printer in the printer selection? Good sign! Select and print. Otherwise, check the driver installation or repeat it if necessary.
  4. Has the receipt arrived? Excellent, then proceed to Step 3.
    The printer was not recognized
    If no printing occurs, it may be that you already connected the USB cable before installation. Please plug the cable into another free USB port and test again.

Step 2 of 3: Satellite Installation

Did the test print work? Then everything is ready to go. Now you just need to connect the printer to Belbo.

  • Install the Belbo Satellite software before proceeding to the next step.

Step 3 of 3: Printer Connection in Belbo

  1. Go to "Settings" in your Belbo calendar.
  2. Enter the term "Printer connection" in the search field at the top of the page and open the "Printer connection" function.
  3. Switch to the "Printer configuration" tab.
  4. Select your printer model under "Printer type".
  5. Click "Set up printer" to find the installed printer.
  6. Enable your printer and then add it to Belbo.
  7. A detailed description of printer connection can be found here.

Login is not assigned to any location

If you see the following message in your calendar after logging in, you are using an email address that is not registered as a login address for this account.
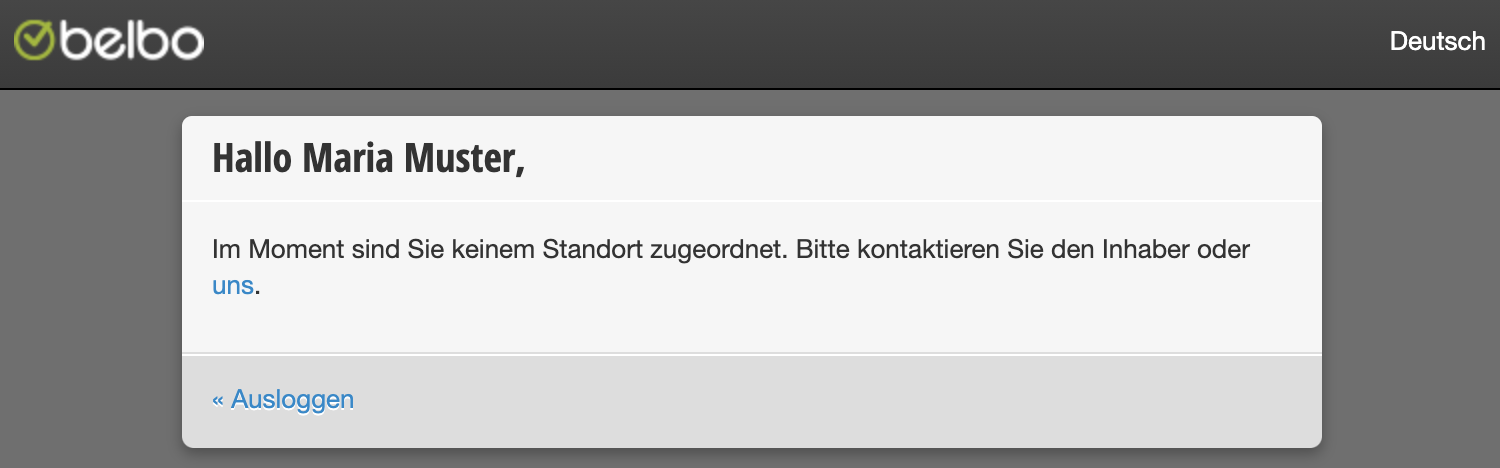
Solution 1) Find the correct address

Basically, you can log in with all logins that are registered under Settings > Employees > Permissions.
Contact the owner of the company and ask them for the correct email address that you can use for login.

Solution 2) Add email address

If you wish to have a new address registered for login, you can inform a person who has the necessary permissions to do so. Under Settings > Employees > Permissions, additional email addresses can be added, which can then also be assigned the desired permissions. Learn more about creating employee logins here.

Solution 3) Check login permissions

If the address you are using is already registered and you still cannot log in with it, it may be that no permissions have been assigned to the login. Ask a person who has the necessary permissions to check under Settings > Employees > Permissions and add permissions if necessary.

Installation and Use of the Socket Mobile Scanner

With the Mobile Socket Scanner CHS 7Ci you can scan barcodes both for selling products and for storing them in the system.
This article covers connecting to an iOS device (iPad or iPhone), Android device (e.g. Samsung), a Mac or a Windows PC.


Turning on:
Hold down the small on/off button until the LED lights up blue and the CHS emits a signal tone twice (low-high).

Important:
The device can only be connected to one device at a time via Bluetooth. Make sure that if you want to switch devices, you always stop the Bluetooth connection on the previous device. This applies in general to all Bluetooth devices and not just for this device configuration.

Note:
The Belbo software only supports HID mode. Please make sure that your barcode scanner is set to HID mode so that data can be transmitted correctly.

How to check and change the mode:

  1. Consult your scanner's user manual to enable HID mode.
  2. Scan the corresponding configuration barcode from the manual.
  3. Test the input in a text editor to ensure that HID mode is active.

Installation on an iOS device

Connect the device via Bluetooth. You can then use the device via browser & app.

Installation on an Android device

Connect the device via Bluetooth. You can then use the device via browser & app.

Installation on a Mac

Connect the device via Bluetooth. You can then use the device via browser & app.

Installation on a Windows PC

Connect the device via Bluetooth. You can then use the device via browser & app.

Testing the configuration

  1. Open any text editor
  2. Scan a barcode
  3. Is there visual or acoustic feedback?

    • Then the scanner is basically working.
    • Otherwise check the connection to the device or the battery level of the device.

  4. Does the barcode appear as text in the text editor?

    • Then everything is set up correctly!
    • Otherwise the scanner may not be in HID mode. Please reset the device according to the instructions or switch it to HID mode.

Problems & Troubleshooting with Socket Mobile Scanner

Questions or problems? Write to us in the help chat!

I cannot connect my device to the scanner. What should I do?

It is possible that your scanner is still connected to another device or that the wrong mode is active. Make sure you disconnect the scanner from all devices in the Bluetooth settings.

Then scan this code, it will reset the scanner to its factory settings.
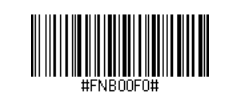
(If scanning does not work, print this page and try again. These barcodes are also in the manual that comes with the scanner.)

Now scan the barcode that activates keyboard mode:
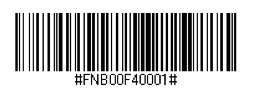
This barcode resets the device to factory settings and HID mode. After a successful scan, the device will automatically shut down.

You can now connect the Mobile Socket Scanner CHS 7Ci with a Bluetooth-enabled device, as described in the instructions above.

I want to connect my scanner to an iOS device, what should I do?

Continue to change the distance and angle from which you scan until you hear multiple beeps (this time the scanner will not shut down).

After you have heard approximately 3 beeps, you can go to iPad > Settings > Bluetooth and select your device there.

I want to connect my scanner to a second device, what should I do?

The Mobile Socket Scanner CHS 7Ci can only be connected to one device at a time. To connect it to another device, you must disconnect it from the first device in the Bluetooth settings:

  1. Turn on the CHS.
  2. Hold down the trigger.
  3. Hold down the power button.
  4. Release both buttons after 3 beeps have sounded.

The CHS will be unpaired and automatically shut down. The next time you turn on the CHS, it can be detected.

Login to online booking not working anymore

If a customer suddenly reports that they can no longer log in, this can have many reasons. Please check the following options together with the customer:

  • The customer has changed their password and is wondering why the old saved password no longer works.
    Help: Open your own online booking page and click on "Forgot Password". Then enter the customer's email address. The customer will receive an email with a link to reset their password.
  • The customer used a wrong email address. For example, the customer registers with "peter.lustig@googlemail.com" and tries to log in a month later with "peter.lustig@gmail.com". This will result in an error and the customer must use the original email address.
  • The login hangs without an error message: This is always a device problem. The customer has most likely set the browser to Private mode. This technically prevents the customer from logging in. Private mode or also Incognito mode is the most common reason for a sudden login problem.
  • The customer is locked. If the customer receives a message in online booking that online booking is currently not possible, they may have been locked. Check in Belbo in the customer's file to see if this is the case. If it was a mistake, you can unlock them again within the customer file.

Printer Connection

You can connect your bond printer directly to Belbo from your Mac or PC to open the cash drawer or print a receipt directly from the checkout process.

You can access this area via Settings > Printer Connection

If this function is not enabled, it can be activated via "Settings > Add Function".

Important Requirements

  • The printer must be installed on the Mac or PC you are using according to the instructions
  • Belbo Satellite must be installed
  • The printer connection can only be used via the browsers Google Chrome or Microsoft Edge. Unfortunately, Safari, Firefox and others cannot be connected.

Further information can be found here.

Settings

Once the "Printer Connection" module has been activated, you will find it under "Settings". Here you can select the desired settings.

Set up Printer Connection

Now you can connect your printer to Belbo.

  1. Switch to the "Printer Configuration" tab.
  2. Select your printer model under "Printer Type".
  3. Click "Set up Printer" to find the installed printer.

If the printer is not yet shared, click on "Set up Printer Sharing". A Windows dialog will then open. Here please click on the "Sharing" tab and select that the printer should be shared:

Once the printer has been shared, you can click directly on "Select". The printer will be added automatically:

Example of correct connection of an Epson printer:

Now you can trigger the receipt printing directly from the checkout process or open the cash drawer from the Belbo checkout.

The menu items "Special Settings" and "Printer Connection" only need to be filled in a few cases and can normally be ignored.

Troubleshooting when using PC and mPOP cash register

If you are using the cash register system on a PC in combination with the mPOP cash drawer-bond printer combination, you can find troubleshooting solutions here.


Requirements Checklist

Is the device properly connected to the computer via USB cable?

Check if the USB cable is connected to the correct port on the mPOP drawer:

Source: https://www.star-m.jp/products/s_print/mpop/manual/en/installing/connectingUSBCable.htm

Only a single blue light should be illuminated on the mPOP device

  • If yes: Everything is okay
  • If no light is on: Is the mPOP device connected to power?
  • If a red light is on: Is the receipt drawer properly closed? Is the paper out or not loaded correctly?

Tip: The receipt drawer can be opened by pressing against it.

Is there a connection between the PC and mPOP register via USB cable?

  • Check in the PC under System Settings > Printers & Scanners to see if the mPop register is detected.
  • If not: Reconnect the mPOP register

Is there a stable internet connection?

  • Test: Please open a website that hasn't been opened in a long time.
  • If the page doesn't load (or loads very slowly): Check your internet connection.

Restart Satellite

  • Right-click on Satellite icon > Exit
  • Restart Satellite

Possible problems and their solutions:

Red light on the mPOP register is on: The receipt roll is probably empty or the receipt roll compartment is not closed correctly.

  • Is the receipt roll loaded correctly?
  • Is the paper out?
  • Solution: Load a full receipt roll correctly and close the receipt drawer properly.

Tip: The receipt drawer can be opened by pressing against it.

For more information on red flashing and its meaning see here (English).

Error message during checkout: "Printer not available"

  • The mPOP register is probably being accessed simultaneously by another device. It can only be used either on the computer or via iPad.

Chinese characters are displayed on the receipt

  • Open or install the "Star Printer Utility" application if necessary
  • Select the device
  • Under "Printer Settings" select the "Reset Defaults" option
  • Restart the printer
  • Umlauts or images are not printed correctly

  • Log in to the Office and open or activate the "Printer Integration" module in Settings
  • Check "Printer Type" in the module (if something other than mPOP is selected, correct it)
  • Deactivate the module again
  • Receipt is not cut off

    • Log in to the Office and open or activate the "Printer Integration" module in Settings
    • Check "Printer Type" in the module (if something other than mPOP is selected, correct it)
    • Deactivate the module again

    Cash drawer does not open

    • Log in to the Office and open or activate the "Printer Integration" module in Settings
    • Check "Printer Type" in the module (if something other than mPOP is selected, correct it)
    • Deactivate the module again

    Cash drawer opens, but receipt is not printed

    • Log in to the Office and open or activate the "Printer Integration" module in Settings

      Check "Printer Type" in the module (if something other than mPOP is selected, correct it)

    • Deactivate the module again

    Test the printer again. If problems persist:

    • Check under Settings > Cash Register System > Receipt Design > Receipt Structure to see if anything is entered.
    • If yes: Cut the text and save it locally (for example in a Word document)
    • Save a completely empty receipt structure field
    • Test printing again and correct the structure outside of active operation.
    • The "Open Cash Drawer" button in the checkout process does not work

      • Log in to the Office, open the "Printer Integration" module in Settings, and enable the "Offer Open Cash Drawer Button in Dashboard" checkbox.

    • Printing sometimes doesn't work or only works the second time

      • After a long period of inactivity, your browser may have activated power saving mode. This can be disabled.
      • For Chrome, you can find this setting here: Chrome Browser Settings -> Performance -> Disable Memory Saving Mode

    Ingenico EC Devices Manual

    This guide explains how to prepare an Ingenico EC device (older models from the iCT and iWL series) for direct connection to Belbo. The settings are configured once directly on the device.

    For newer devices from the Desk 3500 and Move 5000 series, there is a separate guide: Desk 3500 / Move 5000 – Activate ZVT

    You will configure this setup once on the terminal. For instructions on how to set up the terminal in Belbo afterwards, refer to the general guide: Connect ZVT Terminal to Belbo


    Prerequisites

    • You are using Belbo on a computer (Windows or Mac) or an iPad.
    • The terminal is already in operation and manual payments have been successfully processed.
    • The terminal and computer/iPad are on the same WLAN or LAN network.
    • You have the Cashier PIN (often 12345) and the Technician PIN (often 11599) at hand. If neither value is correct, request it from the hotline of your terminal provider.

    Menu Navigation on the Device

    Before you begin, here's a quick overview of menu operation:

    • Open menu: Press the F button twice briefly (function key, usually to the left of "0" on the numeric keypad).
    • Navigate: Arrow keys up and down.
    • Confirm: Green OK button.
    • Back / Cancel: Red X button.

    After opening the menu, the following main items appear:

    1. Transaction Type
    2. Favorites
    3. Actions
    4. Settings ← Starting point for all following steps
    5. Service
    6. Additional Application
    7. Last Selection

    Select Settings (item 4) and enter the Cashier PIN (often 12345). You will now see four sub-items, two of which are relevant:

    • Terminal – for ZVT mode and operating mode options (Steps 1 and 2)
    • Connection – for IP address and port (Step 3)

    Step 1 of 3: Activate ZVT Mode

    In this step, you will switch the terminal to ZVT mode so it can receive commands from the POS system.

    1. Go to Settings → Terminal.
    2. Select Operating Mode. The terminal will now request the Technician PIN (often 11599).
    3. Select ZVT700 and confirm with the green button.
    4. The terminal will restart automatically. Wait until it has fully booted up.

    If 11599 does not work, contact the hotline of your terminal provider. You will find the number on the back of the device. Make a note of the correct steps so you can disable ZVT again if needed.

    Step 2 of 3: Disable Operating Mode Options

    After the restart, open Settings → Terminal → Operating Mode Options again. Set all seven options to Off:

    • Atos Card-IDs → Off
    • Login → Off
    • Status Query → Off
    • Comm. via POS → Off
    • Print via POS → Off
    • Block Print → Off
    • Closing Message (Auto) → Off

    Why all off? These options control ZVT additional functions that can cause communication problems when connecting to Belbo – for example, "Login" enforces separate login before each payment, and "Comm. via POS" reroutes communication. Setting all to Off ensures a direct, trouble-free connection.

    Step 3 of 3: Configure Network Connection

    Open Settings → Connection. Here you configure how the terminal is reached on the network. Belbo communicates with the terminal via IP address and port.

    1. Select TCP/IP as the connection type (for WLAN devices: WLAN).
    2. Make sure the terminal has a static IP address (assigned as a static IP in the router). Note down the IP address.
    3. Check the port – for Ingenico devices, this is usually 5577 or 20007. Note down the port; you will need it in Belbo.

    If needed, you can also determine the IP address and port using the "Find Device" function in Belbo under Settings → Card Terminal, which lists all accessible devices on the network.

    Next Step: Set up Connection in Belbo

    The terminal is now prepared for ZVT. Now set up the connection in Belbo – you will need the IP address and port from Step 3.

    Continue to the guide: Set up ZVT Terminal in Belbo

    Epson Printer Installation for Mac


    Here you will learn how to install your Epson printer on an Apple computer and connect it to Belbo. If you use other devices, please see here.


    Step 1 of 3: Epson Installation

    1. Plug the USB cable into the computer.
      Attention: Some printer models have 2 free USB ports. These are labeled "USB-A" and "USB-B". To connect to the computer, you must use the "USB-B" slot.

    Wiring of the cash register device

      2. With a current Epson printer, you do not need an explicit driver for installation.
      When "adding a printer", you can use the software "Epson 24-PIN" under "Use -> Select software..."

      Step 2 of 3: Satellite Installation

      Now you just need to connect the printer to Belbo.

      • Install the Belbo Satellite software before performing the next step.

      Step 3 of 3: Printer Connection in Belbo

      1. Go to "Settings" in your Belbo calendar.
      2. Enter "Printer connection" in the search field at the top of the page and open the "Printer connection" function.
      3. Switch to the "Printer Configuration" tab.
      4. Select your printer model under "Printer type".
      5. Click "Set up printer" to find the installed printer.
      6. Select your printer and save it.

      Now you can check in the "Test Printer" tab whether printing works.

      Post navigation

      ← Older posts
      Newer posts →
      This manual is a service by belbo. Legal notice