belbo
  • Overview
    • Getting to know Belbo
    • Location Settings
    • Switch to Belbo
    • Calendar View & Navigation
    • Recurring Appointments & Courses
    • Appointment Entry & Management
    • Logins & Permissions
    • Multiple Locations & Head Office
    • Manage Employees
    • Absences & Holidays
    • General
    • Working Hours
    • Time Tracking
    • Data Protection (GDPR)
    • Customer Communication (Email, SMS)
    • Customer Management & Records
    • Bonus & Loyalty Programs
    • Campaigns (Newsletter & SMS)
    • Marketing Consents (GDPR)
    • Tracking & Analytics
    • Overview
    • Services & Prices
    • Products
    • Service Packages & Subscriptions
    • Vouchers
    • Purchasing & Suppliers
    • Stock & Inventory
    • Scanning & Sales
    • Cost of goods & expenses
    • Design & Texts
    • Setup & Settings
    • Integration (Website, Google, Instagram, Facebook)
    • Online payment
    • Accounting & Exports
    • Cash Register Settings & Hardware
    • Checkout process
    • Daily Closing & Reports
    • TSE & Cash Register Anti-Tampering Ordinance
    • Export Overview
    • Employee Utilization
    • Revenue & Reports
    • Belbo Satellite
    • Printer
    • EC Terminal & Card Payment
    • Troubleshooting Hardware
    • Scanner & POS Devices
    • General Settings
    • API & Integrations
    • Notifications & Emails
    • Contracts & Legal
Skip to content

Everything about: Online Booking

Action prices / crossed-out prices in online booking

In the online booking, crossed-out prices can be displayed if a service is currently available at a promotional price.


The customer then sees both the promotional price and the crossed-out original price in the booking:

Set up promotional prices

The list price, which will then appear crossed out later, can be stored in the service under Properties in the "List price" field:

The promotional price is then stored in the service under "Price":

Automatic Waiting List

The Belbo waiting list can automatically notify waiting customers via email when an appointment becomes available in the desired time slot.


Requirements

  1. The waiting list function is activated.
  2. The email template has been created.

Activate waiting list

If the function is not yet activated, it can be enabled under Settings > Add Function.

The waiting list will then be visible in the header area of the system:

Create email template

Under Settings > Waiting List > Customer Notification > Template, you can create the email template that will be sent to waiting customers. Suitable placeholders are available that provide information about the details of the available appointment.

Settings

  • Appointment cancellation by staff: Sends the email when an appointment is deleted by a team member.
  • Online cancellation by customers: An email is also sent when an appointment is cancelled by a customer.
  • Exception: If a break is deleted by a team member, no email is sent to waiting persons.

Design Booking Process

In Belbo, online booking can be designed very freely using CSS. Technical knowledge is a great advantage here. The Belbo team can help implement your desired ideas.


The booking can be enhanced with inquiry steps or images to make it easier for customers to select the right services.

  • An example from the hairdressing industry can be found here.
  • An example from the spa industry can be found here.

Plan your own booking process

To plan the booking process, you first need a concept.

  • What questions / answer options do I want to show customers who access the booking?
  • What happens after selecting the options?
  • Do I already have all the images I want to use and do I have the necessary image rights for them?

Once this data is available, we'd be happy to help implement the booking as you wish. Get in touch with your concept or questions via email at info@belbo.com or via the help chat in your calendar.

Refund for online paid appointments

If you offer online payment, customers can pay for your appointments online. If an appointment is cancelled in time, the deposit must be refunded. You can decide yourself whether this should happen automatically or not.


You can access this area via Settings > Online Payment.
If this function is not activated, it can be activated via "Add function".


Option 1: Manual Refund

You can specify that the deposit will not be refunded automatically. In case of a refund, proceed as described here. In the online payment settings, the Appointment Cancellation option is set to "no action".

  • Disadvantage: If customers cancel unnoticed within the deadline, they will not receive the refund automatically and must contact you.
  • Advantage: You have an overview of the refunds

The payment can be refunded directly via the appointment.

If the appointment has already been removed, it can be refunded via the payment module under Settings > Online Payment:

Option 2: Automatic Refund

To automatically refund payments when the customer cancels the online appointment, the Appointment Cancellation option must be set to "Payment Reversal":

If this option is selected, you must specify under "Cancellation Deadlines" until when an appointment can be cancelled in time:

Alternative: Replacement Voucher (in the future)

We are planning to enable the issuance of a voucher as an alternative to refunds. However, as of 11/2025, this function is not yet available.

Important Prerequisite

To ensure that the deposits paid can be refunded to customers, you must set a sufficiently high minimum balance in your PayPal or Stripe payment account that always remains in the account.

  • Help article on Minimum balance at Stripe
  • At PayPal, the minimum balance is set up as part of setting up an automatic transfer. Help article on Automatic transfer at PayPal

Make performance(s) available for online booking

Here we explain how to make a newly created service or service group available for online booking. This applies to customers who use the "Special Booking Process" feature ("Booking Process" for Swiss customers).


Refund online payments manually

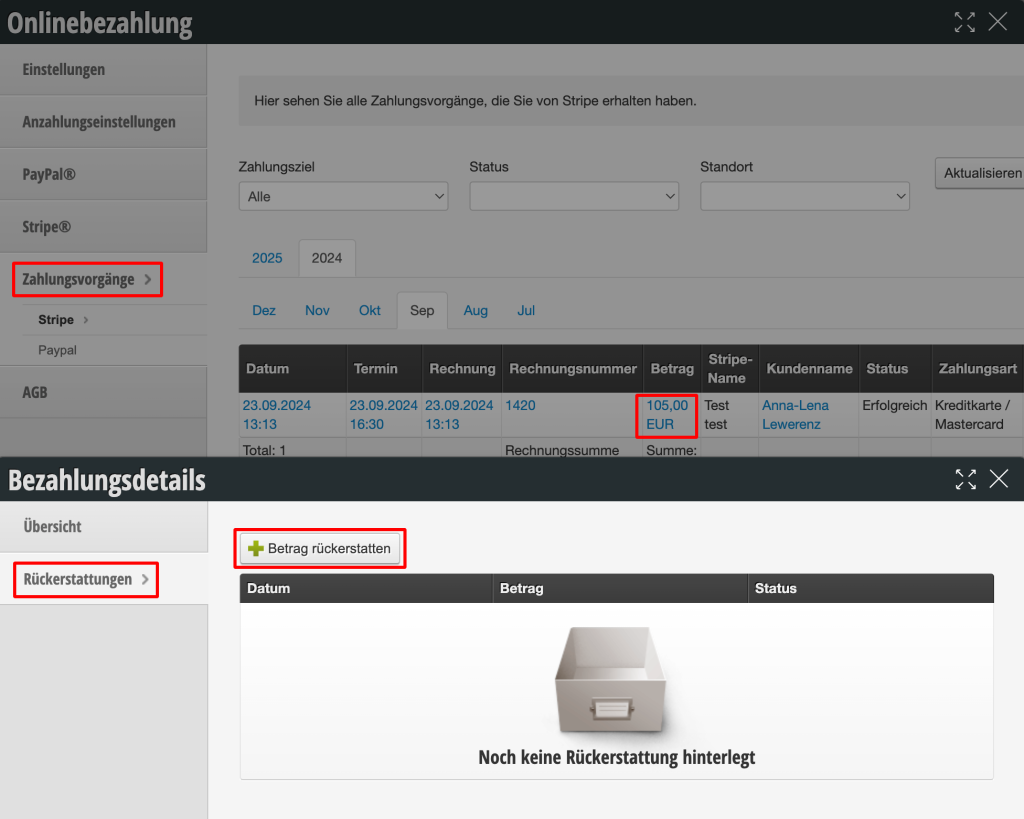
If customers cancel an appointment that has already been paid (or partially paid) online, the money is not automatically refunded to the customer.


Refund payment

Go to "Settings" and select "Online Payment", then choose the desired payment provider under "Payment Transactions". Then click on the amount:

The amount can then be (partially) refunded:

Restrict bookings of specific employees by new customers

You can specify that certain employees cannot be booked online by new customers. This relieves popular employees from regular customers and gives, for example, new team members the opportunity to get more appointments.


Prerequisites for the new customer lock

  1. You allow online booking only with login.
  2. Your customers must log in, before they are shown the available employees and free appointments.
  3. There is only one initial status.
  4. Regular customers have a different status than the initial status.

1. Check online booking mode:

Under Settings > Online Booking, the option "Registration mode / Allow booking of appointments without login" must be disabled:

2. Check registration mode

Under Settings > Online Booking > Basic Settings > Registration, the option "Also show available times, then request login" must be disabled:

3. Check initial status

Under Settings > Customer Settings > Customer Status, there is only one status which has the attribute "Initial Status". New customers automatically receive this status. All customers with this status can no longer book the team member blocked for new customers.

If there are multiple or no statuses with this attribute, you can correct this by clicking on the status and enabling the option "New customers automatically receive this status" only in the desired new customer status.

The name of the initial status is irrelevant. This can be "New Customer", but also e.g. "Standard Customer". The lock is based exclusively on the Initial Status attribute.

4. Check regular customers

To ensure that regular customers can continue to book the team member blocked for new customers, please check your customer records. All customers who have the customer status marked with "Initial Status" can no longer book the person blocked for new customers!

Setting up the lock for a team member

To prevent new customers from booking online with a specific team member, go to Settings > Employees, open the employee profile, and enable the option "Block booking from new customers" in the "Online Booking" tab.

From now on, only customers who have a customer status without the "Initial Status" attribute can book with this person.

Further information

Communicate the lock transparently

Especially if you work alone and want to block bookings from new customers, we recommend indicating on the booking page that no appointments are currently available for new customers. This way you communicate transparently why certain people cannot find any free appointments. More on this topic: Online Booking: Texts

Define exceptions

If there are individual services that should still be bookable by new customers despite the new customer lock, you can set this in the service. To do this, open the desired service and enable the option "Ignore new customer lock for employees for this service" in the "Online Booking" tab.

This makes sense if, for example, the owner generally does not want to be available for new customers, but can still provide individual consultation services to them.

Troubleshooting

If regular customers complain that they cannot select a specific person for booking, please go through the prerequisites listed above.

Tracking of the booking with Google Analytics

To enable tracking of bookings that come from your own website, cross-site tracking must be activated in your Google Analytics account. This is explained here: [GA4] Set up cross-domain measurement - Analytics Help (google.com). The snippet from the Google Analytics account must then be stored in the "Tracking Code" function.


You can use the following URL patterns to measure key points in the booking process:

  • Website visit: Page URL contains: .belbo.com
  • Successful booking: Page URL contains: .belbo.com/finalConfirmation/success

Appointment Pressure Layout

The appointment print layout can be customized. However, the degree of customization depends on whether printer integration is used or not.


If a bond printer is used, the layout can be fully customized. This is done using placeholders.

For printing via the print dialog, however, the layout cannot be completely customized, but only an addition below the appointment details can be added.

Advance payments for future appointments

This function gives you the ability to accept advance payments on-site for appointments in the future and record them correctly.


You can activate this function via Settings > Add Function > Cash Register System > Advance Payments.


1. If you want to record an advance payment for an appointment, open the corresponding appointment and click on Cash Register.

2. Then click on the "Record Advance Payment" button:

3. In the subsequent dialog, select the payment method with which the advance payment should be made and the advance payment amount:

4. Subsequently, a walk-in appointment opens for today, which can be settled with the desired payment method.

5. Your advance payment has now been recorded and is noted accordingly in the appointment. On the day of the appointment that was paid in advance, redemption is then possible:


Send Advance Payment Link via Email

If the customer makes the appointment by phone and is not on-site to make the advance payment directly, a payment link can be sent to her via email. Prerequisite: Online payment is set up.

After clicking on Cash Register > Advance Payment, the message can be sent using the "Send Advance Payment Request via Email" option.

Post navigation

← Older posts
This manual is a service by belbo. Legal notice