
belbo
  • Overview
    • Getting to know Belbo
    • Location Settings
    • Switch to Belbo
    • Calendar View & Navigation
    • Recurring Appointments & Courses
    • Appointment Entry & Management
    • Tasks
    • Overview
    • Multiple Locations & Head Office
    • Manage Employees
    • Logins
    • Rights
    • Overview
    • Absences & Holidays
    • Working Hours
    • Time Tracking
    • Overview
    • Data Protection (GDPR)
    • Customer Communication (Email, SMS)
    • Customer Management & Records
    • Overview
    • Bonus & Loyalty Programs
    • Campaigns (Newsletter & SMS)
    • Marketing Consents (GDPR)
    • Tracking & Analytics
    • Overview
    • Services & Prices
    • Service Packages & Subscriptions
    • Vouchers
    • Products
    • Purchase & Vendors
    • Stock & Inventory
    • Scanning & Sales
    • Cost of Goods & Expenses
    • Overview
    • Design & Texts
    • Setup & Settings
    • Integration (Website, Google, Instagram, Facebook)
    • Online payment
    • Overview
    • Accounting & Exports
    • Cash Register Settings & Hardware
    • Checkout process
    • Daily Closing & Reports
    • TSE & Cash Register Anti-Tampering Ordinance
    • Overview
    • Export Overview
    • Employee Utilization
    • Revenue & Reports
    • Belbo Satellite
    • Printer
    • EC Terminal & Card Payment
    • Troubleshooting Hardware
    • Scanner & POS Devices
    • General Settings
    • API & Integrations
    • Notifications & Emails
    • Contracts & Legal
Skip to content
Cash Register & Accounting›Checkout process

Cashier menu

Feature: Cash Register › Cashier Menu › Settings

With the help of the cash register menu, you can simplify the checkout process for your employees. This allows you to create buttons that your employees can simply select during checkout.

You can access this area via Settings > Cash Register Menu
If this function is not enabled, it can be activated via "Settings > Add Function".

Function of the Cash Register Menu

If the cash register menu is not enabled, all services you have created can be selected from a selection menu. If the cash register menu is enabled and correctly configured, simple buttons can be selected during the checkout process to enter the desired services.

Warning: if the cash register menu is only enabled but not yet configured, it is not possible to add services during the checkout process.

Short video on how to use the cash register menu:

/wp-content/uploads/2018/07/Juli-05-2018-12-38-28.mp4

Setting up the Cash Register Menu

Under Settings > Cash Register Menu you can access the settings area for this function. If it is not enabled, you can activate it under "Add Function". It is best to do this outside of business hours, as the cash register function may not be fully available during the setup process. If you want to start the setup and continue at a later time, you can deactivate the module and reactivate it at a later date without losing your settings.
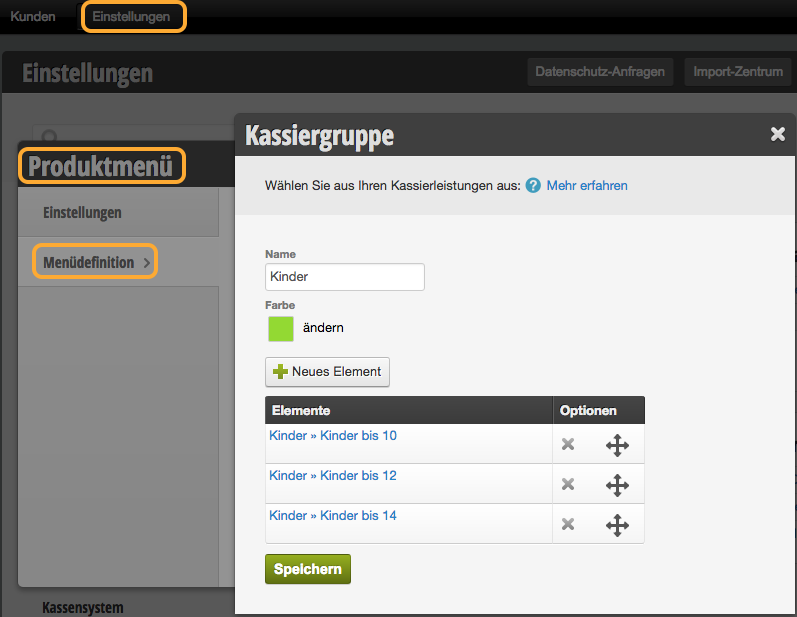
Requirements for using the cash register menu
The cash register menu refers to the services you have already created Services. Before you can set up the cash register menu, you must first set up your services completely.

Adding buttons to the cash register menu
To add services to your cash register menu, open the cash register menu on the settings page and select the "Menu Definition" tab. Here you select + Add Group to create a new button element.

Give your button the desired name and an individual color so that your employees have easy visual orientation.
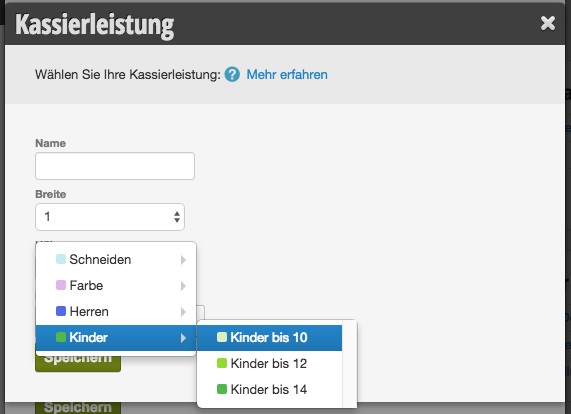
Adding Services
After you have created a new button, you can select the services that will be added to the checkout process when this button is selected.

The button is named exactly as the assigned service and also receives its color. To color the buttons of the service in the desired color, define the color within the service.

Repeat this process for each service grouped under the menu button and then save your settings.

Using the Cash Register Menu

Once you have finished setting up your cash register menu, it can be used. When a service is added to a registered appointment or a walk-in customer during checkout, your employees can use the buttons you have created.

Categories: Checkout process
Tags: kassieren, Schaltflächen

Have a question? Ask it here.

This manual is a service by belbo. Legal notice